Facilities Management
5 Essential Tips for Choosing the Right CMMS
You don't want to miss these 5 key features when choosing a CMMS for your facilities management team
You're going on site to document existing conditions, which method should you use?
In this article, we’ll break down the pros and cons of several ways you can document existing building conditions. As architects and engineers, we’ve had the opportunity to capture building data using all of these methods. Some were very efficient, others created lots of followup work after the site visit. Here’s what we found:
Before laser scanning or tech such as Matterport, architects documented created existing conditions documentation the “old school” way. This usually entailed walking the site with a tape measure and clipboard with a set of drawings.
While we’ve come a long way since then, there are still architects that prefer to use this method.

PROS
Accessibility: most people have access to pen, paper, and a clipboard. There aren’t many advantages to using the clipboard method unless the project is small. Typically, the time savings gained during the walkthrough are lost when you have to download and transpose everything back at the office.
CONS
There are many disadvantages to this method:
WHEN TO USE THIS METHOD
We recommend using this method only if you need to, such as a last-minute walkthrough where you can’t prepare ahead of time.
PROS
Thankfully, technology and hardware have come a long way in the past decade. It is now possible to bring a laptop on site to input field conditions while cross referencing documents. While this is a huge time saver over the Clipboard Method, it still has a few drawbacks.
– Accurate Data: Access to a computer during a walkthrough helps find and note deviations between the model, floor plans, or construction documents and pre existing conditions. But, it also means you have to have a these data sources from which to start. With older buildings you may be starting from a scan of a floor plan or building documentation that is woefully out of date.
CONS
– Disconnected: Common building data such as notes, photos, and conditions ratings are still disconnected from your model or the documents you are referencing. This means you’re still going to waste time hunting for this information in different channels in the future.
– Time-consuming (and awkward): As we mentioned above, you’re still going to waste time in the future searching for photos and other data that you can’t input into Revit. You will also need to purchase a laptop stand ahead of time to wheel around while on site.
WHEN TO USE THIS METHOD
This method is only useful if you already have good digitized documents or a model and don’t mind wheeling around a laptop cart.
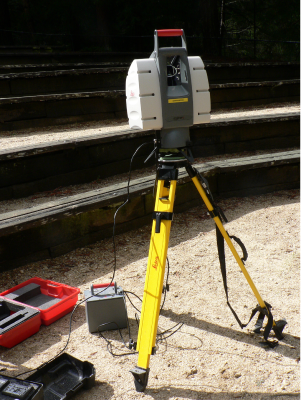 Working on a larger, more complex renovation project? A 3D laser scan (or Lidar Scan) of the building may be your best starting point for capturing existing conditions.
Photo: David Monniaux, CC BY-SA 3.0 http://creativecommons.org/licenses/by-sa/3.0/, via Wikimedia Commons
PROS
– Connected: The end product of a laser scan is a point cloud or digitized cartesian coordinates (x,y,z). Multiple scans can be combined and cleaned up in software such as Autodesk Recap then directly exported to Revit to create a model.
– Efficient: Scanning is highly efficient as it doesn’t require as much time on site as the previous options. But the turnaround time for a detailed model can be lengthy depending on the size and complexity of your project.
– Accurate: Scan to BIM is highly accurate when performed under the correct conditions. However, too much ambient light can distort results since the scanner may have trouble detecting points on reflective surfaces. This means the team may need to scan at night or during non-operational hours in an industrial setting.
In addition, it’s been said that 3D scans are almost too accurate in that they capture uneven walls and objects out of plane. Scanning may be overkill for small and mid-sized projects.
CONS
– Your data is still disconnected and depending on what info you need, time-consuming: As we mentioned above, rich building data like notes, photos, and condition ratings will still be disconnected to the Revit model. This equals a lot of time wasted hunting for this information in different channels in the future.
– Expensive: This is option costs significantly more than the others since it requires using expensive hardware that is large and hard to transport.
– Timing: The scanning crew will need access to the site when they can turn off all ambient sources of light. This may be no issue for commercial building owners as tenants usually go home in the evening. This can be a challenge for projects in hotels, manufacturing sites, or other facilities that operate around the clock.
WHEN TO USE THIS METHOD
This method is generally used on complex existing buildings with large spaces where clash detection is the desired goal.
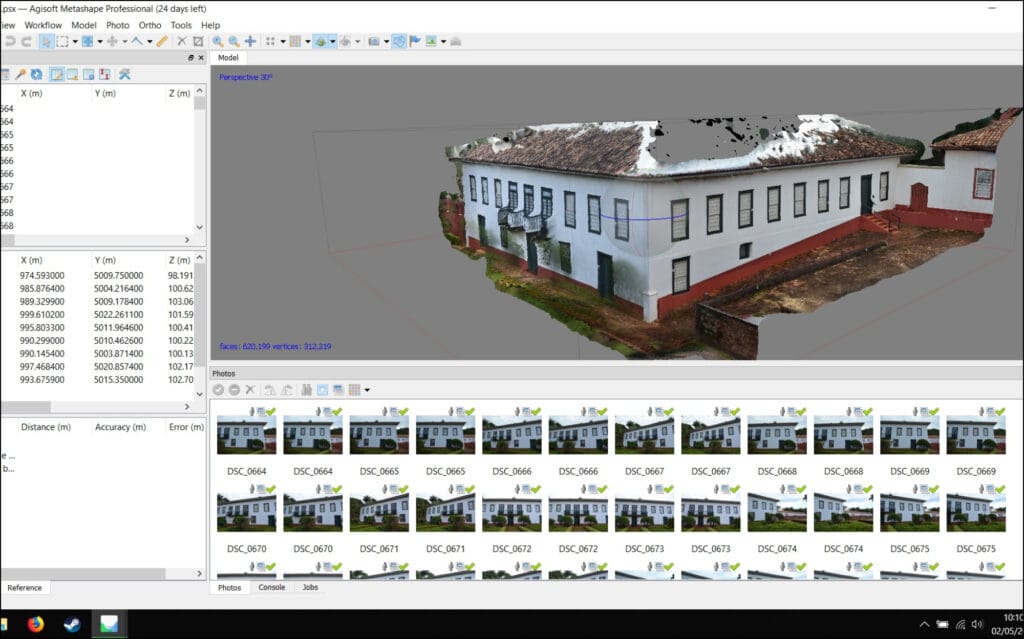
Similar to the 3D Scanning Method, photogrammetry generates a 3D model by using a comprehensive photo scan to gather data. Unlike lidar scanning which shoots light at a surface, this method uses many photos "stitched together" to capture a space. This makes the equipment for a photogrammetry scan 1/10 or less of the price of a typical laser scanner.
PROS
– Connected: Similar to the 3D Scanning Method, a photogrammetry scan can be used to create a point cloud and data can be imported directly into Revit.
– Accurate, kind of: Depending on the space you’re documenting, photogrammetry can be very accurate. The texture of surfaces makes a difference in the type of data that is captured. Smooth, flat surfaces make it difficult for photogrammetry scans to work, leaving you with inaccurate data.
CONS
– Still disconnected and time-consuming: Photogrammetry does a better job of capturing material types than a 3D Scan, but you will still need to translate that data into the Revit model. Also, note that the initial scan can be time-consuming.
– Expensive: While this option costs less than 3D scans, the software required to capture and stitch the photos together has monthly fees and extra fees for the point cloud output. You will also need to do multiple scans to connect the rooms together. All of this means the price can add up quickly.
WHEN TO USE THIS METHOD
It’s best to use this method when documenting existing conditions with smaller room sizes that don’t have smooth, flat surfaces.
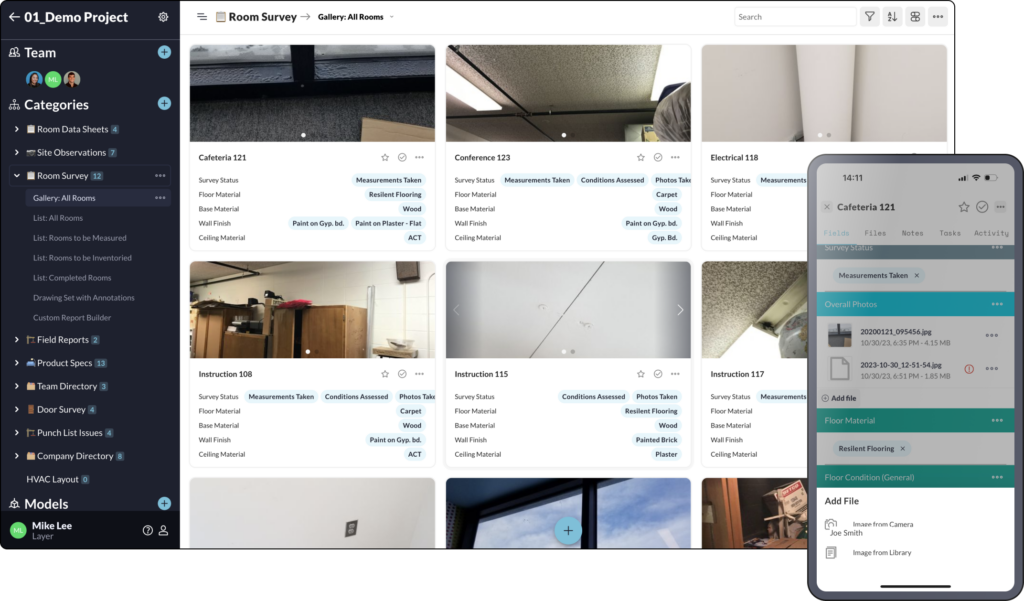
There is a wide range of mobile apps on the market that make it easy to create robust forms to input data. While some products provide the ability to upload drawings, most are geared towards construction workflows.
This is the primary reason we created Layer App. We built a tool specifically for architects and designers who need to capture existing building conditions. The added bonus of using Layer is that it is the only mobile app on the market that connects captured data to Revit.
PROS
– Accurate: Layer’s diverse range of form fields lets users input any kind of data accurately and consistently.
– Connected: Layer connects directly to Revit or Floor plans at any time in a project, regardless of whether there is a model at the time of your site visit.
– Efficient: Capture data only once and find it later in one intuitive dashboard that makes it easy to view your data right in Revit.
– Affordable: Layer’s new Drawing View gives you unlimited everything, including the number of sheets, for one low monthly fee that you can include in client contracts.
– Easy to Use: Layer was recognized by Architect Magazine for our intuitive mobile-friendly interface that makes it easy to capture data on the go, even when you’re not connected to WiFi.
WHEN TO USE THIS METHOD
Layer can be used for any type or size of project. Built to be flexible, the app comes with a suite of robust team communication tools that make it easy to coordinate teams on site. And while Layer was built to connect project data to Revit, it can also be used at any time without Revit, making it an easy-to-use solution for team members who don’t know Revit.
The right solution will depend on the size of project you’re documenting, the type of information you’re capturing, and the budget you’re working with. If you’re looking for a flexible documentation tool that connects to Revit, we recommend that you try Layer.
Get started by scheduling a quick demo
You don't want to miss these 5 key features when choosing a CMMS for your facilities management team
Learn how to choose a good work order system that can help you do more with fewer resources
Learn more about why Related Elements fields are one of the most powerful field types within Layer when it comes to managing your building data.