Learn how to build a project change log in Layer using custom fields, views, and automations to track and review data updates across your project.

Silvia Lee
Layer supports multiple ways to track changes to project data. This article explains how to build a workflow that shows what changed, when it changed, and who made the change. Depending on your team or project requirements, you can choose from several approaches with different levels of visibility, notification, and traceability. Changes can be tracked using system metadata, filtered views, custom categories, or automations. These methods can be used on their own or combined into a single workflow.
Use Fields to Log Change Status and Responsibility
To track changes manually, add a group of revision-related fields to your category. These fields should capture the current state of an item and give context for review or follow-up.
Recommended Fields
Status (Select field): Define statuses such as In Progress, Owner to Review, Complete
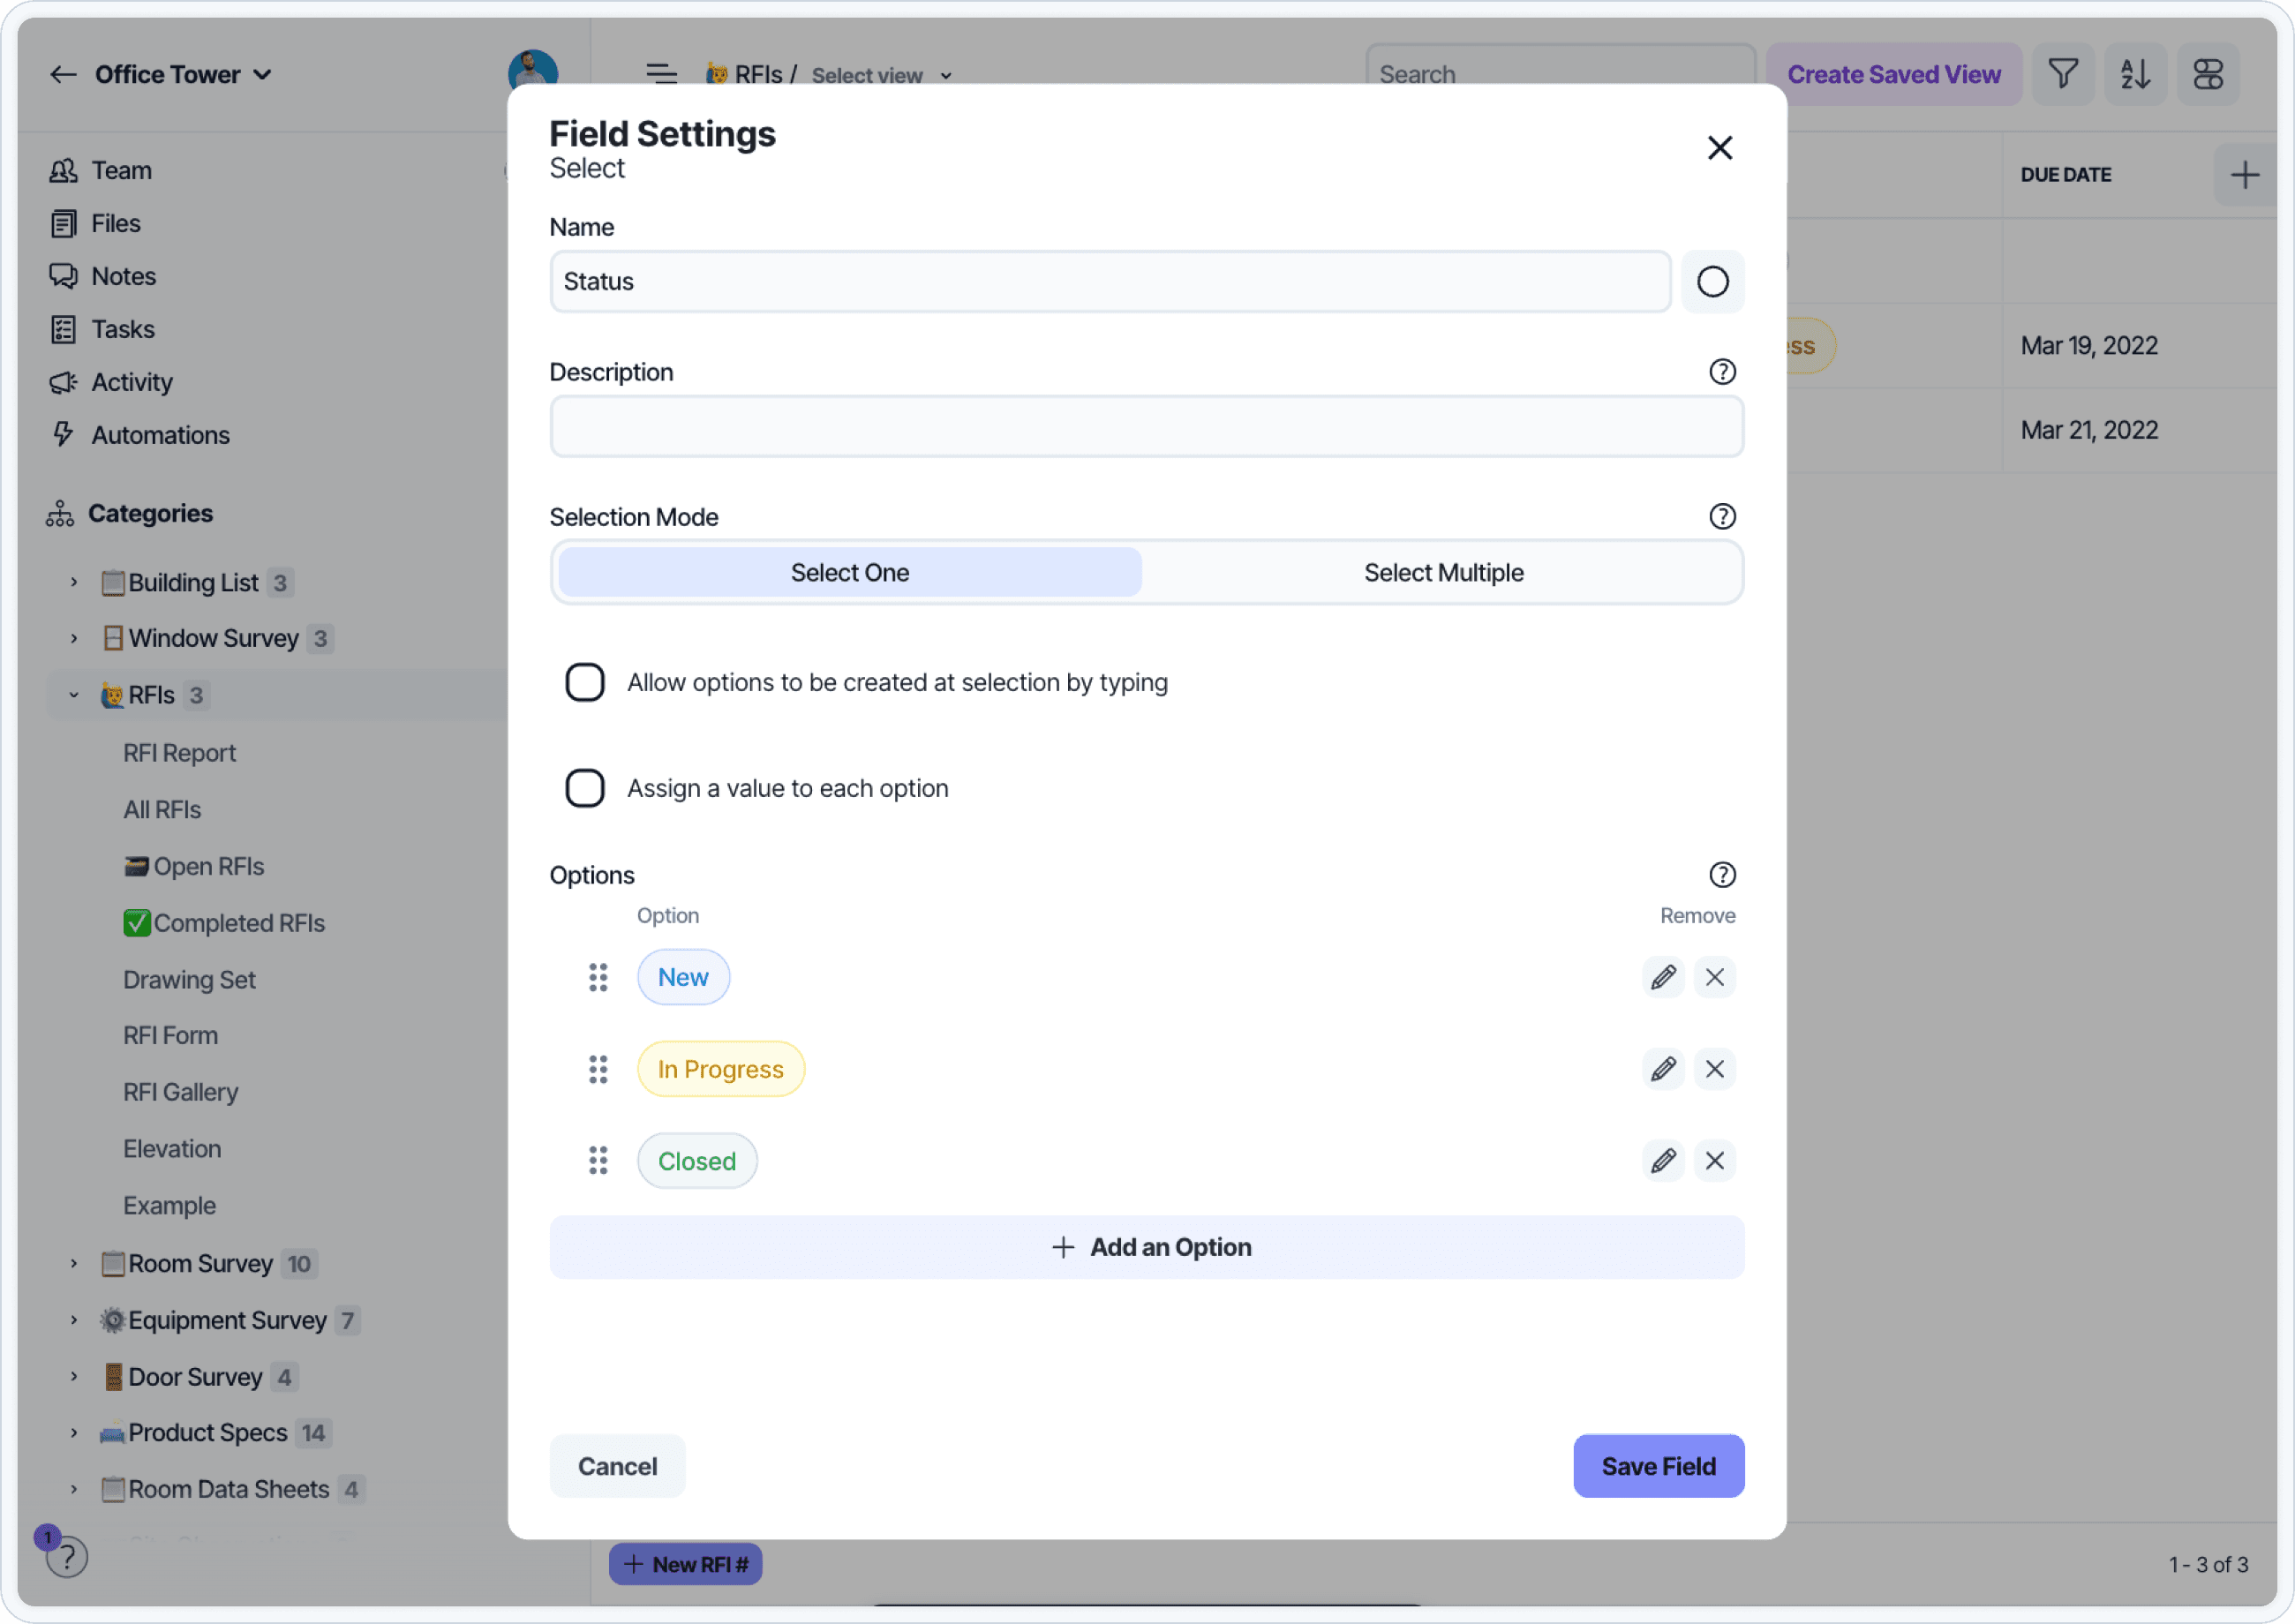
Notes (Formatted Text field): Add a freeform description of what changed or why
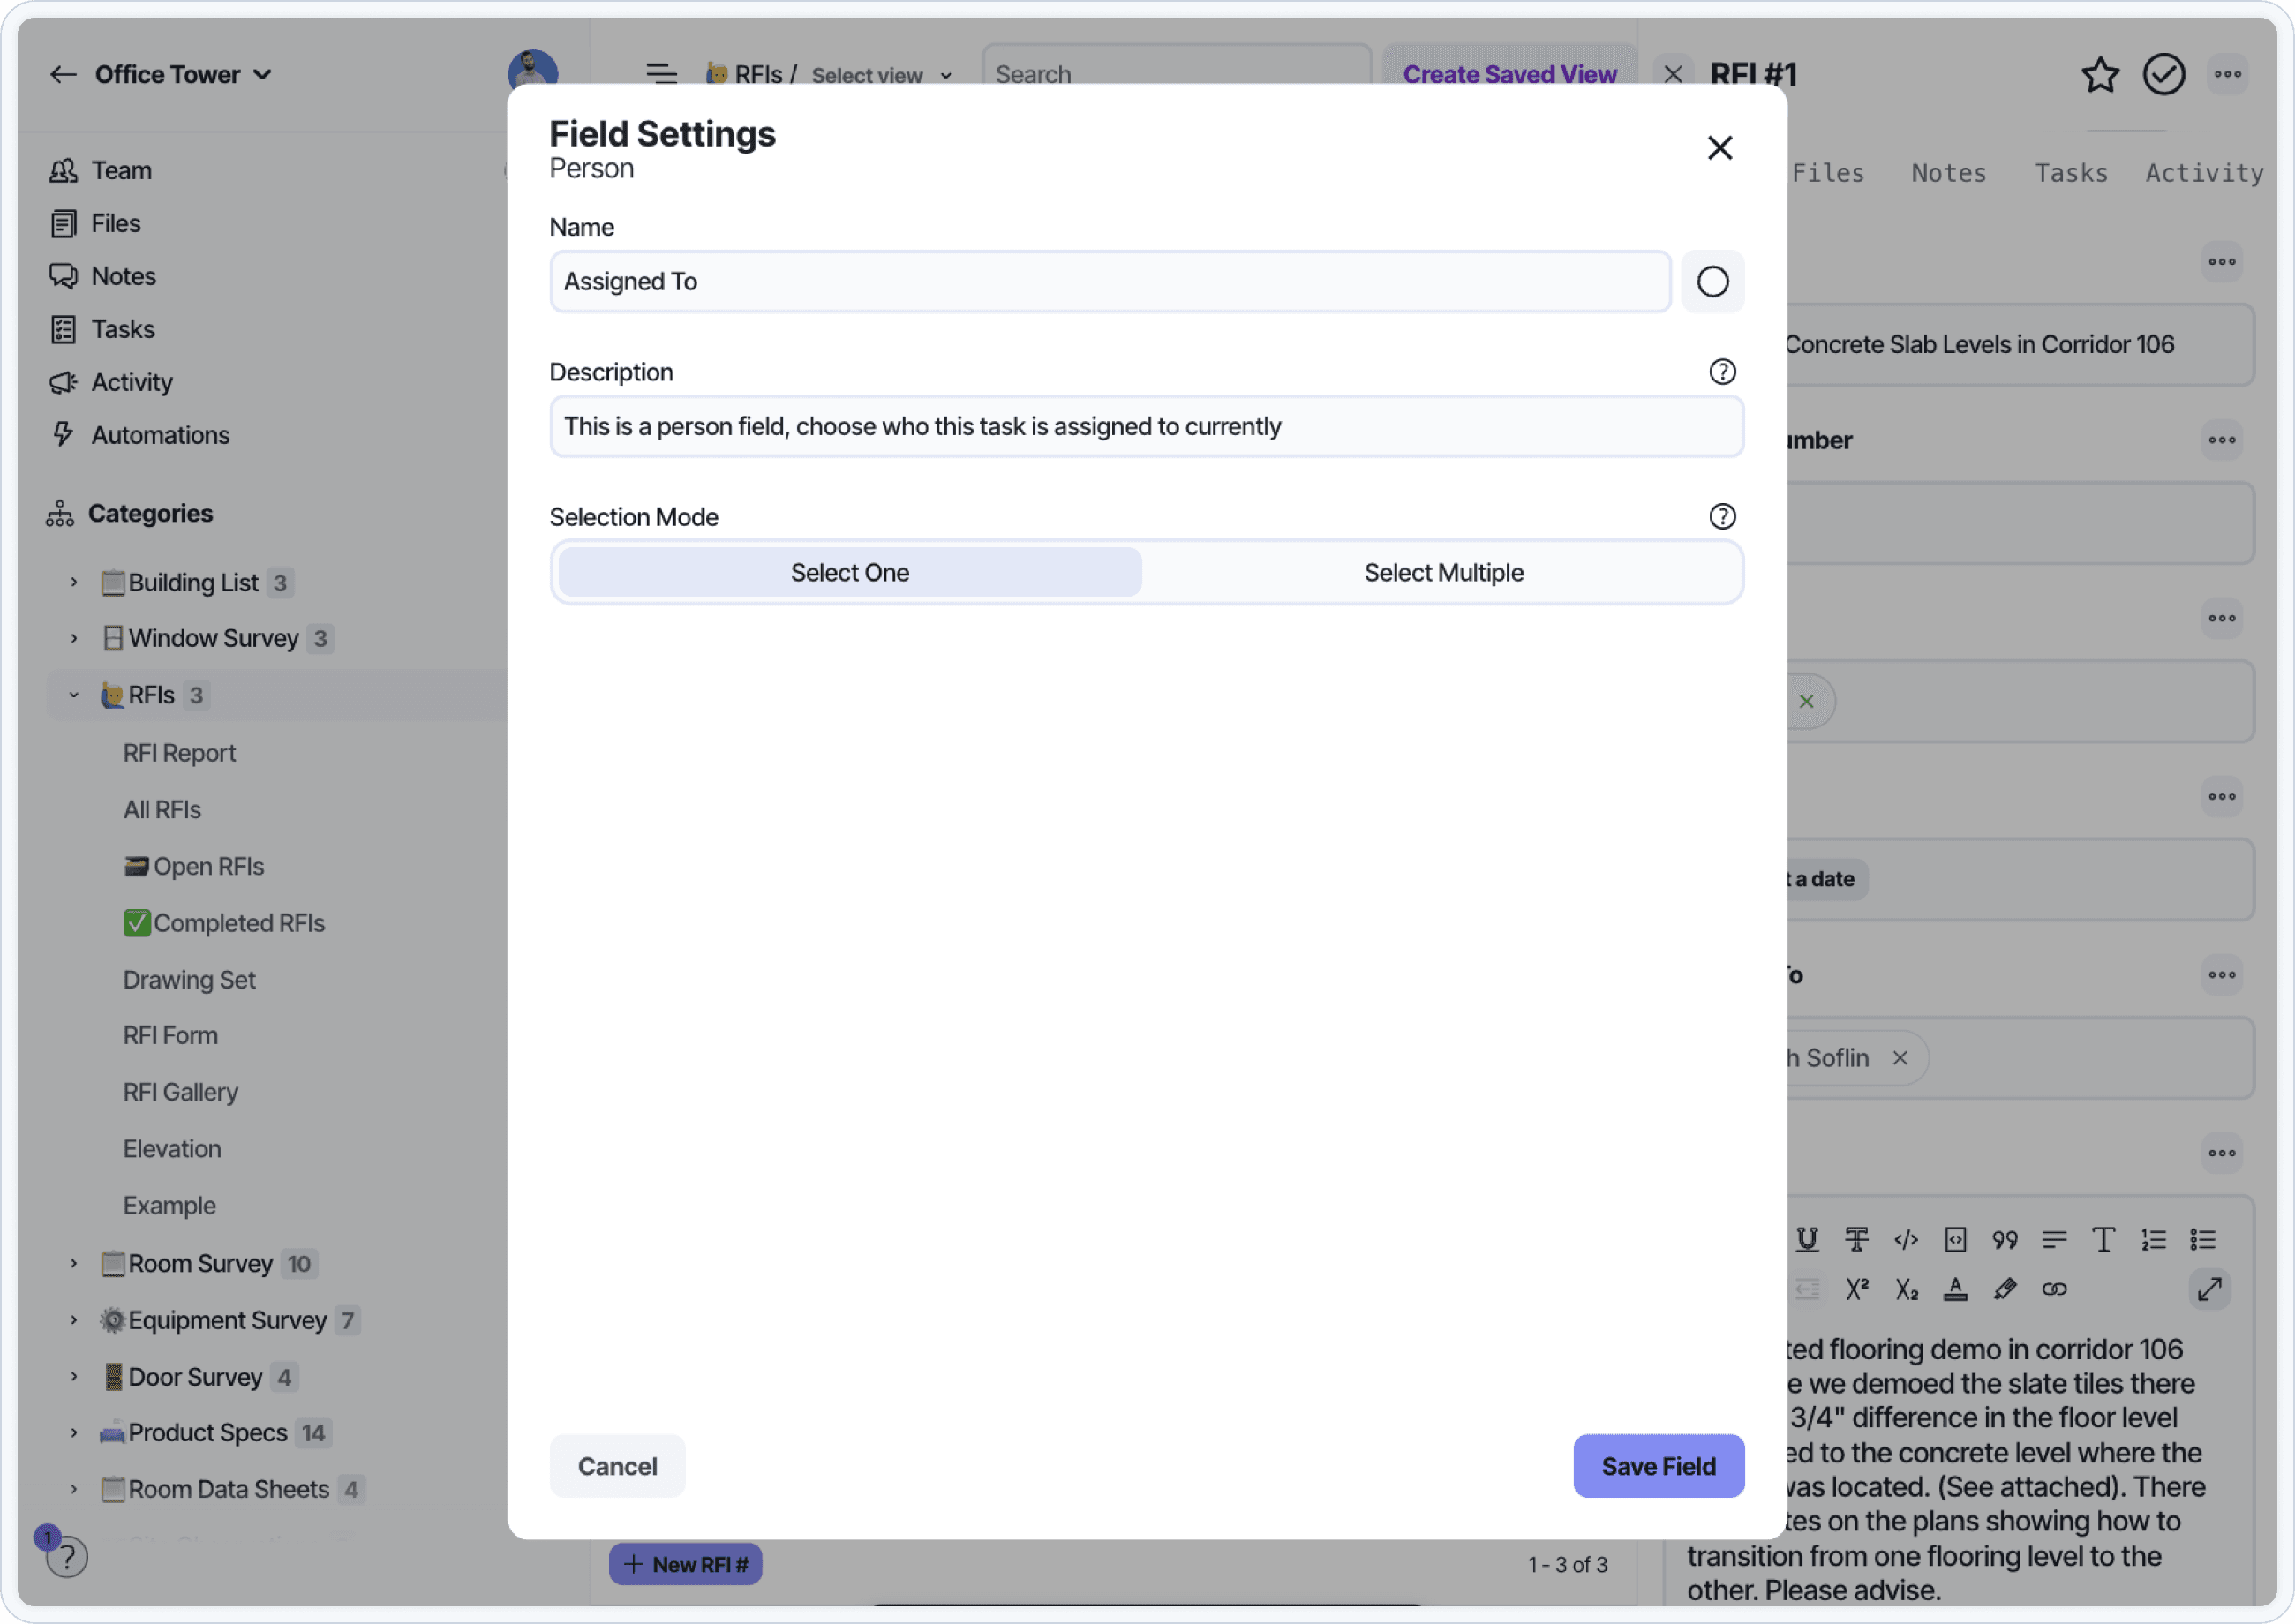
Responsible Party (Select or Person field): Identify the stakeholder reviewing or resolving the change
Last Updated At (Updated At field): System field that shows when the last change occurred
Last Updated By (Updated By field): System field that shows who made the last update
These fields can be grouped in a field group labeled “Revisions” or “Change Tracking.” Grouping the fields provides clarity when reviewing updates and allows the group to be shown or hidden when in focus mode or on document views.
You can use also use the Restricted role permissions to control which users can edit each field.
Use Views to Surface Recent Changes
Use filtered views to see changes across multiple elements in a category. These views can be filtered by system metadata fields or custom revision fields you create.
Show recently updated elements
Apply a filter on Updated At to show elements that changed within a time window.
Example filters:
Updated At is after yesterdayUpdated At is within the past 7 days
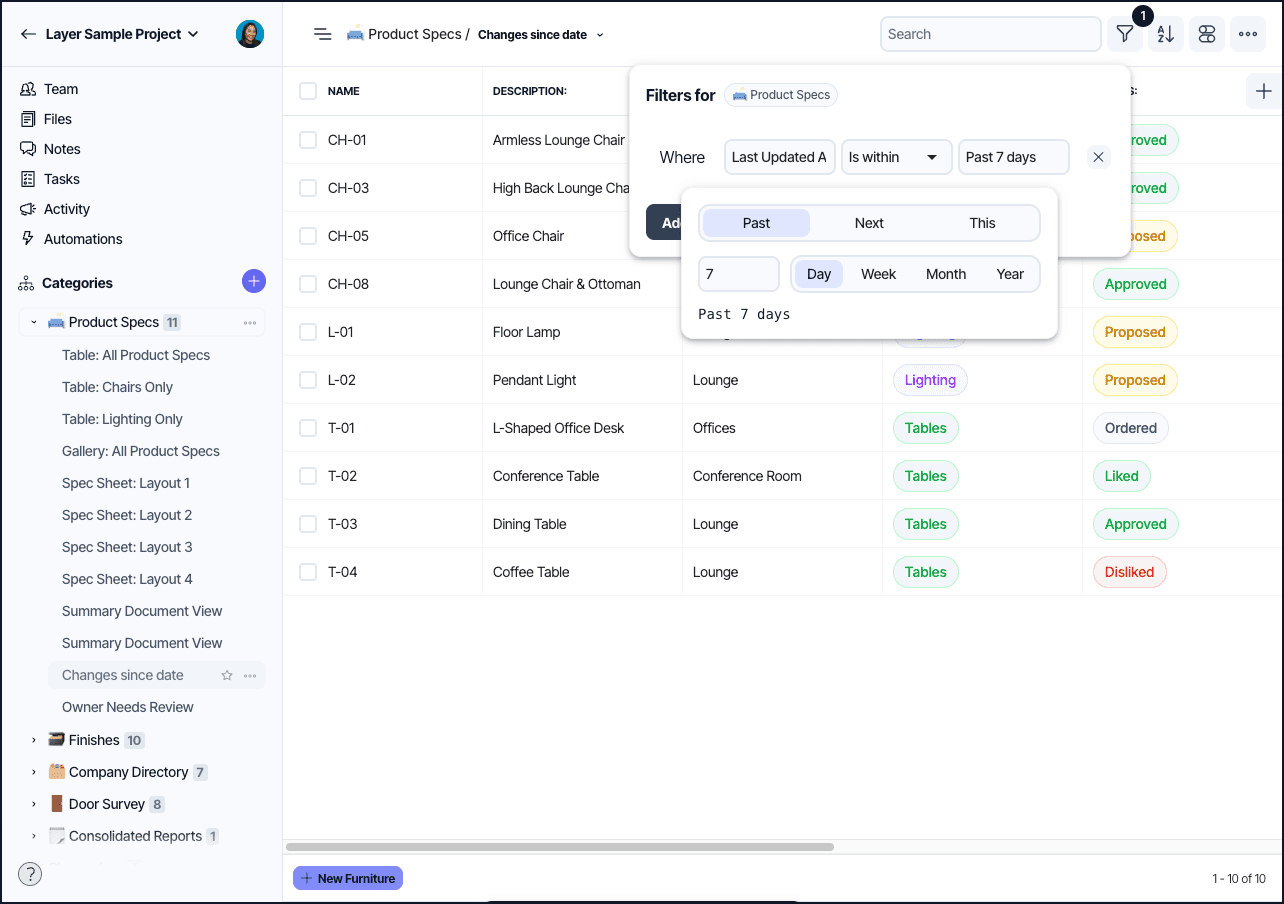
Save these views as “Changes Since Yesterday” or “Recent Updates” and make them available to your team.
Filter by status or reviewer
Use custom fields like Status or Responsible Party to group changes by reviewer, team, or progress state.
Examples:
Status = Owner to ReviewResponsible Party = Architect
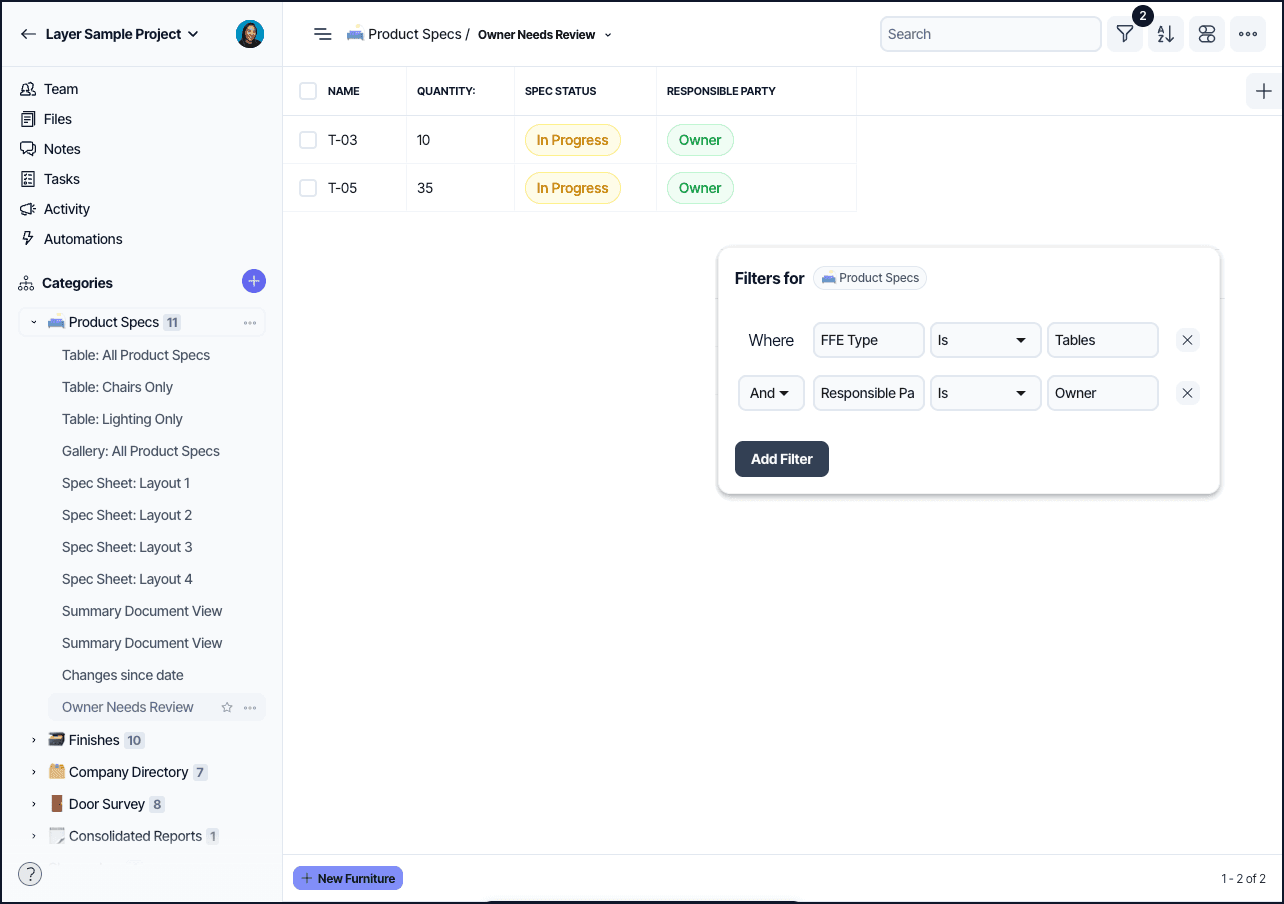
Save filtered views to create role-specific dashboards, such as “Owner Review Required” or “Spec Updates for Architect.”
Highlight Changes Visually in Document Views
Use conditional formatting to highlight updated values in a document view. Formatting rules are based on system metadata and apply visual styling (e.g. font, color, size) when conditions are met.
Configure a conditional formatting rule
In the document view editor:
Select the field (e.g. Quantity)
Add a condition:
Updated At is after yesterdayApply formatting (e.g. bold, red text, large font size)
This draws attention to recently updated fields when sharing or exporting document views.
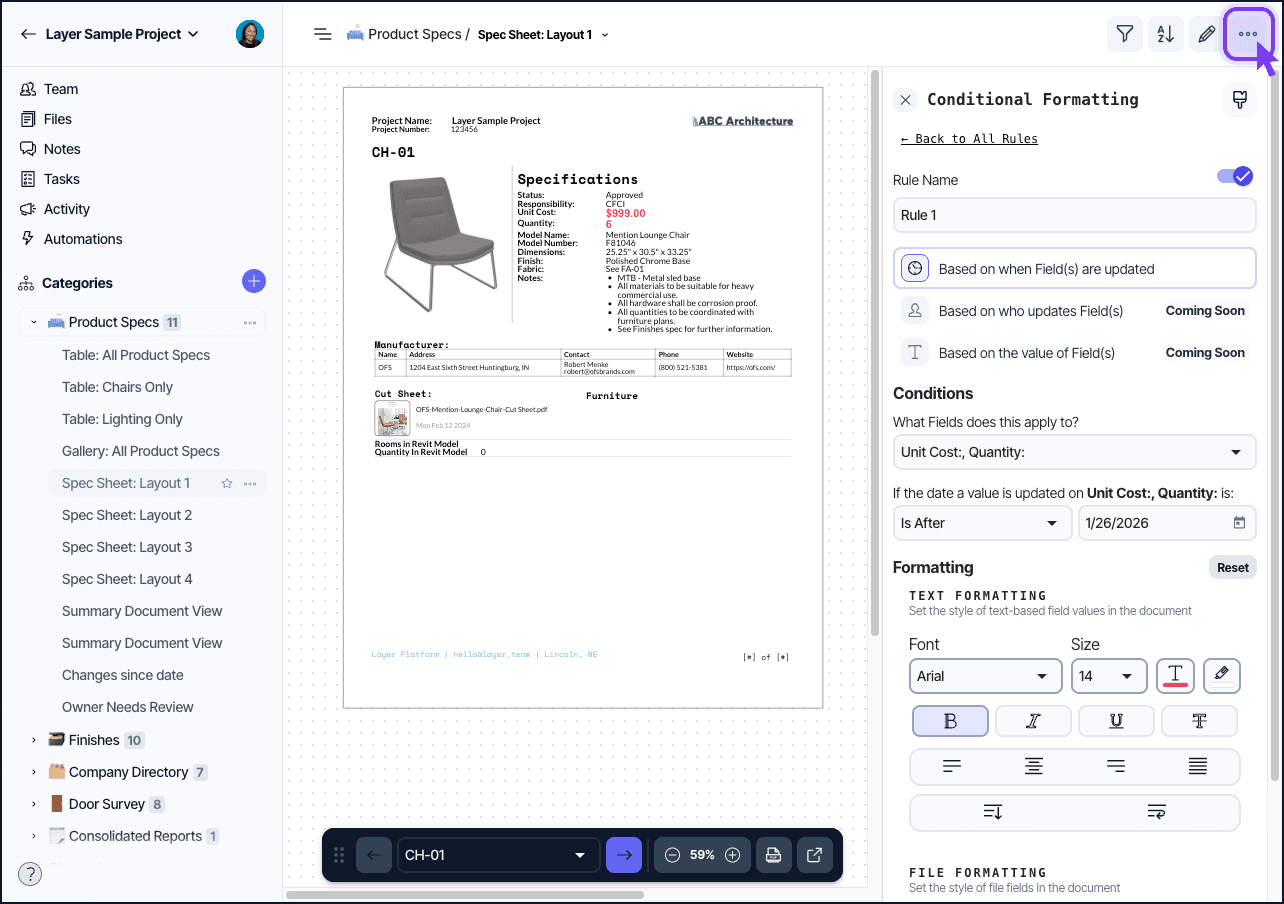
Notes on behavior
Conditional formatting uses Activity timestamps, not value comparisons. If a user changes a value and reverts it, the update still triggers formatting. If you need full control over visual formatting, use a Formatted Text field instead.
Create a Change Log Category
Use a separate category to log change records across multiple elements. This is useful when one revision affects multiple items or when change history needs to be tracked independently from the primary category.
Set up the Change Log
Create a new category named
Change LogAdd fields such as:
Add a relationship field that links to the source category (e.g. Product Specs)
Set the relationship as one-to-many or many-to-many depending on your workflow. For example, one change log entry can link to multiple product specs that need review.

Change Log elements can include their own metadata or custom fields and will display links to all related records. This separate category works best to keep track of changes in one place referencing multiple categories and/or paired with automations.
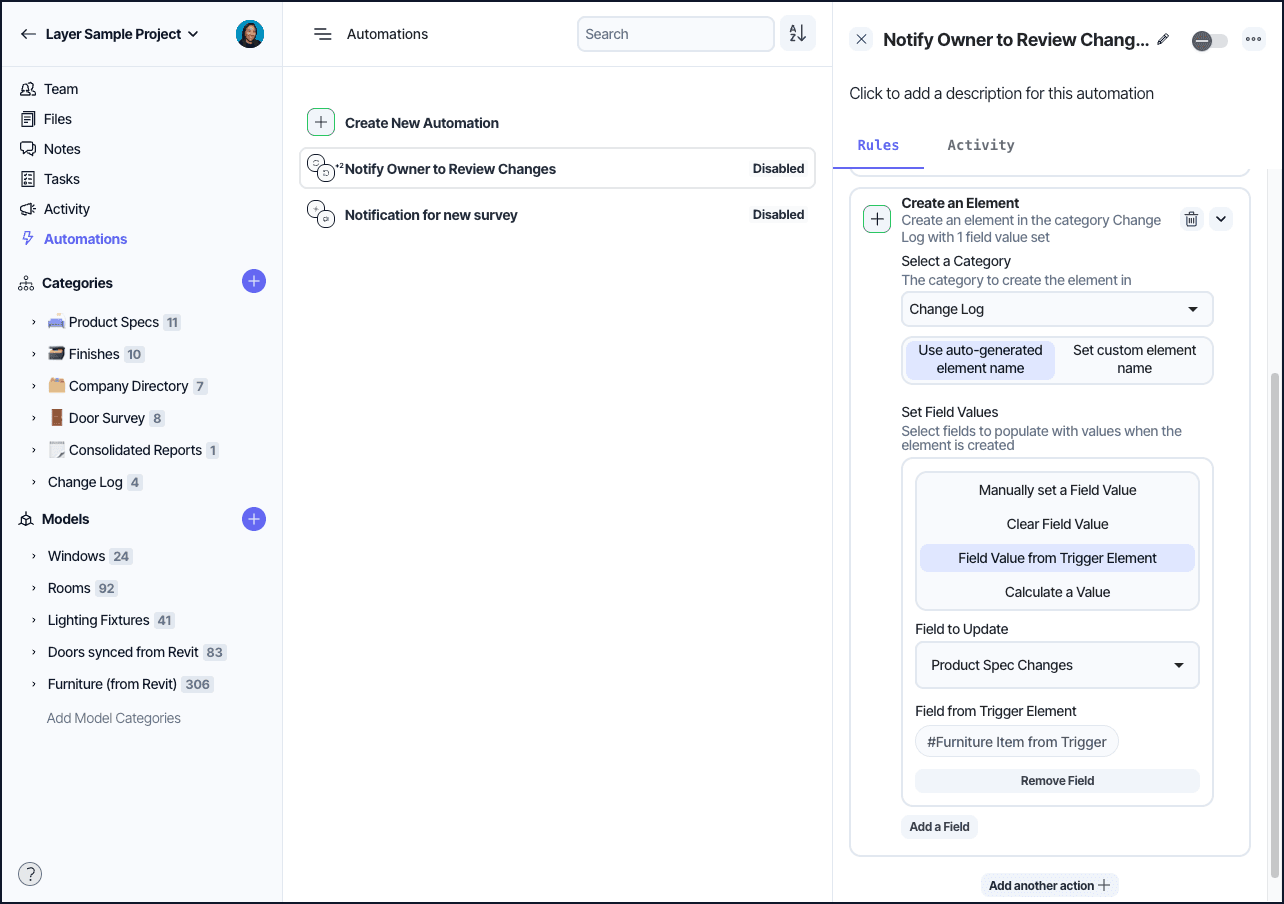
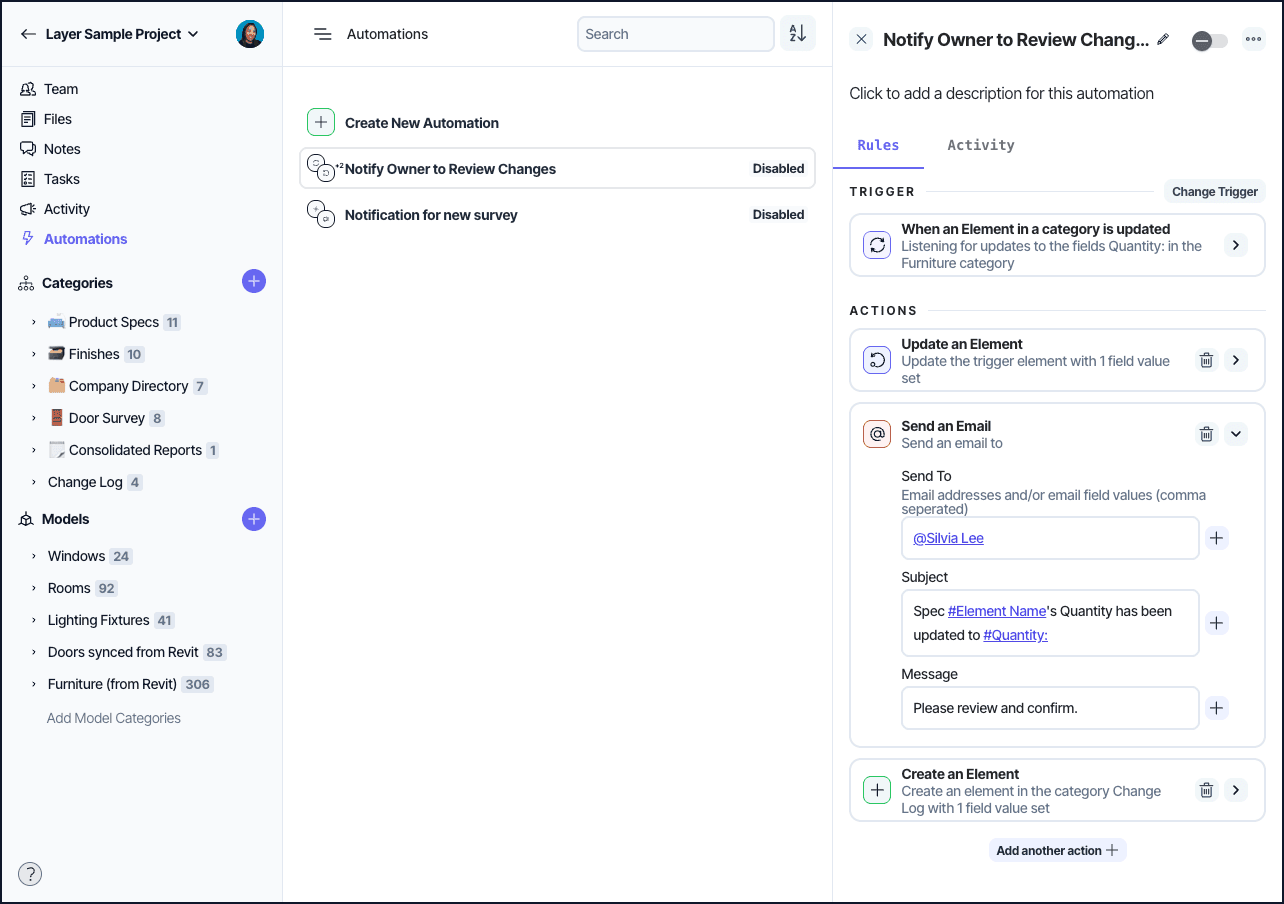
Automate Field Updates When Data Changes
Use automations to flag records when key fields are updated. This helps keep workflows consistent without requiring manual edits.
Example: Update status when Quantity changes
Go to Automations and create a new rule
Trigger: When
Quantityis updatedAction: Set
Statusto Owner to Review
This automatically flags the record for follow-up.

Create Log Entries Automatically
Add a second action to the same automation to create a new element in the Change Log category.
Link it to the updated spec
Populate fields like Notes or Responsible Party using values from the triggering record
This creates a record of the change and links it to the element that was updated.
Notify Stakeholders About Changes
Use person fields and automations to notify team members when something they are responsible for changes.
Example automations:
When
Status = Owner to Review, notify the person inResponsible PartyWhen an element is updated, assign it to a person and send them an email
Notifications can be sent through Layer’s in-app system or by email. Use email when stakeholders do not have Layer notifications enabled.
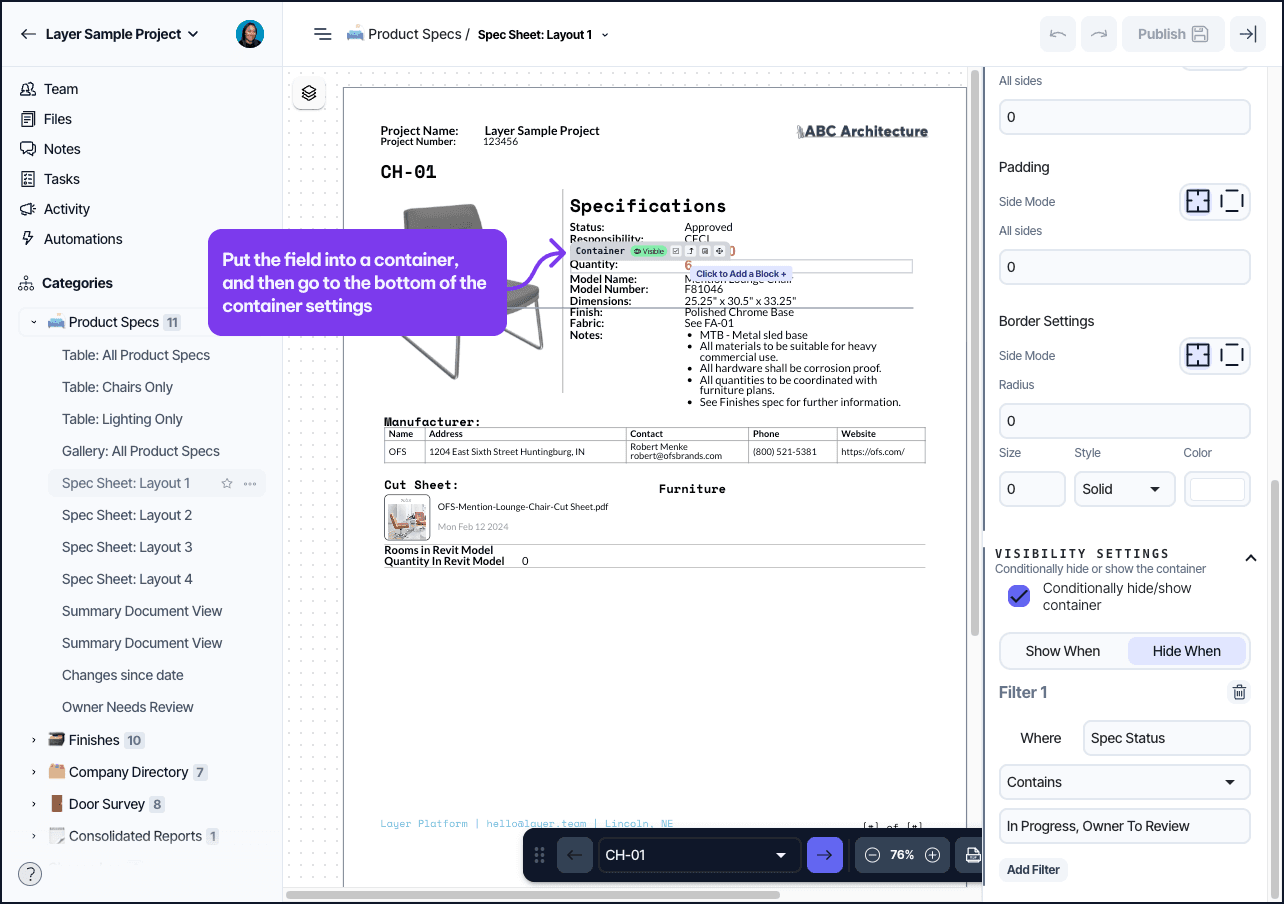
Show or Hide Fields Based on Status
Document view containers can be conditionally shown or hidden based on field values. Use this to control what information is visible in reports or PDFs.
Example: Hide Quantity field until reviewed
Place the Quantity field inside a container
Set visibility rule: Hide container when
Status = In ProgressWhen the status is updated to Reviewed, the container becomes visible
This helps prevent unapproved values from appearing in shared or exported documents.
Combine Tools for Flexible Change Tracking
Layer supports multiple methods for tracking updates. You can use them individually or combine them to build a review process that fits your team’s workflow.
Common combinations:
Use
Updated AtandUpdated Byto audit activityUse
StatusandNotesfields to coordinate reviewUse automations to flag records or notify reviewers
Use a Change Log category to centralize revision tracking
Use document view formatting to show what changed
Choose the tools that provide the right level of traceability for your project.

