Learn how Restricted Users work in Layer, including how to assign the role, manage view-based permissions, and control project access.

Mike Lee
Restricted Users are a paid, project-level role in Layer that provide limited access to project data. This role is designed for team members (paid licenses) who need to view or edit specific information without the ability to access the full project.
Restricted Users log into Layer like any other project member. Unlike Collaborators, who can see all project data by default, Restricted Users only see what is explicitly shared with them through Views. They cannot browse other categories, create views, or access unshared fields.
This article explains how to assign the Restricted User role, manage their permissions, and ensure they only see what they need.
What is a Restricted User?
A Restricted User badge inside Layer indicating limited project-level access.
A Restricted User is:
A paid, authenticated user in your Layer subscription
Assigned at the project level, not the company level
Permissioned entirely through View Settings
Able to log in and work within the app (vs. using Shared Views or Forms)
Restricted Users cannot explore the project freely. They see only Views that are set with permissions to “Everyone”. Restricted Users cannot view or access other categories, or fields unless explicitly included in your pre-set Views.
Step 1: Add the User to Your Company
Before assigning someone as a Restricted User on a project, you must first invite them to your company:
Go to your Company Settings
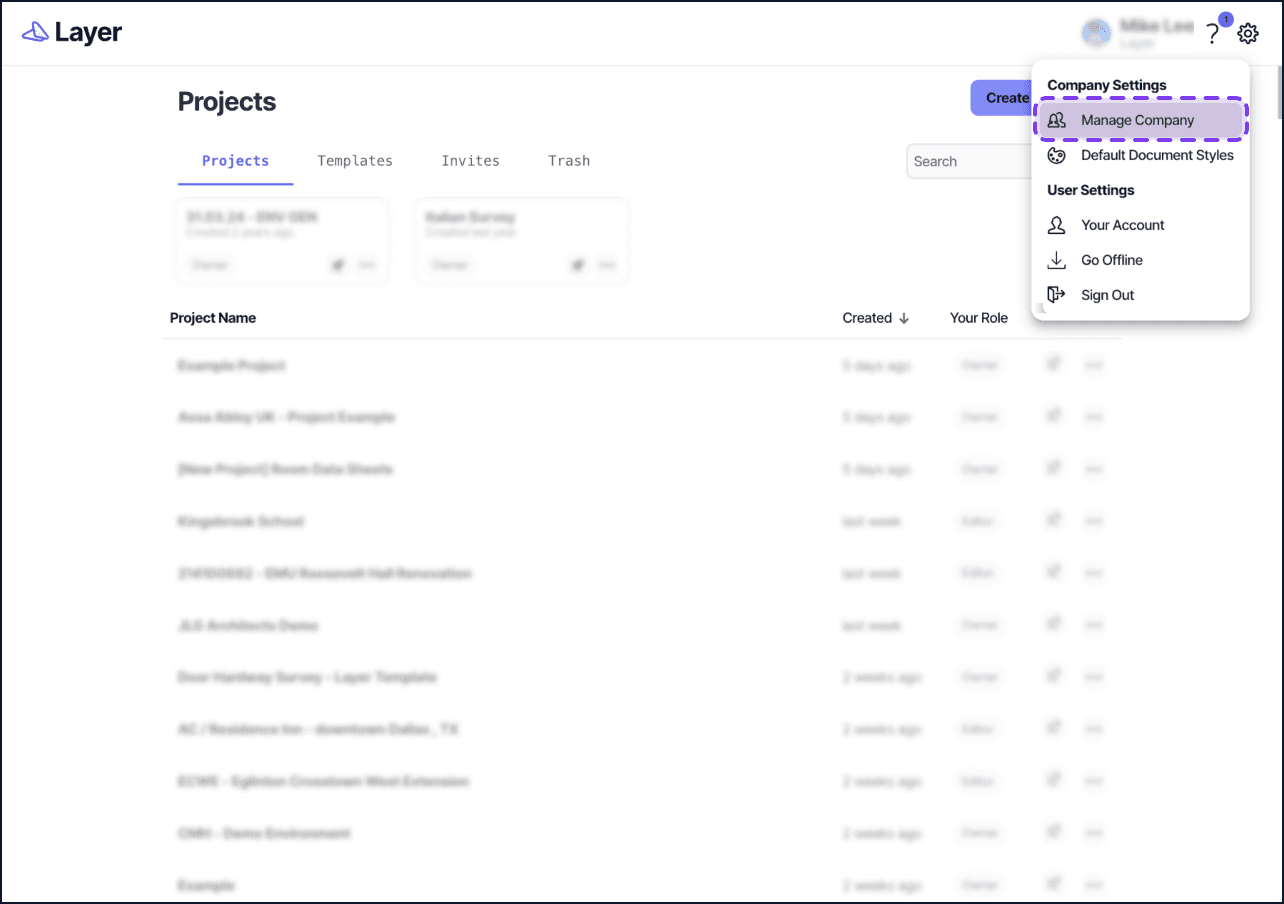
The Manage Company panel for inviting a new user to the company before assigning a project role.
Click Invite Member
Enter their email address and assign any company-level role (e.g. Member or Admin)
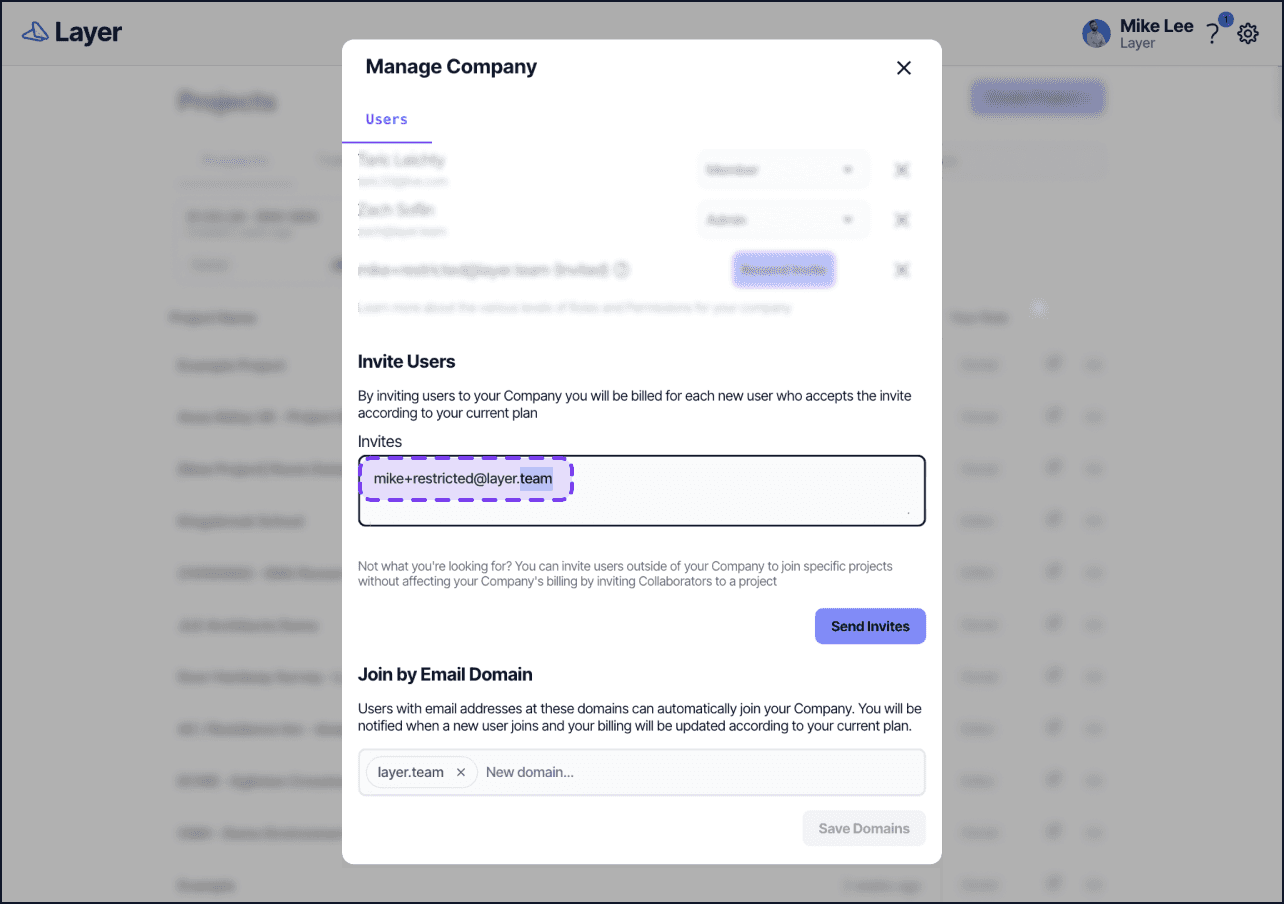
Adding a new user to the company with their email and a company-level role.
Have the user accept the invitation
You will not see the Restricted role at this level, as it is assigned at the project level only.
Alternatively, you can also suggest the user sign up for an account and request to join your company. Read full help article →
Step 2: Prepare Views Before Adding the User
By default, any View marked as Default View will appear for all users added to the project, including Restricted Users. To avoid giving unwanted access:
Open each View in your project
Remove the Default View setting
Set View visibility to “Everyone” (this allows admins to share it later)
This ensures that Restricted Users see nothing when first added, and you can then assign Views manually.
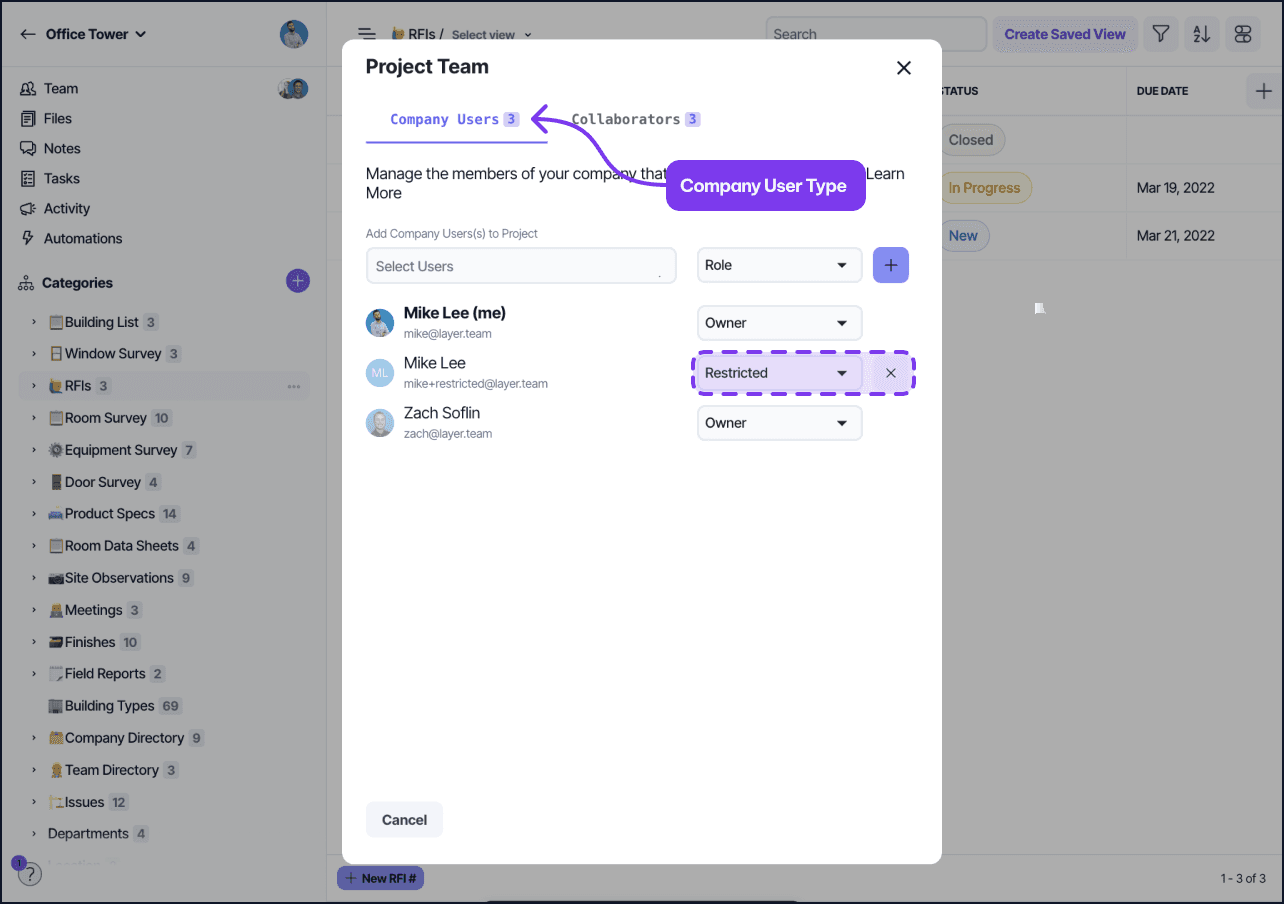
Step 3: Add the User to the Project as Restricted
To assign the role:
Open the project
Go to Project Settings > Users
The Project Settings Users tab where Restricted Users are assigned.
Click Add User
The Add User dialog inside a project, used to invite a team member.
Select the Restricted role
Click Invite
Once added, the user will not see any content until you share a View with them.
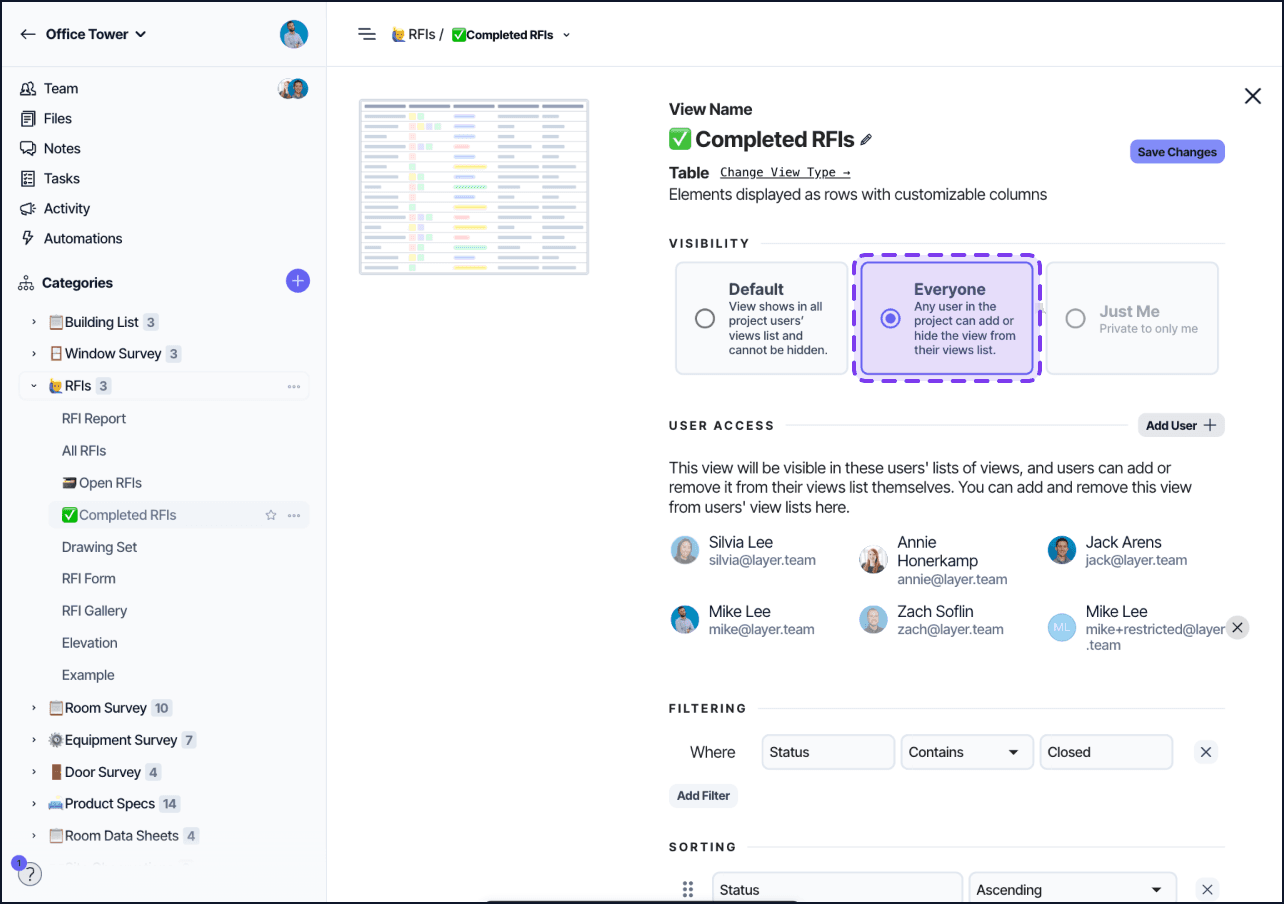
Step 4: Share Views to Control Access
Views are the only way to give Restricted Users access to project data.
To share a View:
Open the View
Click Add User +
Select the Restricted User from the list
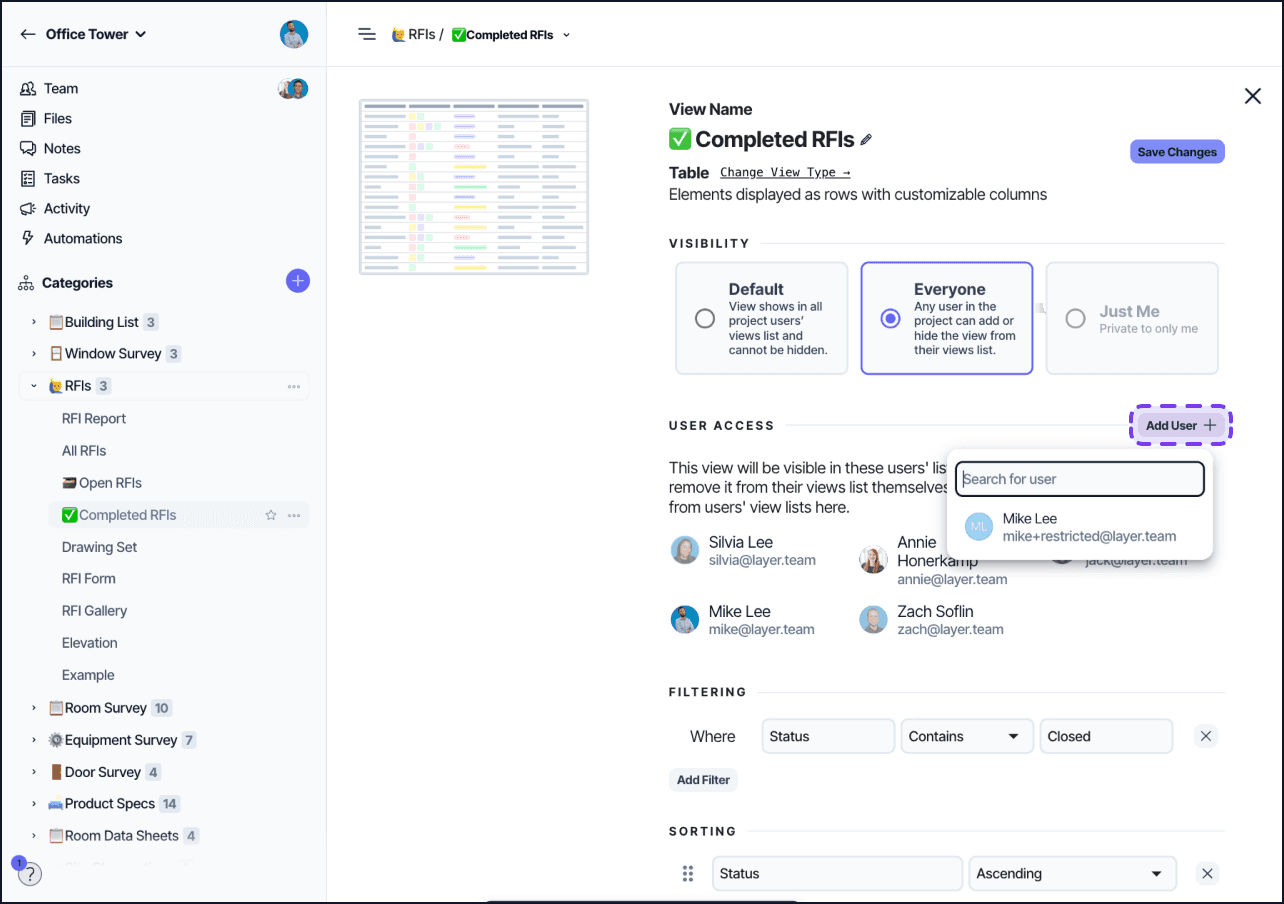
Adding a Restricted User to a specific View to grant scoped access.
Save changes
Once shared, the View will appear in the Restricted User’s sidebar. They will only see the category, elements, and fields exposed in that View. You can also remove them similarly by clicking the “x” next to their user card in the view settings.

Managing Restricted User access by removing them from a View’s shared list.
What Restricted Users Can Access
Capability | Allowed | Notes |
|---|---|---|
View assigned categories | ✅ | Only after being added to a view in that category |
View assigned views | ✅ | Must be manually shared by a project admin |
View enabled fields | ✅ | Only fields that are visible in the shared view |
Edit field values | ✅ | Only in editable fields within the shared view |
Apply local filters | ✅ | Filters apply only to their session, cannot be saved |
Save view changes | ❌ | Cannot modify filters, sort order, or layout |
Create or edit views | ❌ | No access to view configuration |
Access project settings | ❌ | No visibility into project-level configuration |
See other users | ❌ | Only via Person fields, if visible in a shared view |
Access Automations or Templates | ❌ | No visibility into automation tools |
Add or remove users | ❌ | No user management access |
Understanding the User Experience
When a Restricted User logs in:
They see only the Views assigned to them
They cannot see or browse categories until at least one View from a category is shared
Fields not included in a View are completely hidden
They can edit values only if the fields are marked editable
The sidebar and navigation are scoped to just their assigned Views
Even if a category has many fields, a Restricted User will only see what is included in the View configuration.
Tips for Managing Restricted Access
Name Views clearly (e.g. “QA Review – Phase 1” or “Client Feedback – Furniture”)
Use View filters to limit which elements are visible
Use field-level permissions to avoid exposing sensitive data
Regularly audit user access and remove views when no longer needed
Keep track of which Views each user has access to for troubleshooting
Billing Considerations
Restricted Users count as paid seats in your subscription. Converting a user from Collaborator to Restricted will increase your license usage.
To manage your billing, visit the Billing tab under your organization settings.

