Interior Design
Interior Design
Interior Design
How to Connect FF&E to Revit Workflows
How to Connect FF&E to Revit Workflows
How to Connect FF&E to Revit Workflows
Layer makes it easy to connect FF&E to Revit workflows. Designers and specifiers who don't know Revit can complete Revit schedules using Layer.

Jessica Wyman

Jessica Wyman

Jessica Wyman
Originally Published: Dec 6, 2023


Contents
Updated:Nov 19, 2025
How to Connect FF&E to Revit Workflows for Efficient Project Management
What is FF&E?
FF&E is shorthand for Furniture, Fixtures, and Equipment. In the architecture and interior design realms, this term encompasses items that are not typically supplied or installed by the general contractor on a construction project. The exact meaning will vary depending on the context in which it is used.
What workflows are associated with FF&E?
Regardless of the exact scope of FF&E on a project, FF&E items need to be carefully tracked from the selection stage to their final placement in the building.
Options need to be considered. Costs assigned. Final choices need to be approved. Procurement, delivery, and installation statuses need to be recorded.
Throughout that whole process, there is a great deal of data to be gathered and shared among the project stakeholders. That data often resides in disconnected platforms making it difficult to keep tabs on everything at once.
What is Layer and how can it improve my FF&E workflow?
The Layer Revit Add-in makes it easy for multidisciplinary project teams to manage the process of selecting, specifying, and tracking FF&E as part of their Revit based workflows. FF&E items that have been placed in the model can be displayed in Layer where additional contextual information can be attached by non-Revit team members.
To put it more simply, designers and specifiers who don't know Revit can use Layer to fill out schedules in Revit.
How to get started
To get started, create a Layer account and start a Layer Project to which the Revit model will be attached. Then install the Layer add-in for Revit, available here. Once you've done that, follow these steps:
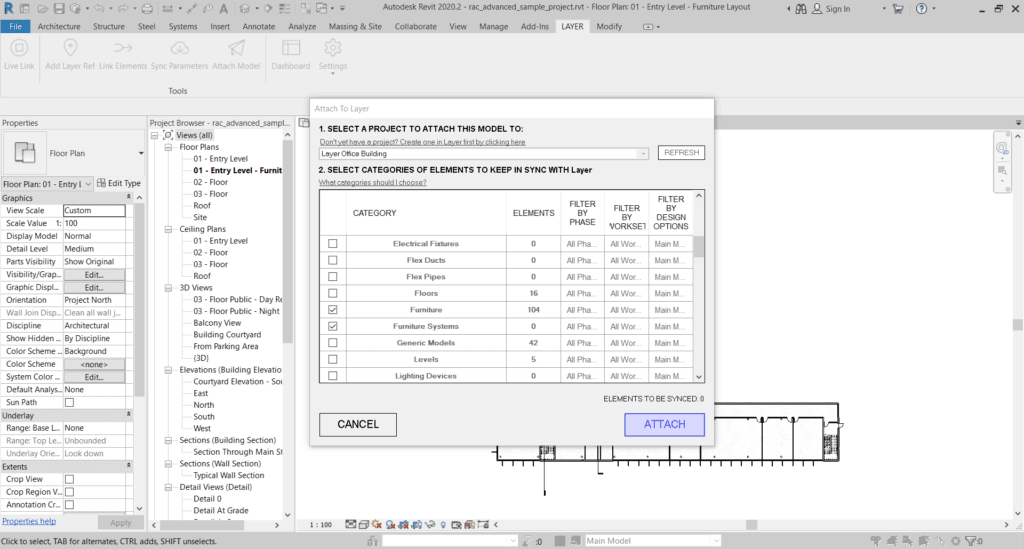
1. Attach your Revit model to Layer. Make sure to include all FF&E categories and the Rooms category.
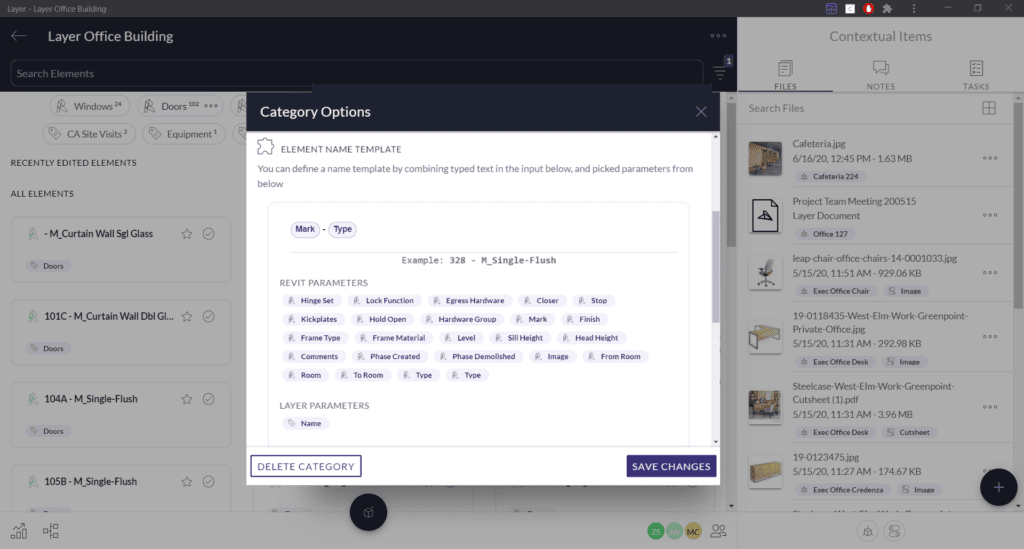
2. In Layer, create an Element Name Template for the synced Revit categories to distinguish between instances of FF&E (i.e. Mark-Type). By default, Layer will display Revit Elements with the Type name only.
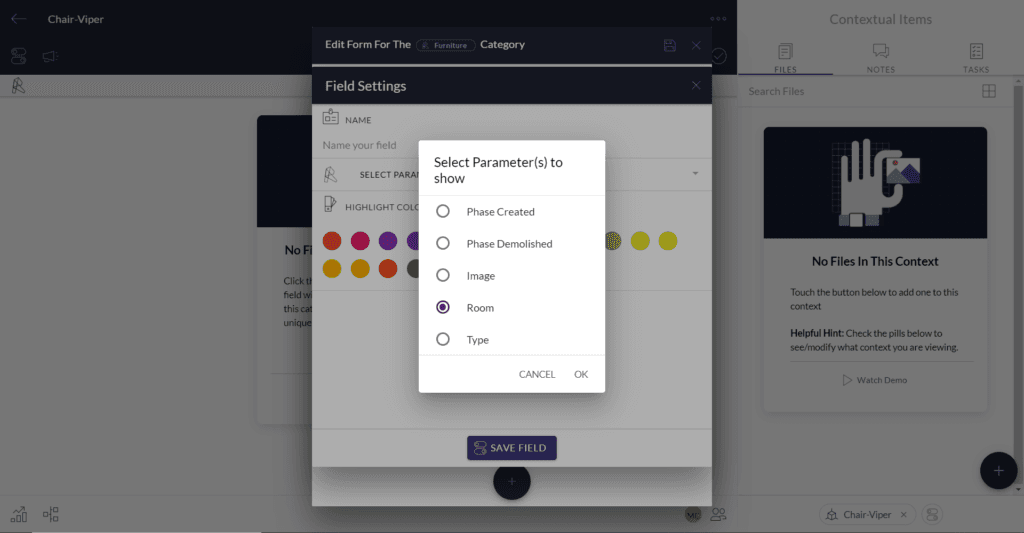
3. Create Display Revit Parameter fields as needed. Select the Room parameter to show what room the piece of equipment is in in Revit.
4. Create new fields for data that will be updated outside of Revit. These fields represent the data that will be "pushed" to Revit.
5. Create Revit Parameter Sync rules to connect Layer fields to Revit parameters.
6. Create Layer categories for Equipment and Furniture types. These categories represent the "catalog" of FF&E which will be used throughout the project. Consider fields such as a File Uploader field for cut sheets; Text fields for power and plumbing; and Text fields for the manufacturer, supplier, and cost information.
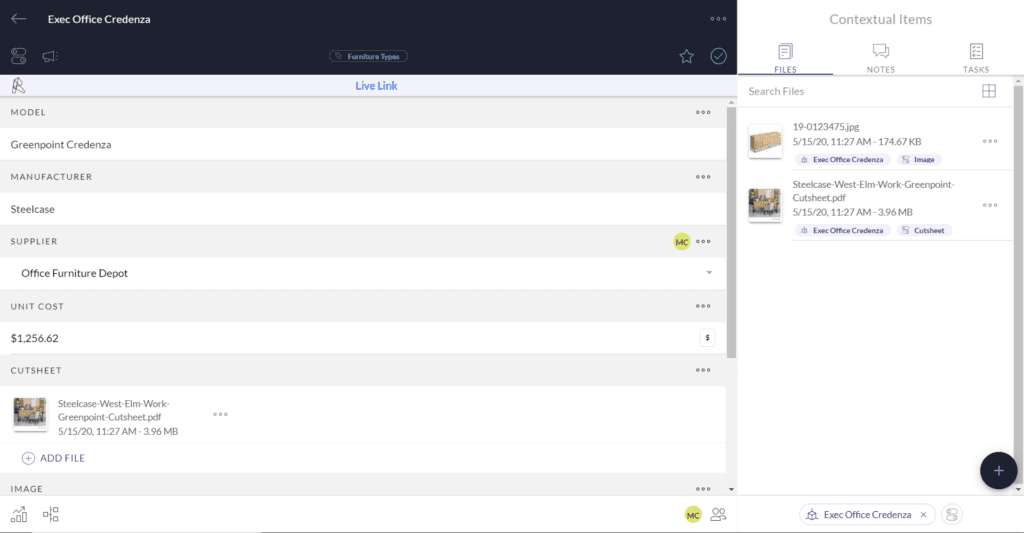
7. Create Related Element fields that connect to the Revit instance Elements to connect FF&E Types to the instances of FF&E. Create Lookup fields for the "type" information which needs to be visible within the instances of FF&E.
8. Output .csv or .xlsx reports as needed. Sort and filter data according to requirements in Excel.
9. Back in Revit, click the Dashboard button and the Live Link button on the Layer Revit Add-in. Select an instance of FF&E and the Layer Dashboard will display that Element's linked fields and files.
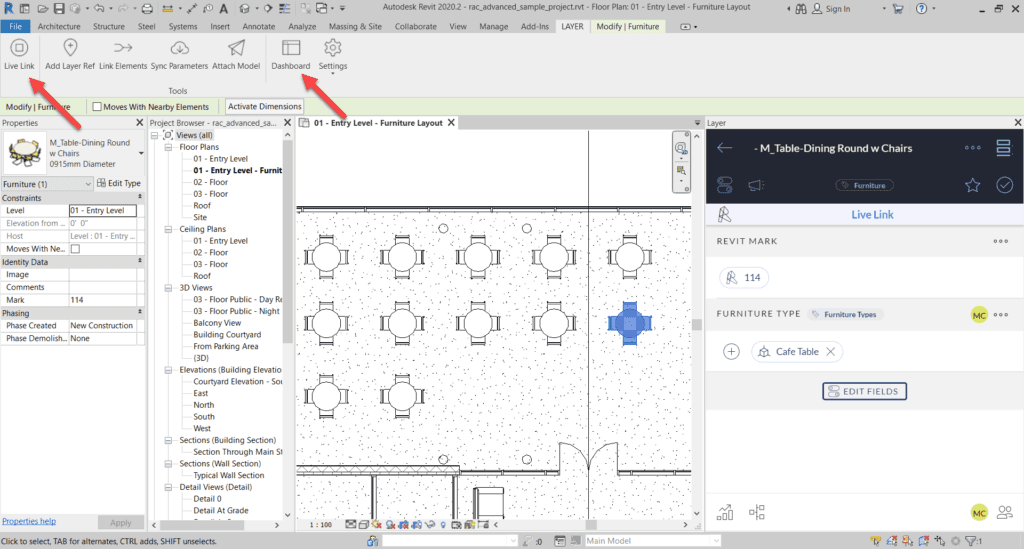
10. Click the Sync Parameters button on the Layer Revit Add-in to pull in the data fields mapped in Step 5 into Revit.
Need more help? Read this handy article Sync Layer Data to Revit Parameters or email help@layer.team and we'll get you set up for success.
Learn more about Layer
If you’d like to learn more about a flexible database tool like Layer, schedule a demo >
Tip: Layer users get unlimited access to best practice templates too!
How to Connect FF&E to Revit Workflows for Efficient Project Management
What is FF&E?
FF&E is shorthand for Furniture, Fixtures, and Equipment. In the architecture and interior design realms, this term encompasses items that are not typically supplied or installed by the general contractor on a construction project. The exact meaning will vary depending on the context in which it is used.
What workflows are associated with FF&E?
Regardless of the exact scope of FF&E on a project, FF&E items need to be carefully tracked from the selection stage to their final placement in the building.
Options need to be considered. Costs assigned. Final choices need to be approved. Procurement, delivery, and installation statuses need to be recorded.
Throughout that whole process, there is a great deal of data to be gathered and shared among the project stakeholders. That data often resides in disconnected platforms making it difficult to keep tabs on everything at once.
What is Layer and how can it improve my FF&E workflow?
The Layer Revit Add-in makes it easy for multidisciplinary project teams to manage the process of selecting, specifying, and tracking FF&E as part of their Revit based workflows. FF&E items that have been placed in the model can be displayed in Layer where additional contextual information can be attached by non-Revit team members.
To put it more simply, designers and specifiers who don't know Revit can use Layer to fill out schedules in Revit.
How to get started
To get started, create a Layer account and start a Layer Project to which the Revit model will be attached. Then install the Layer add-in for Revit, available here. Once you've done that, follow these steps:
1. Attach your Revit model to Layer. Make sure to include all FF&E categories and the Rooms category.

2. In Layer, create an Element Name Template for the synced Revit categories to distinguish between instances of FF&E (i.e. Mark-Type). By default, Layer will display Revit Elements with the Type name only.

3. Create Display Revit Parameter fields as needed. Select the Room parameter to show what room the piece of equipment is in in Revit.

4. Create new fields for data that will be updated outside of Revit. These fields represent the data that will be "pushed" to Revit.
5. Create Revit Parameter Sync rules to connect Layer fields to Revit parameters.
6. Create Layer categories for Equipment and Furniture types. These categories represent the "catalog" of FF&E which will be used throughout the project. Consider fields such as a File Uploader field for cut sheets; Text fields for power and plumbing; and Text fields for the manufacturer, supplier, and cost information.

7. Create Related Element fields that connect to the Revit instance Elements to connect FF&E Types to the instances of FF&E. Create Lookup fields for the "type" information which needs to be visible within the instances of FF&E.
8. Output .csv or .xlsx reports as needed. Sort and filter data according to requirements in Excel.
9. Back in Revit, click the Dashboard button and the Live Link button on the Layer Revit Add-in. Select an instance of FF&E and the Layer Dashboard will display that Element's linked fields and files.

10. Click the Sync Parameters button on the Layer Revit Add-in to pull in the data fields mapped in Step 5 into Revit.
Need more help? Read this handy article Sync Layer Data to Revit Parameters or email help@layer.team and we'll get you set up for success.
Learn more about Layer
If you’d like to learn more about a flexible database tool like Layer, schedule a demo >
Tip: Layer users get unlimited access to best practice templates too!
Get Started Today
Want to see how Layer can transform the way your team works?
Get Started Today
Want to see how Layer can transform the way your team works?
Get Started Today
Want to see how Layer can transform the way your team works?
Solutions
Solutions
Solutions


