Architectural Design
Architectural Design
Architectural Design
Architectural Design Phases: Pre-Design and Starting the Revit Model
Architectural Design Phases: Pre-Design and Starting the Revit Model
Architectural Design Phases: Pre-Design and Starting the Revit Model
The key to saving time across a project is to capture data accurately the first time. Here are 4 tips during pre-design to get a few hours back throughout your project.

Jessica Wyman

Jessica Wyman

Jessica Wyman
Originally Published: Jun 2, 2023


Contents
Updated:Nov 19, 2025
Pre-Design in Architecture: Tips to Set Up Your Project for Success
As an architect or interior designer you're in the design business. You get paid for results, not sending emails or searching for information. Gathering information during pre-design usually means lots of back and forth via email, spreadsheets, and documents.
The key to saving time across a project is to capture data accurately the first time. The added bonus: You can connect to, and view everything in your Revit model at any time as your project progresses.
Here are 4 simple ways the Layer App can save you hours of time during pre-design:
1. Store site visit data & client questionnaires all in one place.
Design starts by using dark magic to understand how your clients will interact with their space. By "dark magic" I mean conducting client questionnaires to understand their wish lists, requirements, and pain points. This information is critical - it sets the tone for design decisions that you will make down the line. Don't let key client requests get lost in notepads or emails.
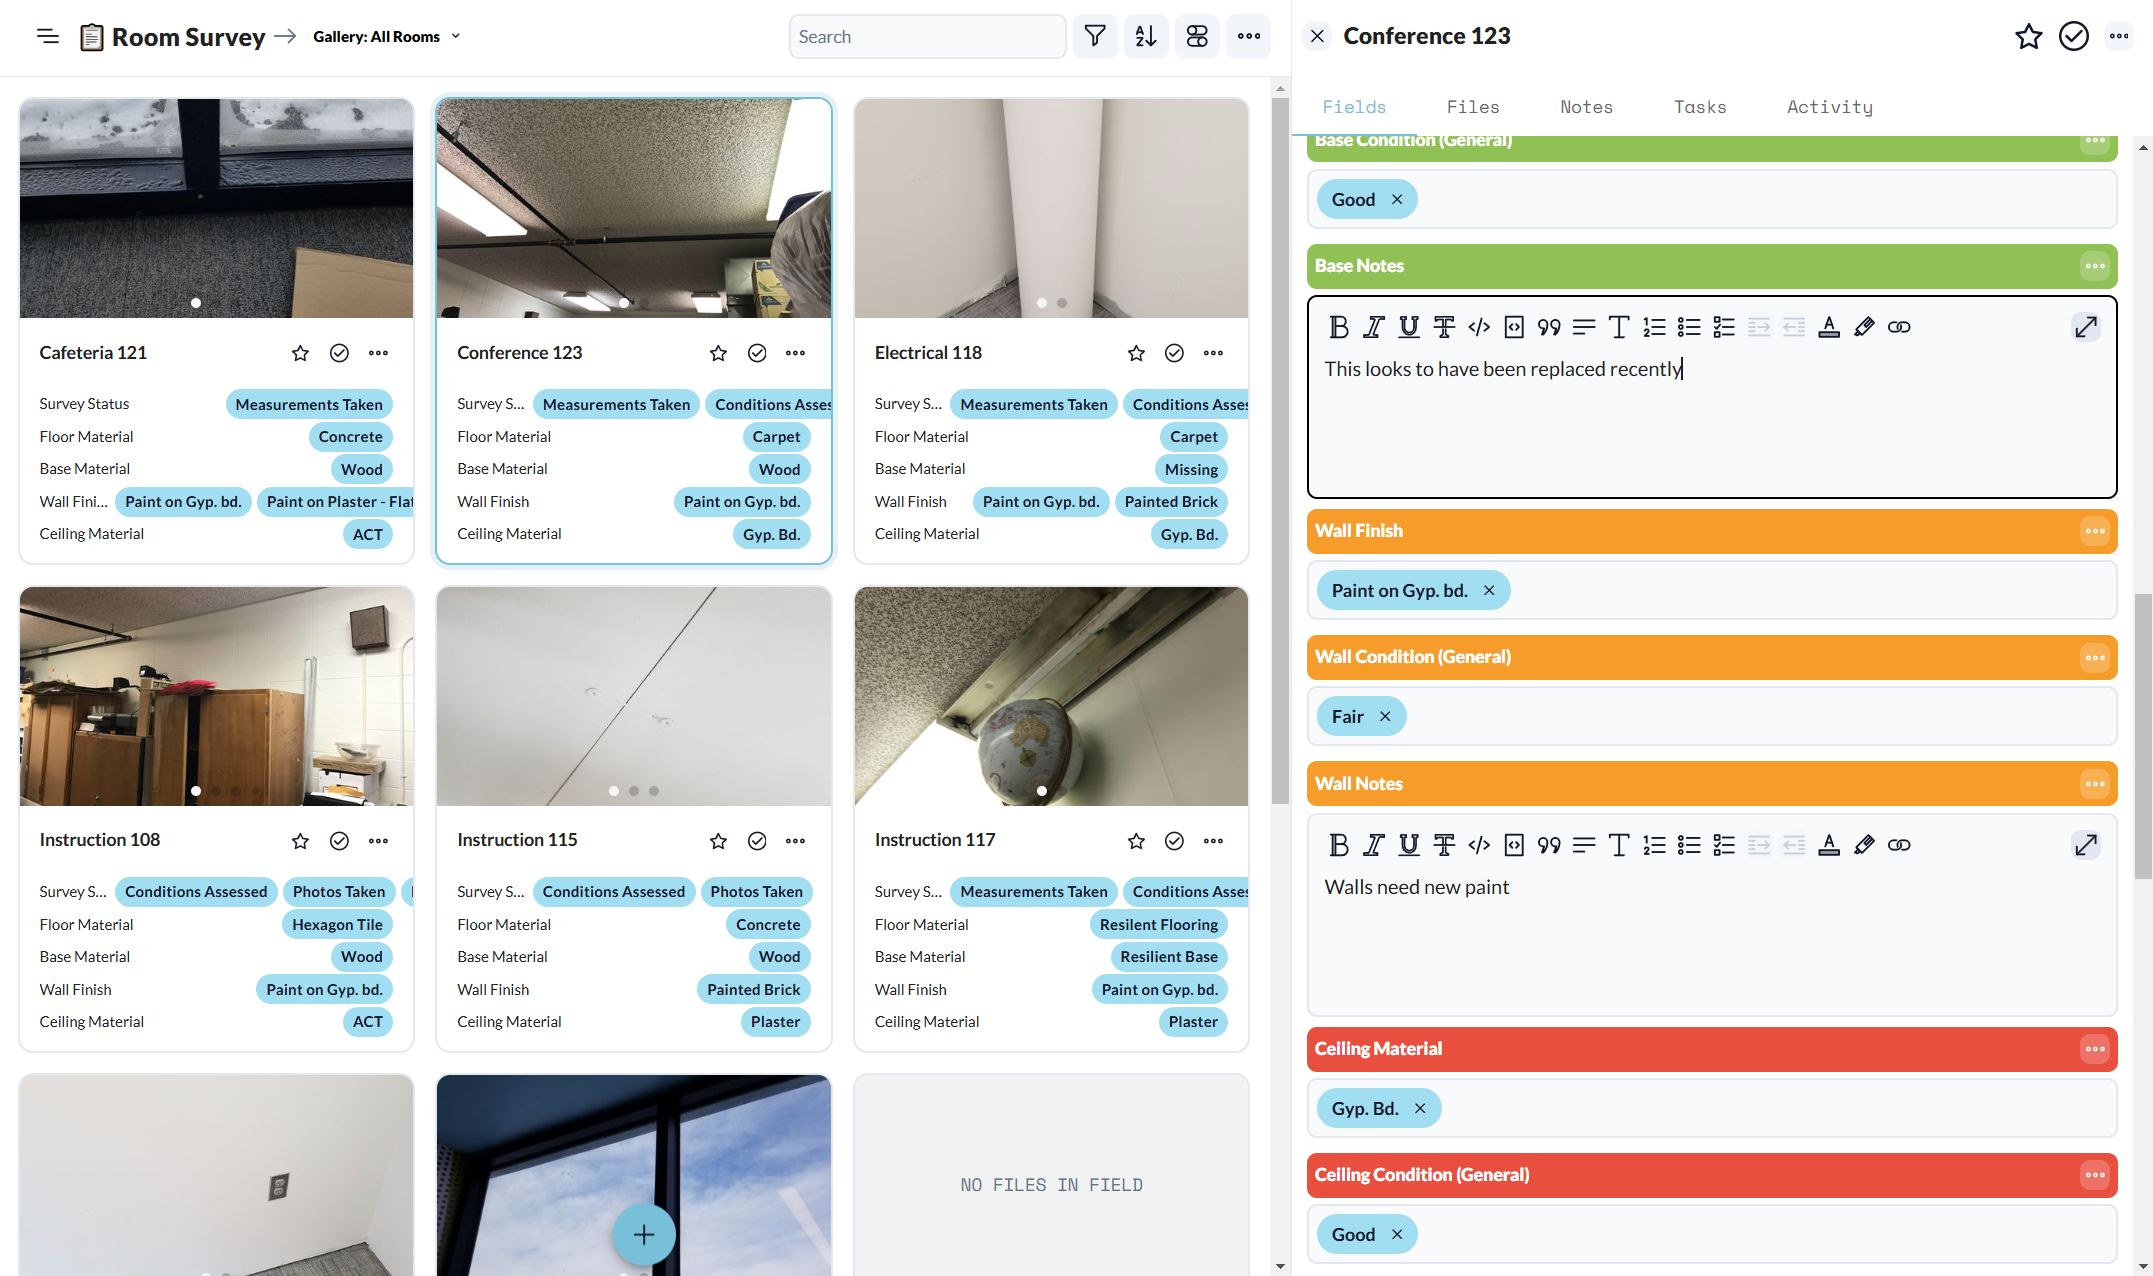
By configuration Layer's form fields into a survey, you can take notes directly in the Layer platform.
Here is an example of how you can use Layer to conduct an existing conditions study on the rooms in the project.

2. Keep a list of project stakeholders.
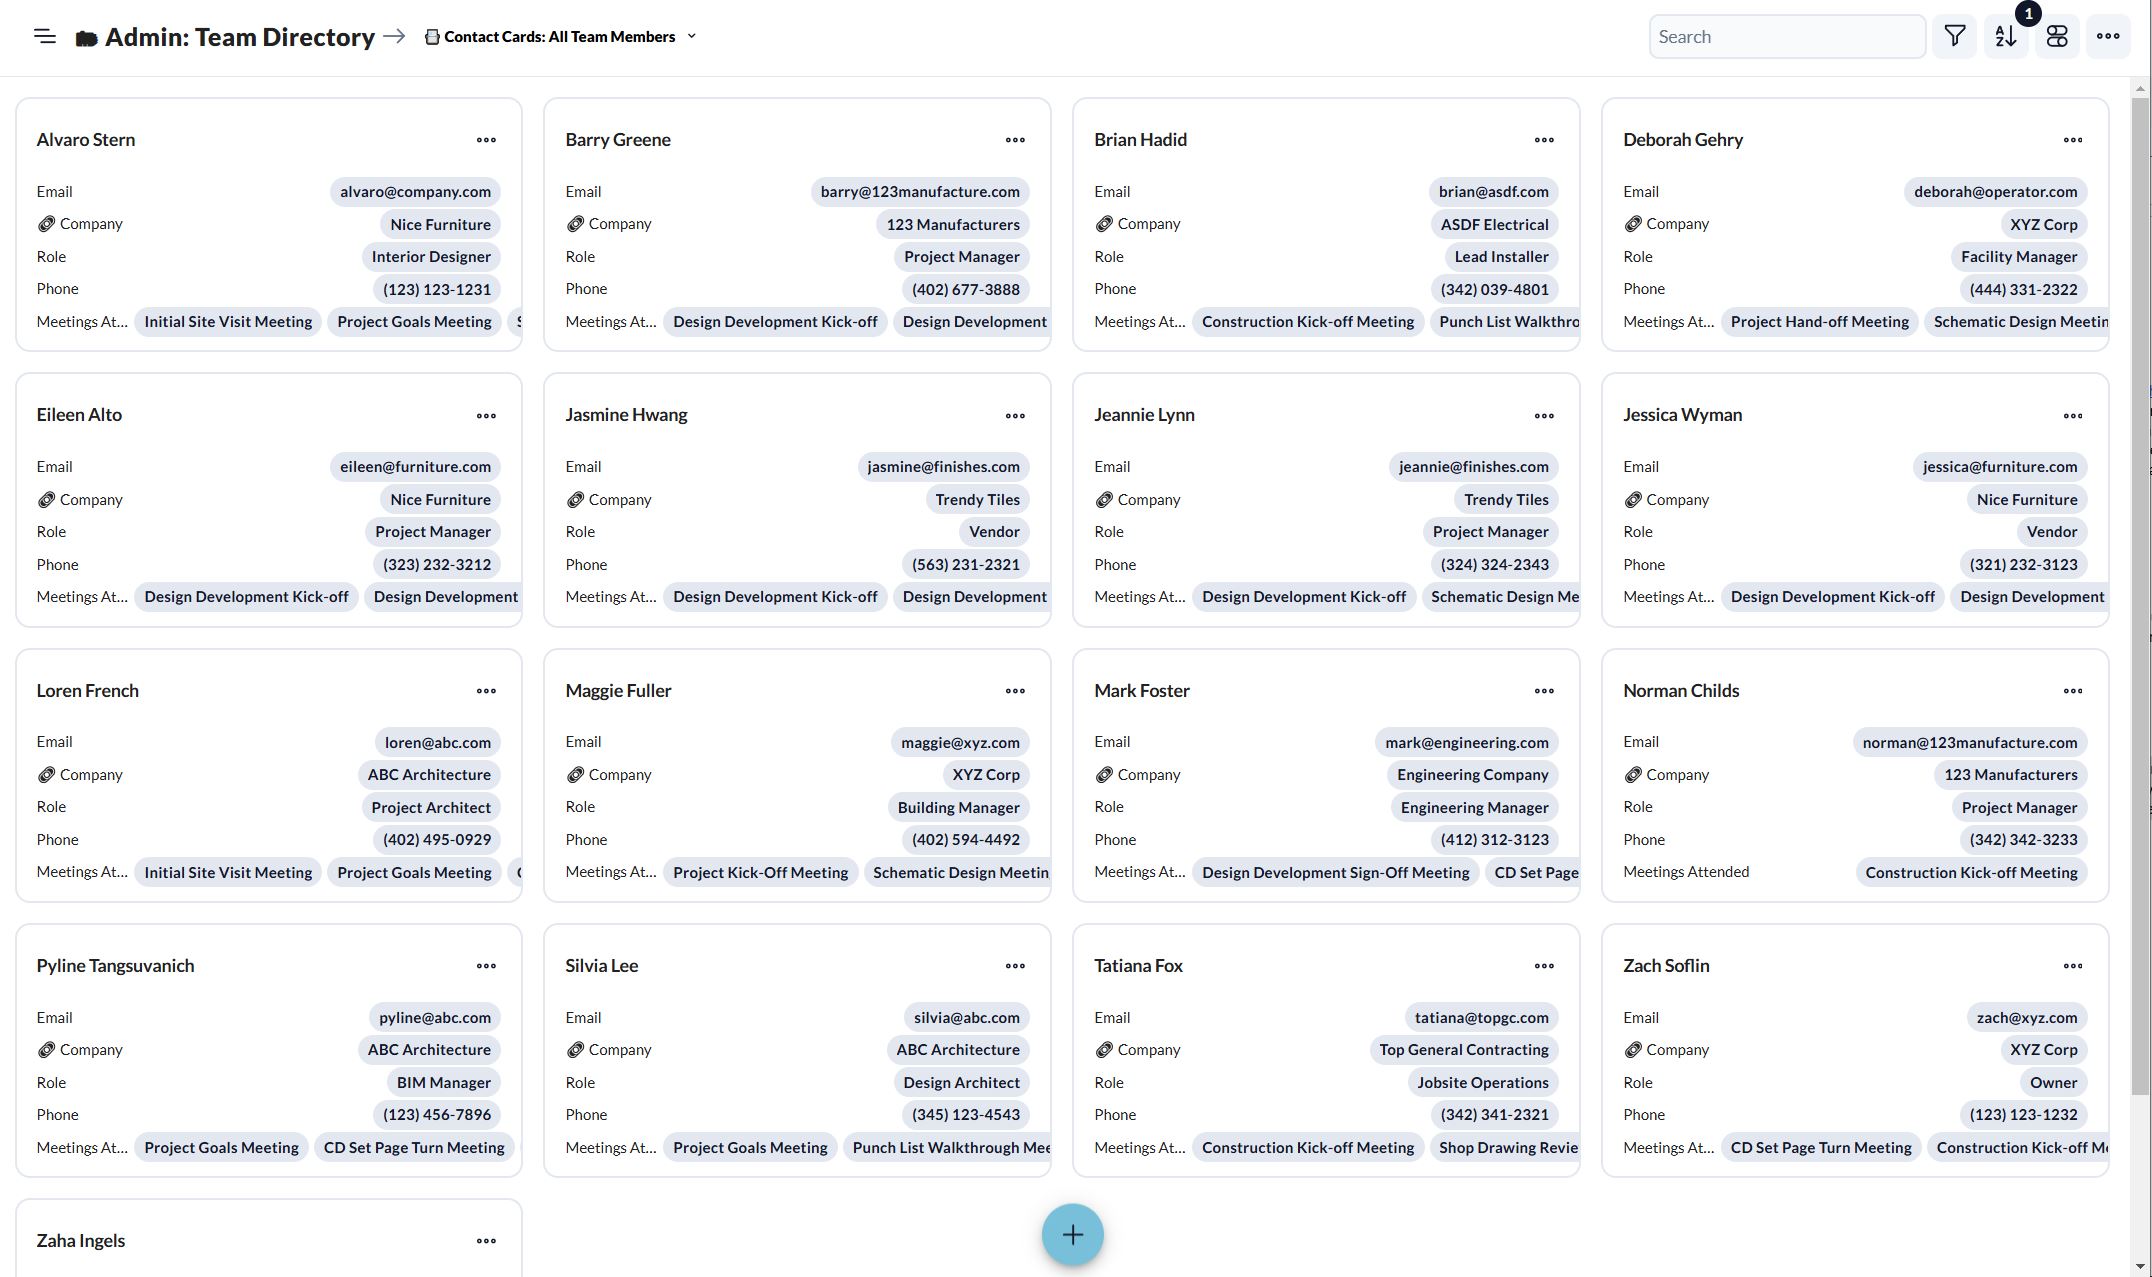
A lot of people are involved in any design and construction project. More often than not, there isn't a live spreadsheet with everyone's contact information. Let Layer serve as your home base to organize your data, including your project team members.
You can create a Layer Category to serve as your Project Directory. This is a great way to store names, contact information, and roles in a single place. You can even invite your stakeholders to view and add information to your project as it progresses.
Read more about how to add external collaborators to your Layer project here.

3. Make your meeting minutes work for you.
It’s essential that meeting minutes capture everything you need to move a project forward. Documenting why decisions were made allow you to confidently move on to the next task at hand without second guessing whether or not it will satisfy the client's request.
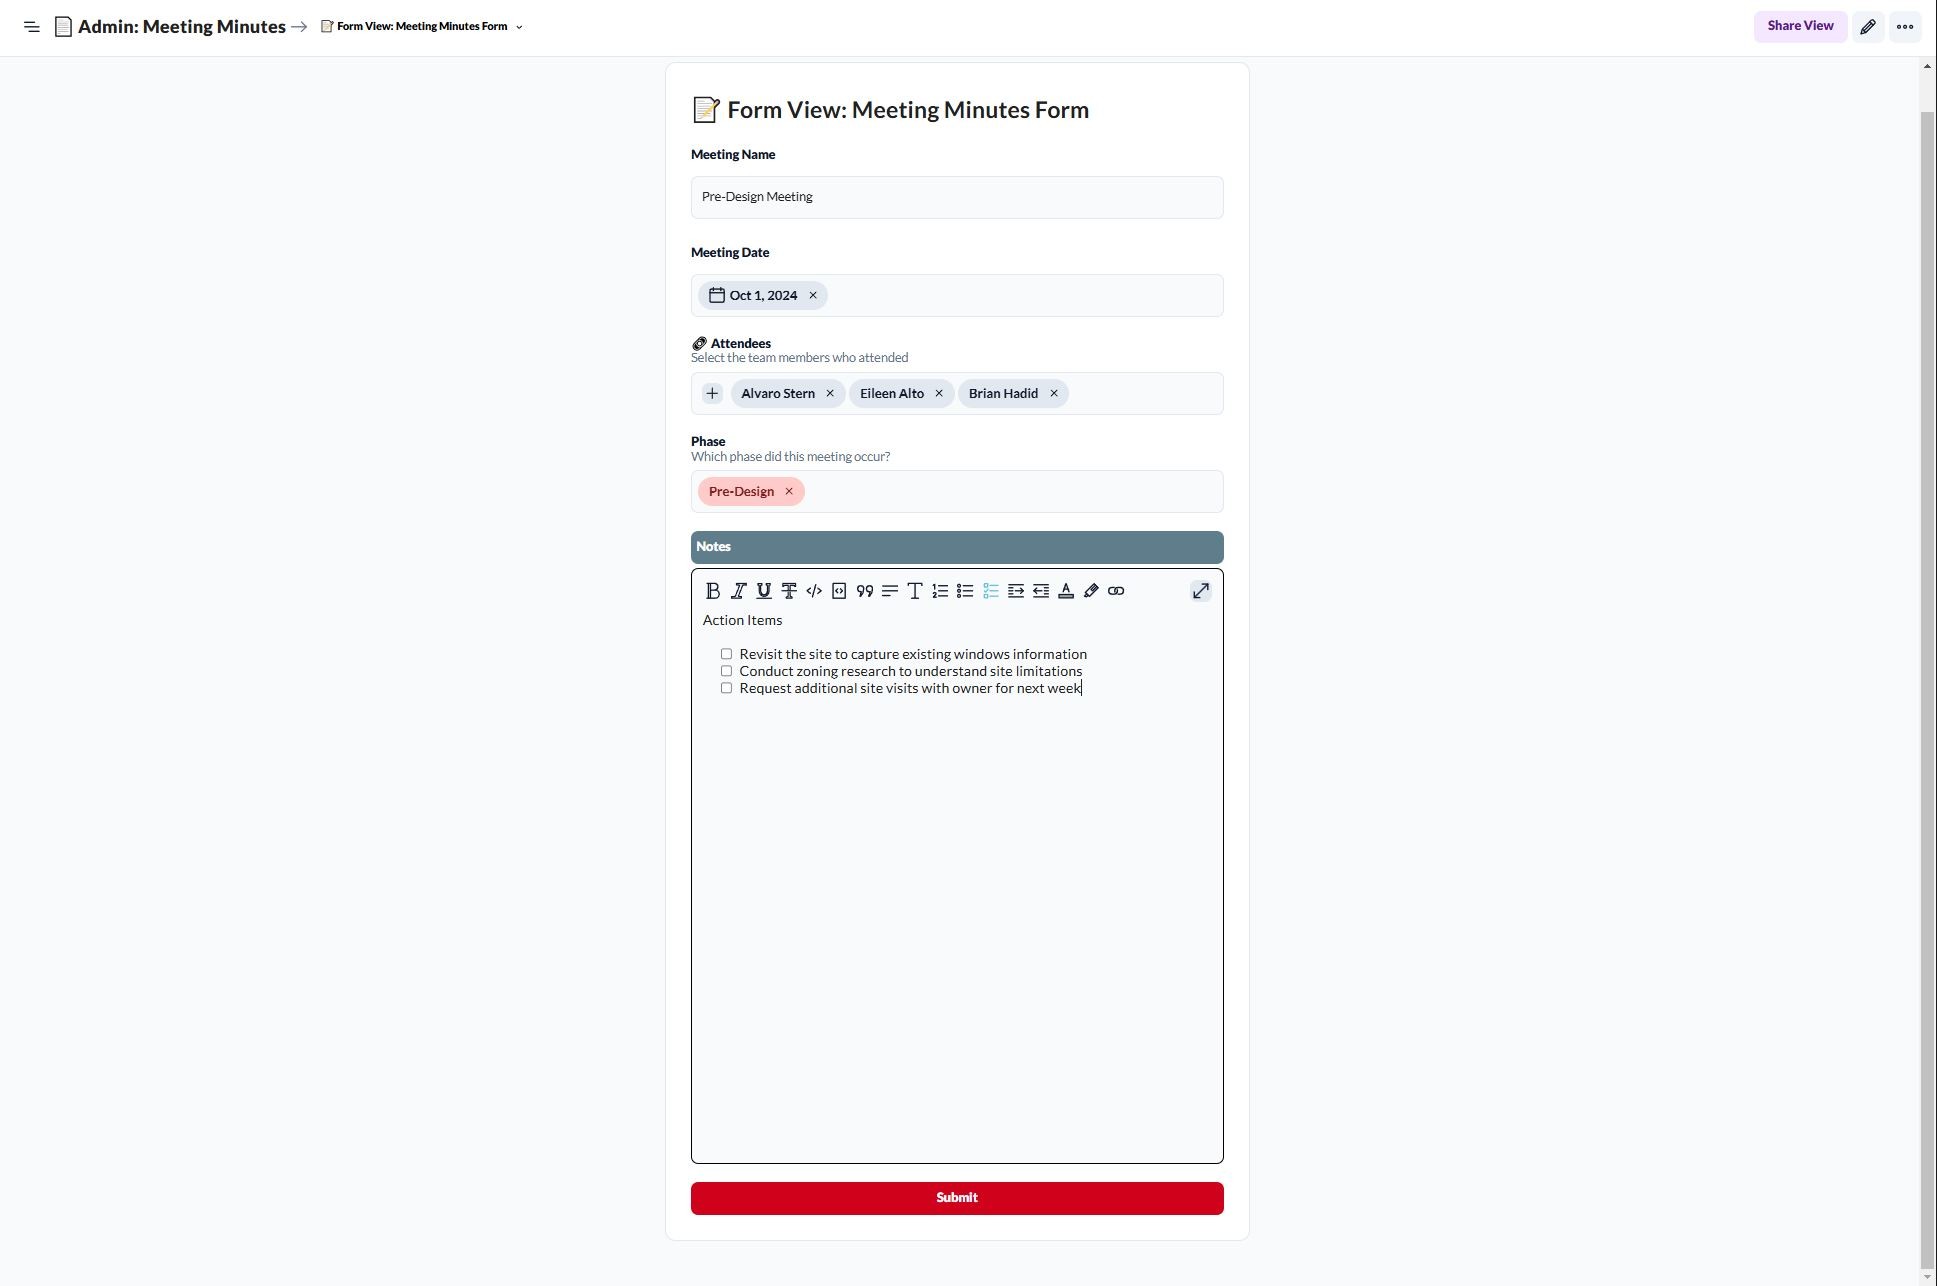
Using Layer for meeting minutes helps keep everyone accountable for their decisions. It also makes it easy to communicate changes from the meeting to team members not in attendance.
Track decisions from meeting to meeting with all of your meetings in one Category. The power of Layer is that you can tag attendees from your Project Directory. This creates a direct link between the project team members and your meeting minutes.

4. Use Layer with Revit during the Pre-Design Phase
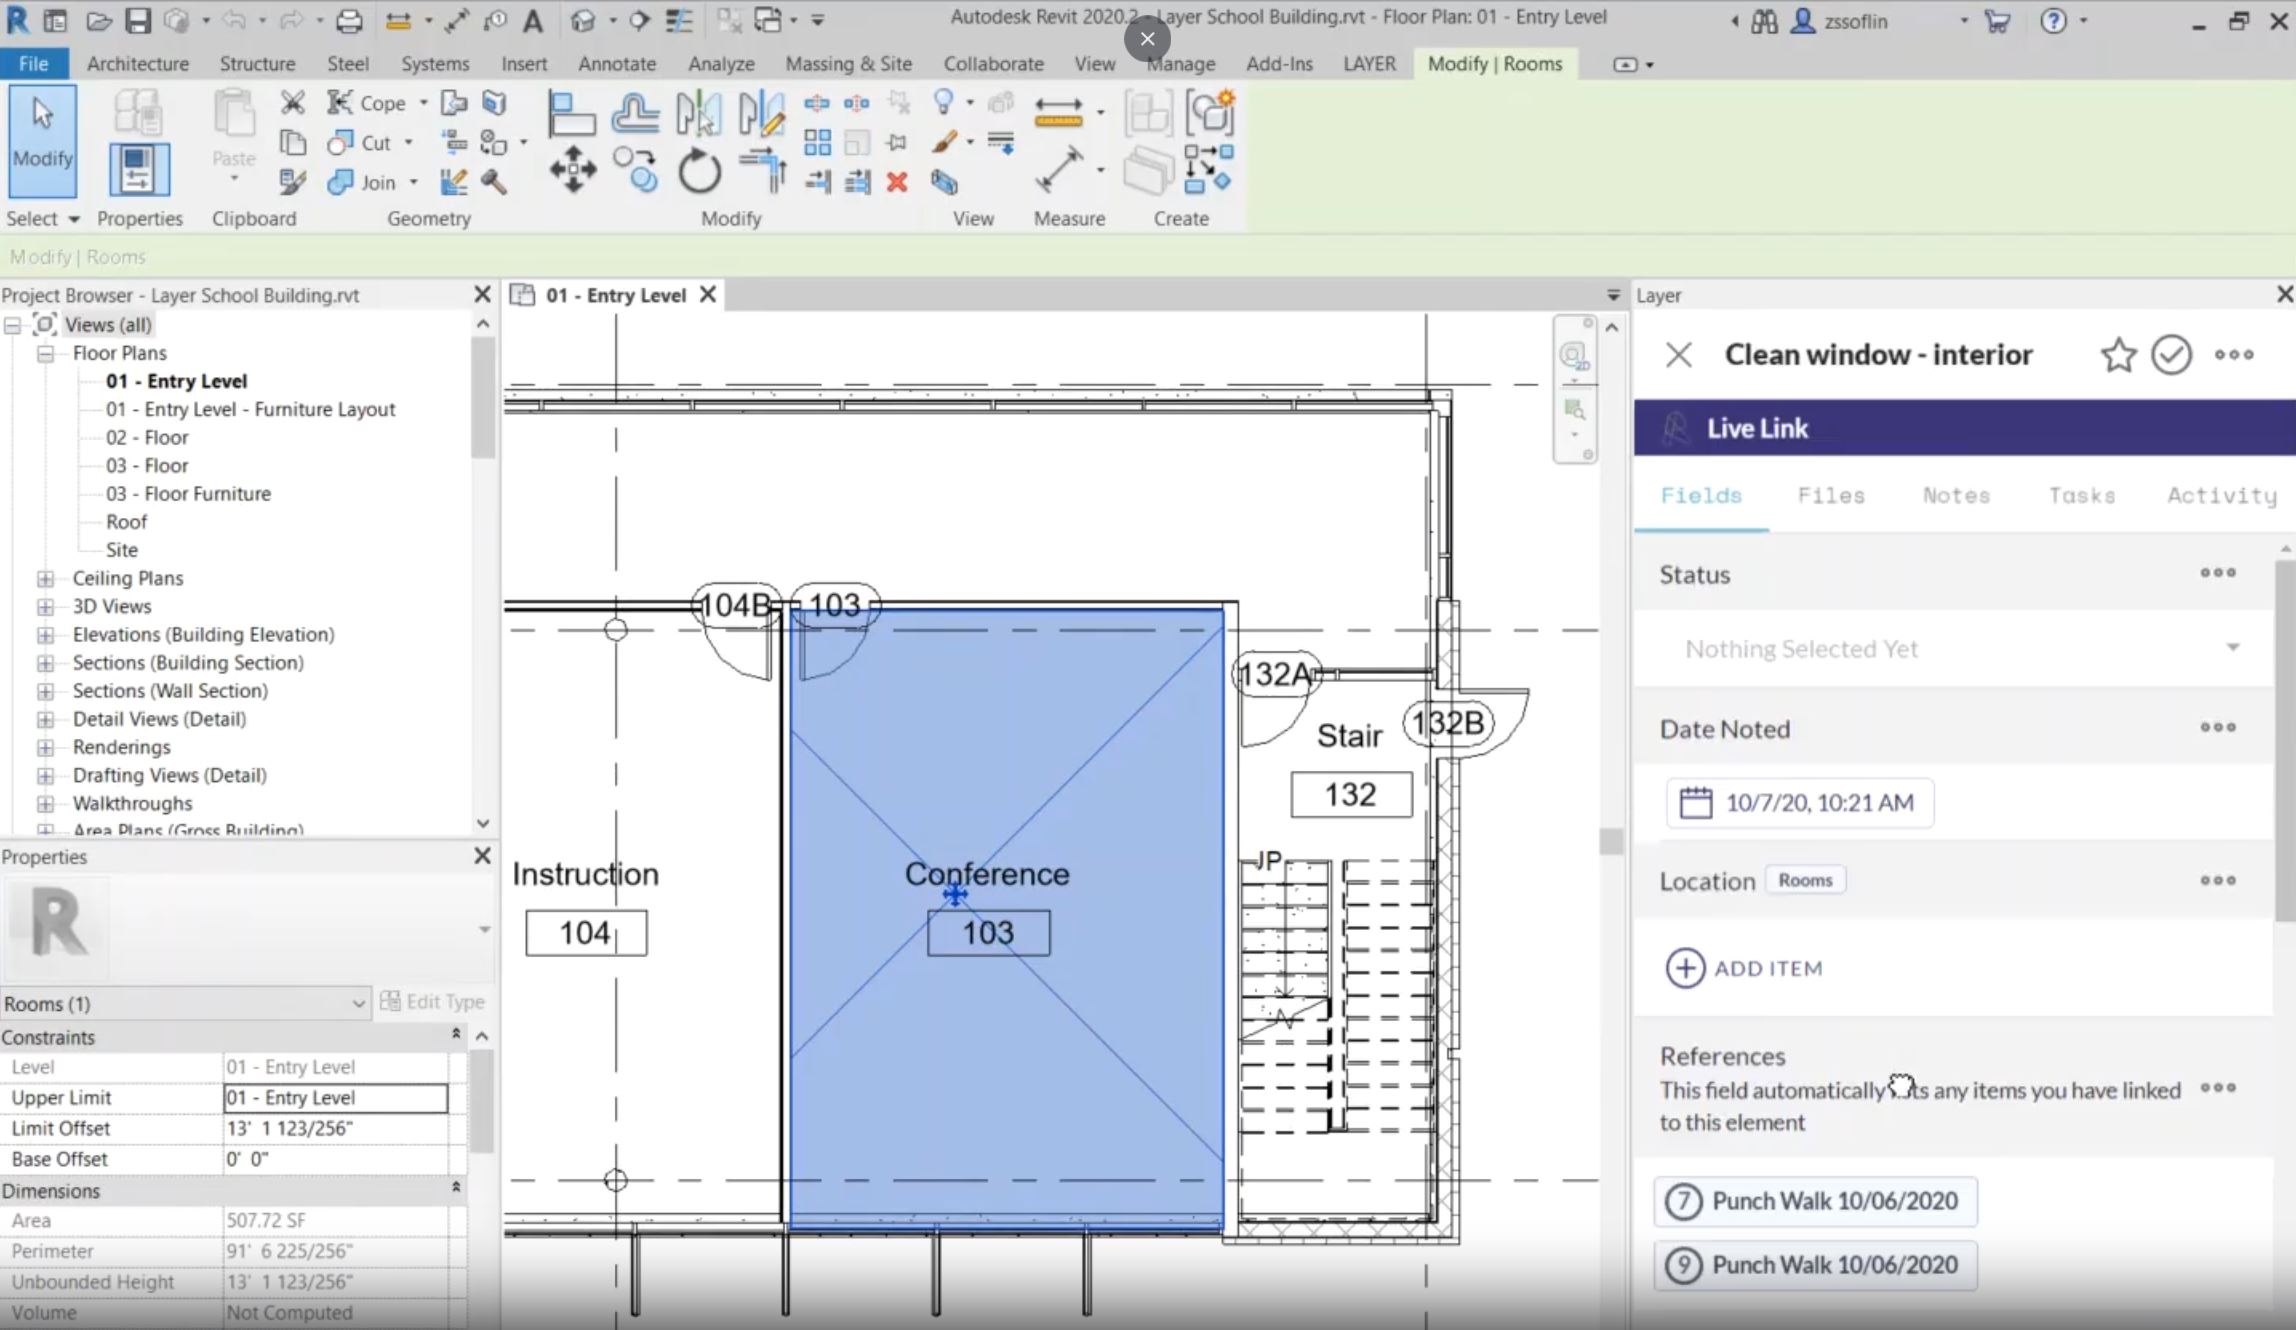
Layer is a flexible database. Flexible databases are digital tools that make it easy to capture and store building data in an organized manner. Revit limits the kind of data you can attach to a model. You can install Layer as a plug-in for Revit. With this, you can add information like images, files, meeting minutes and you can surface that data right in your Revit model.

It’s surprising how much time we spend searching for or recreating data we need to do our work.
Data can come in all forms at any time of the day.
It’s imperative to be intentional about where we capture and store this data to be truly efficient. The added bonus of using Layer is that once this information is captured, you can connect it all to Revit. This makes it even easier to access everything you need as your project progresses to the next phase, like Schematic Design.
Pre-Design in Architecture: Tips to Set Up Your Project for Success
As an architect or interior designer you're in the design business. You get paid for results, not sending emails or searching for information. Gathering information during pre-design usually means lots of back and forth via email, spreadsheets, and documents.
The key to saving time across a project is to capture data accurately the first time. The added bonus: You can connect to, and view everything in your Revit model at any time as your project progresses.
Here are 4 simple ways the Layer App can save you hours of time during pre-design:
1. Store site visit data & client questionnaires all in one place.
Design starts by using dark magic to understand how your clients will interact with their space. By "dark magic" I mean conducting client questionnaires to understand their wish lists, requirements, and pain points. This information is critical - it sets the tone for design decisions that you will make down the line. Don't let key client requests get lost in notepads or emails.
By configuration Layer's form fields into a survey, you can take notes directly in the Layer platform.
Here is an example of how you can use Layer to conduct an existing conditions study on the rooms in the project.

2. Keep a list of project stakeholders.
A lot of people are involved in any design and construction project. More often than not, there isn't a live spreadsheet with everyone's contact information. Let Layer serve as your home base to organize your data, including your project team members.
You can create a Layer Category to serve as your Project Directory. This is a great way to store names, contact information, and roles in a single place. You can even invite your stakeholders to view and add information to your project as it progresses.
Read more about how to add external collaborators to your Layer project here.

3. Make your meeting minutes work for you.
It’s essential that meeting minutes capture everything you need to move a project forward. Documenting why decisions were made allow you to confidently move on to the next task at hand without second guessing whether or not it will satisfy the client's request.
Using Layer for meeting minutes helps keep everyone accountable for their decisions. It also makes it easy to communicate changes from the meeting to team members not in attendance.
Track decisions from meeting to meeting with all of your meetings in one Category. The power of Layer is that you can tag attendees from your Project Directory. This creates a direct link between the project team members and your meeting minutes.

4. Use Layer with Revit during the Pre-Design Phase
Layer is a flexible database. Flexible databases are digital tools that make it easy to capture and store building data in an organized manner. Revit limits the kind of data you can attach to a model. You can install Layer as a plug-in for Revit. With this, you can add information like images, files, meeting minutes and you can surface that data right in your Revit model.

It’s surprising how much time we spend searching for or recreating data we need to do our work.
Data can come in all forms at any time of the day.
It’s imperative to be intentional about where we capture and store this data to be truly efficient. The added bonus of using Layer is that once this information is captured, you can connect it all to Revit. This makes it even easier to access everything you need as your project progresses to the next phase, like Schematic Design.
Get Started Today
Want to see how Layer can transform the way your team works?
Get Started Today
Want to see how Layer can transform the way your team works?
Get Started Today
Want to see how Layer can transform the way your team works?
Solutions
Solutions
Solutions


