Learn how to create and customize views in Layer, apply filters and sorts, save or share views, and generate shared links or embed code for external collaboration.

Zach Soflin
Wednesday, January 28, 2026
Create a New View
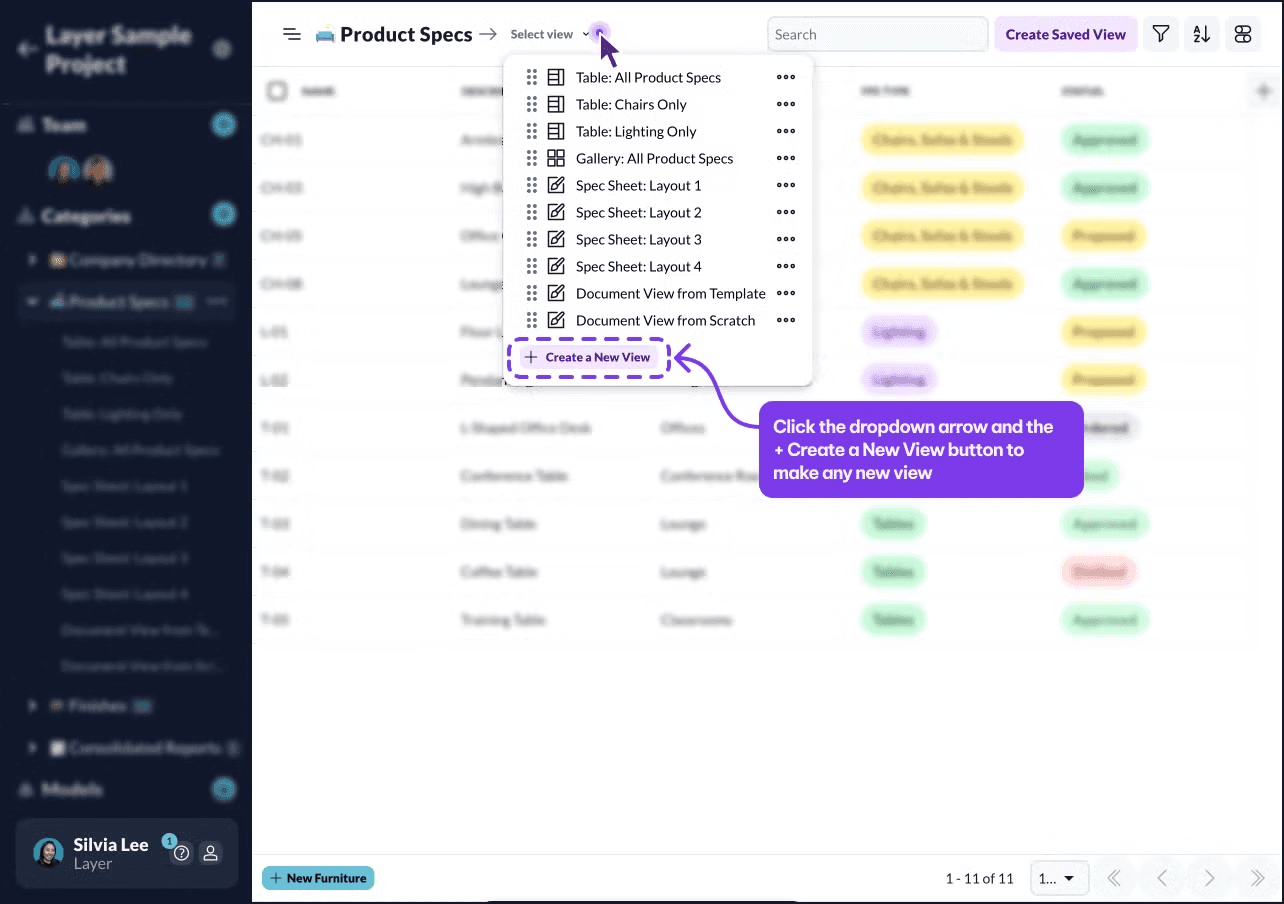
New views can be created by clicking the arrow next to Select view and + Create a New View as seen below.

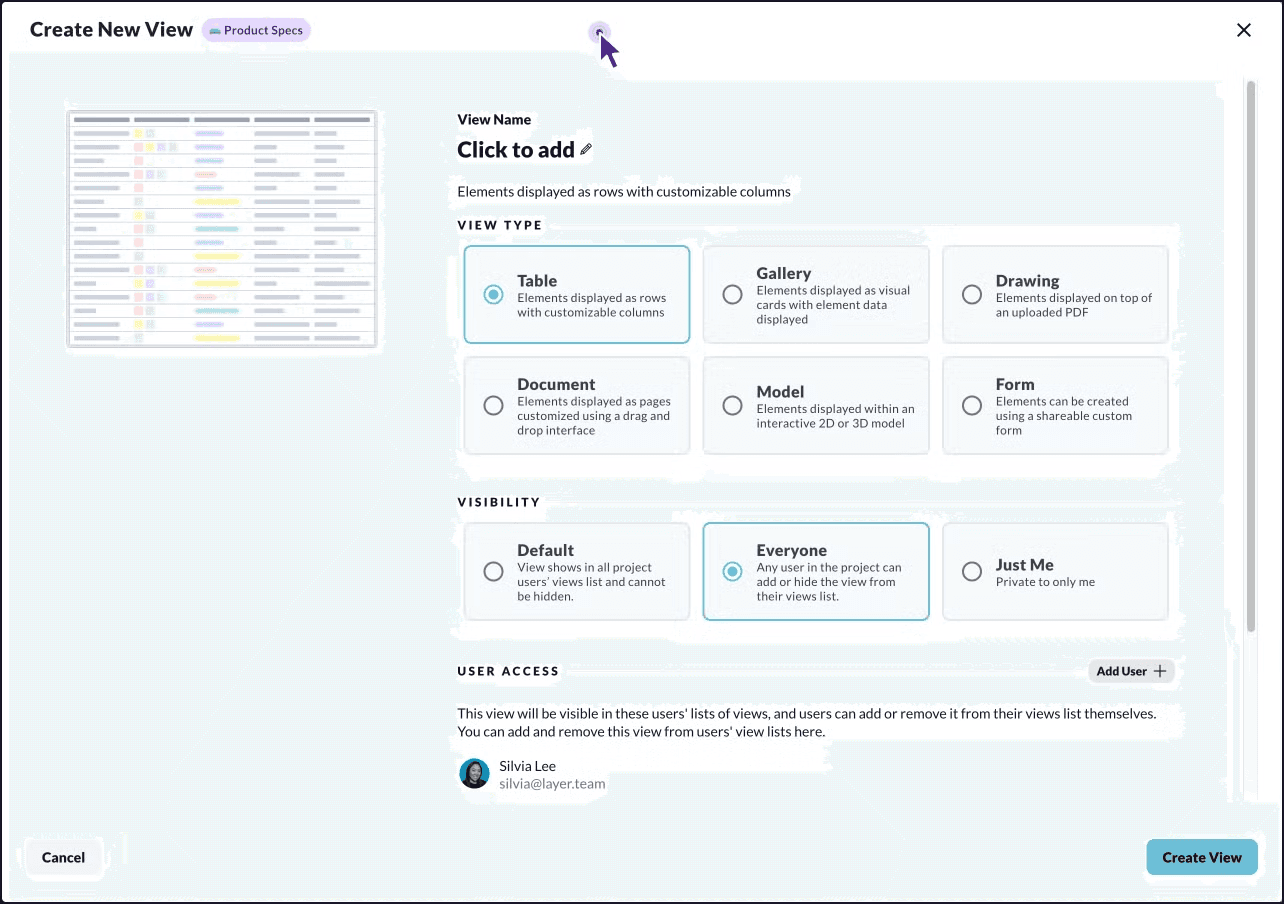
You will see options to create any of our 6 different view types, and what the visibility setting will be for each. Visibility settings can be changed later on when you edit your view settings.

Visibility
There are three options for View Visibility:
Default - View shows in all project users' views list and cannot be hidden.
Views with the default setting will be shown in all users' view lists. These views cannot be added or removed by individual users.
Everyone - Any user in the project can add or hide the view from their views list.
Any new view created will be set to a visibility of Everyone unless it is changed.
Views set to Everyone can be added by everyone but will not automatically be added to users' view lists. For that, use the Default setting.
Just Me - Private to only me
Views created with this visibility setting will only be seen by your account. It will not be visible to others or able to be added.
Filtering
Individual views can have filtered applied to only show specific elements.
In a view, click on the filter icon in the top right which will open a window that allows for filters to be added
In that window, click on the Add Filter. This will open a blank filter that has an option for what field, the clause, and the value.
💡 Ex: To filter the view to only elements created before January 1st, 2023, this is what it would look like:
Field: Created At Clause: Is Before Value: 01/01/2023
Sorting
In a view, click on the sort icon in the top right which will open a window that allows for sorting on elements.
In that window, click on the Add Sort. This will open a blank sort that has the option for what field to sort and sort direction.
💡 Ex: To sort by the date the element was created with most recent at the top, this is what it would look like:
Field: Created At Direction: Descending
Saving
Once you have filters or sorts, you can choose to save the view so they will always have those filters or sorts applied.
Once you have a sort or filter created, there will be an option to save the changes in the top of the view. Clicking on the Save Changes will save the changes to the current view.
If you want to duplicate the view with the applied sorts or filters, you can click the dropdown next to the Save Changes button which will open a menu where you can Save Changes, Save as New which will duplicate the view, or Discard Changes which will remove the applied filters or sorts.
Shared Views
Shared views allow someone without a license to see your data.
1. To share a view first you need to open the share view dialog which can be done two different ways
By clicking on the three dot menu button to the right of the view name on the menu panel on the left side of the page and then clicking Share View
If you already inside the view you want to share, on the top right of the screen you can click the three dot menu button and click the Share View
2. This will open a new window which gives you the option to create a link to share, add in emails to send the link to others, or embed the view into other pages like Notion for example.
To generate a link to share you can switch the toggle to Share via secret link, a link will be revealed and you are now able to copy the link to pass on. In the future, if you want to control the access, you can either toggle off access to the link, or generate a new link, which will invalidate the previous one.
To share via email, you can enter email addresses into the input under Share With Specific People which will send them an email with a link to the view. After someone’s email has been added, you will be able to see that they were sent an email with the link to that view
To embed a shared view, click the Embed tab and then switch the toggle for Embed Code, a code snippet will appear and you can copy that into a website or document such as notion.

