Surveys & Assessments
You're going on site to document existing conditions, which method should you use?


Capturing Existing Site Conditions: A Guide for Architects and Designers
Documenting existing site conditions is one of the most important steps in any project, whether you are working on a renovation, an adaptive reuse project, or ground-up construction. Accurate and accessible field data gives your team a source of truth they can rely on for programming, scope development, code analysis, budgeting, and early coordination.
This guide explains what existing site conditions are, how architects document them, and how to select the right survey methods and tools for your project.
What Are Existing Site Conditions?
Existing site conditions include all physical characteristics of a building or site at the start of a project. This includes structure, walls, systems, circulation, exterior context, and the condition of materials, finishes, and equipment. Many surveys also identify existing furnishings, fixtures, and equipment.
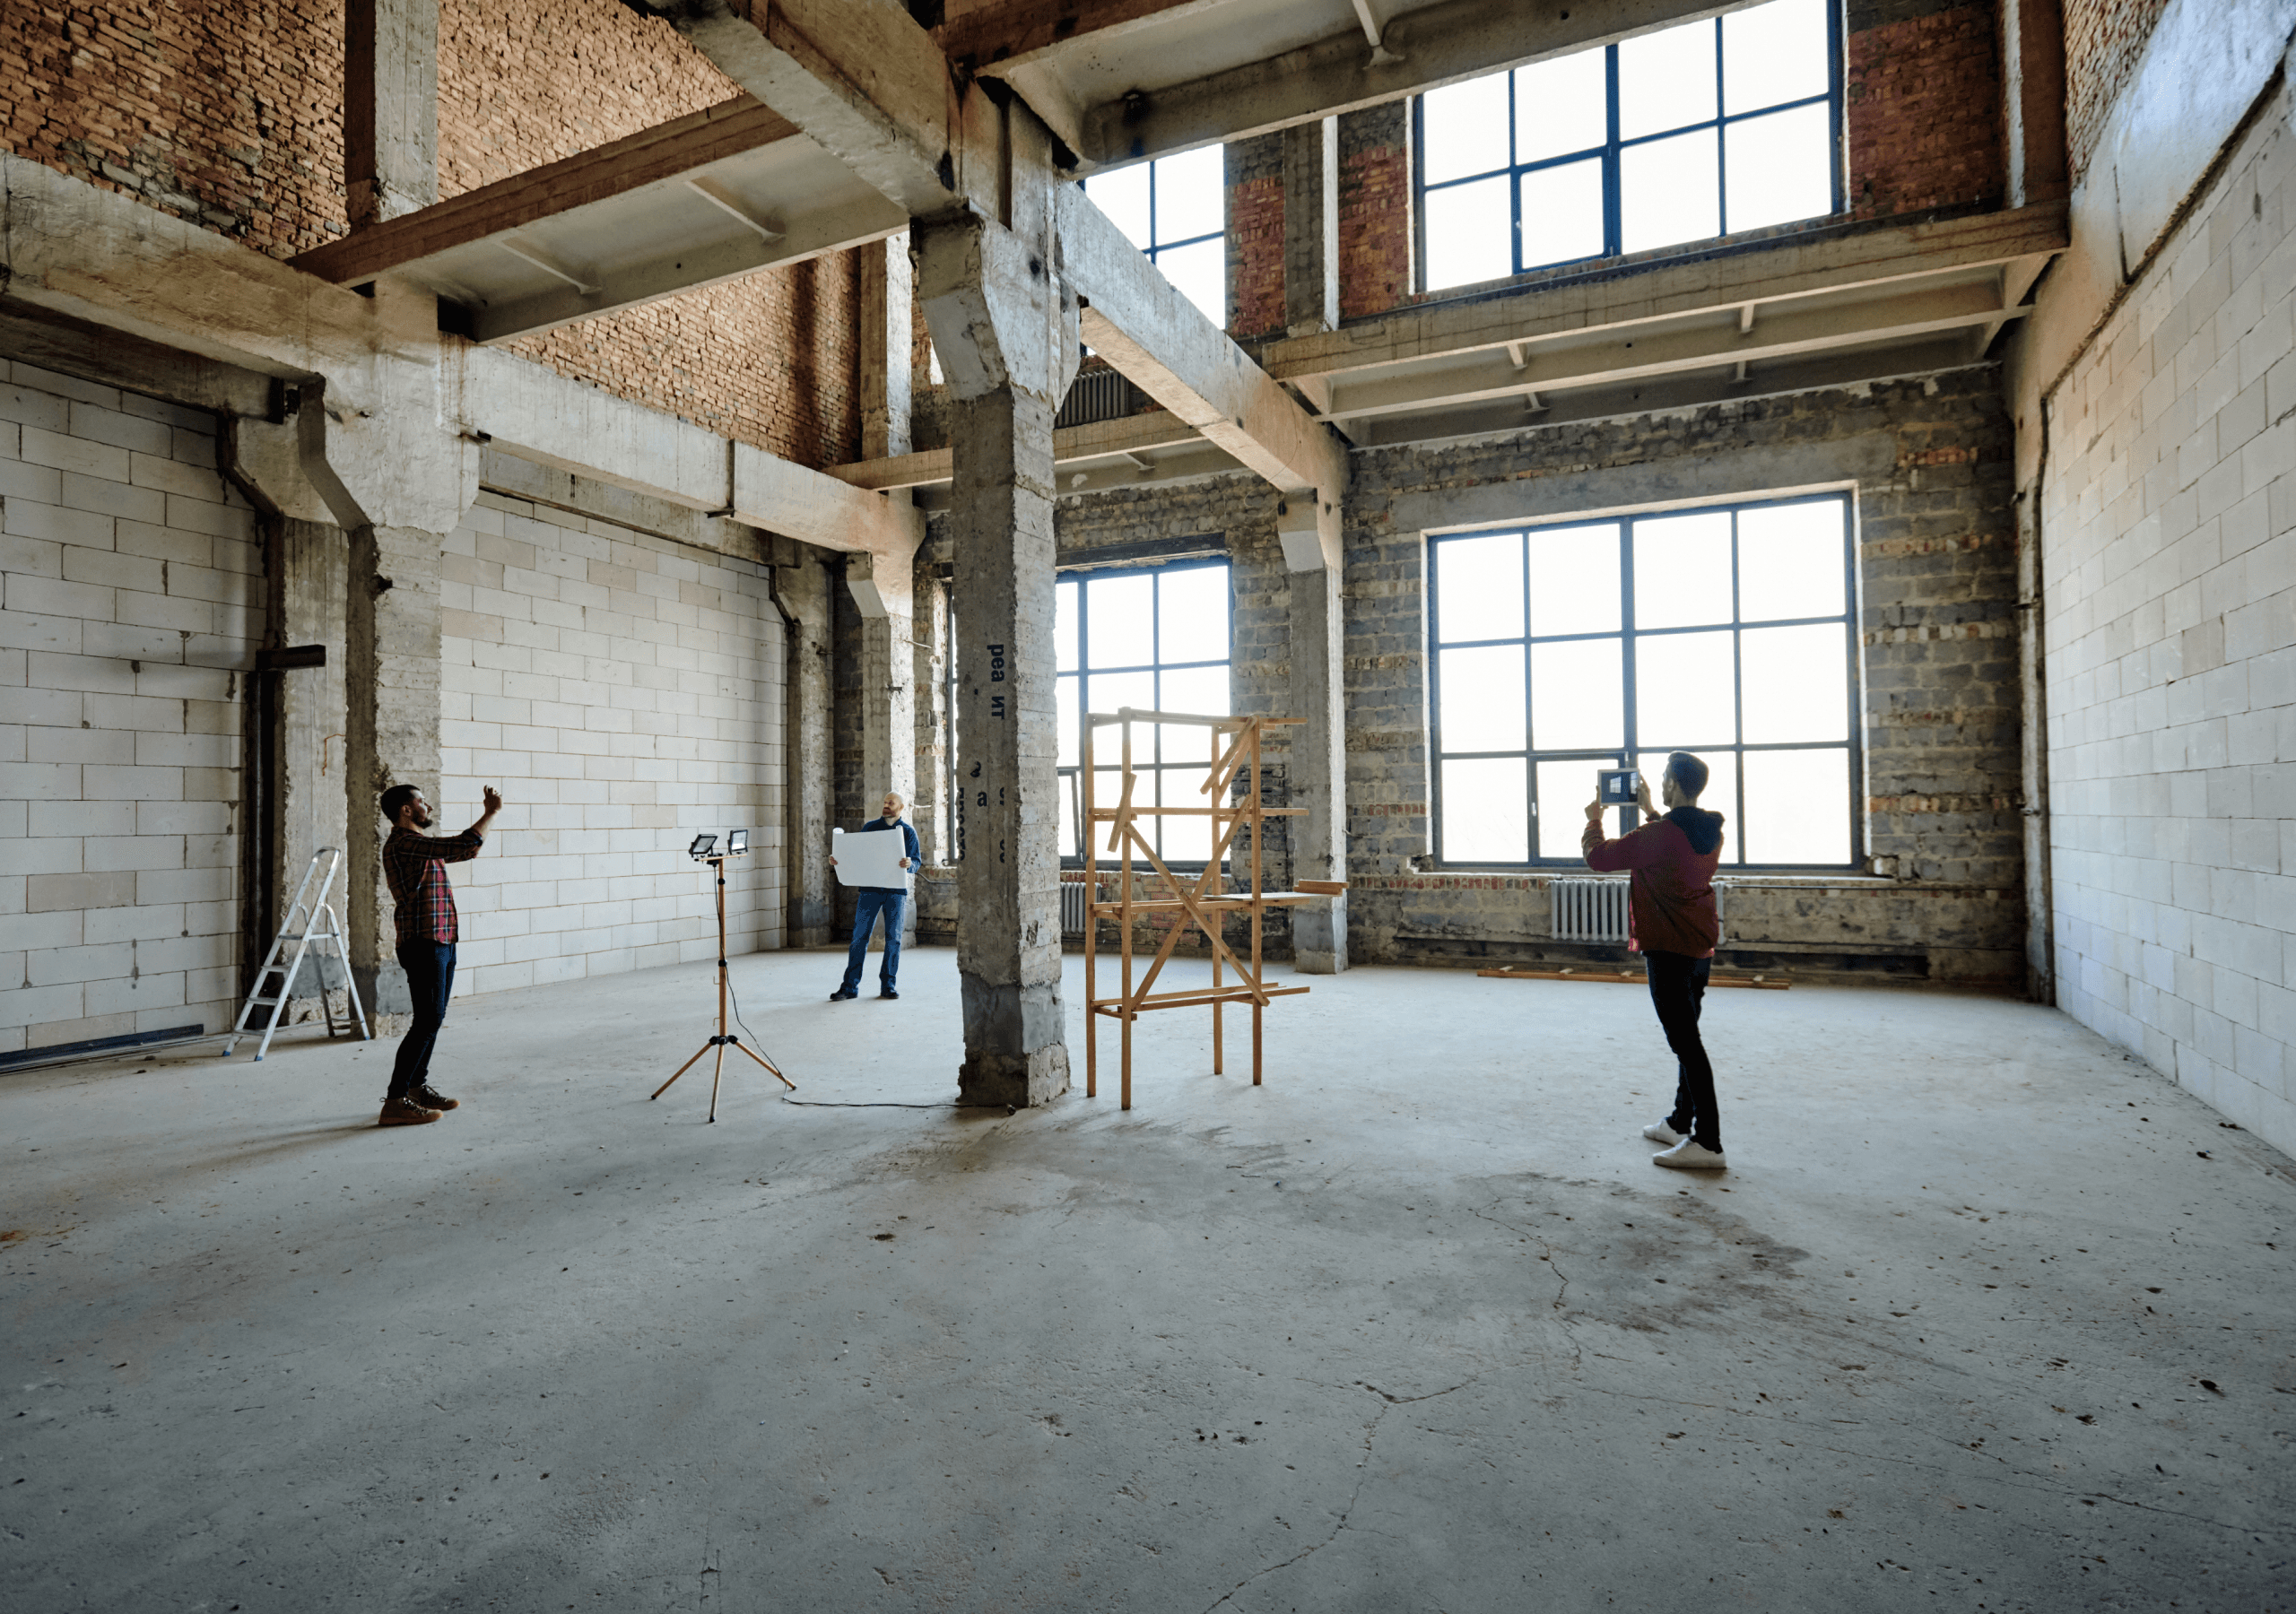
An architect capturing existing site conditions on a tablet during a building walkthrough.
Accurate existing conditions documentation supports programming, design development, code and zoning analysis, cost estimating, existing conditions modeling, and the production of existing conditions models or drawings. It also reduces rework by limiting field discrepancies that later become RFIs.
Why Existing Conditions Matter
Architects rely on existing conditions surveys to understand constraints and opportunities before design begins. Without this baseline, teams risk making incorrect assumptions about geometry, structure, utilities, or clearances. These issues often don’t surface until construction, when changes are more costly and disruptive.
Capturing existing conditions creates a centralized reference of the building’s layout and systems. With accurate floor and ceiling dimensions, project teams can trust area calculations used in programming, test fits, and code compliance. Real room dimensions also support reliable room data sheets early in the project, which streamlines planning and coordination.
A complete conditions model allows teams to identify ADA issues, exit path problems, and other code violations before documentation progresses. Including structural and MEP information reduces conflicts during design coordination and makes demolition planning more precise. This level of clarity minimizes RFIs during construction because existing constraints have already been addressed.
Beyond the current project, having a model of the building in place supports future renovations and long-term facility management. Teams can return to this model as a source of truth for space planning, systems upgrades, and capital improvement projects.
Common Methods to Document Existing Site Conditions
Below are four common approaches used by architects, interior designers, and contractors. Each method serves a different project scale, budget, and accuracy requirement.
1. Static Site Surveys
Many teams still rely on basic tools like a tape measure, the Notes app, or a shared Word doc to capture site data. Photos are stored in phone galleries, and notes are typed or handwritten without a consistent format. While accessible, this approach makes it difficult to organize and align information with drawings or models later.
Pros
Accessible: Most people already have a phone or laptop available to take notes and photos. For very small projects or quick walkthroughs, this approach can work with minimal setup.
Cons
Time-consuming: After the visit, data must be manually sorted, labeled, and entered into digital drawings or models. This extra step often offsets any time saved on site.
Inconsistent: Without standardized fields or templates, data quality depends on individual habits. Notes may be incomplete, unstructured, or difficult for others to interpret.
Disconnected: Photos, notes, and measurements are not linked to specific locations or model elements, which creates friction during documentation, modeling, or coordination.
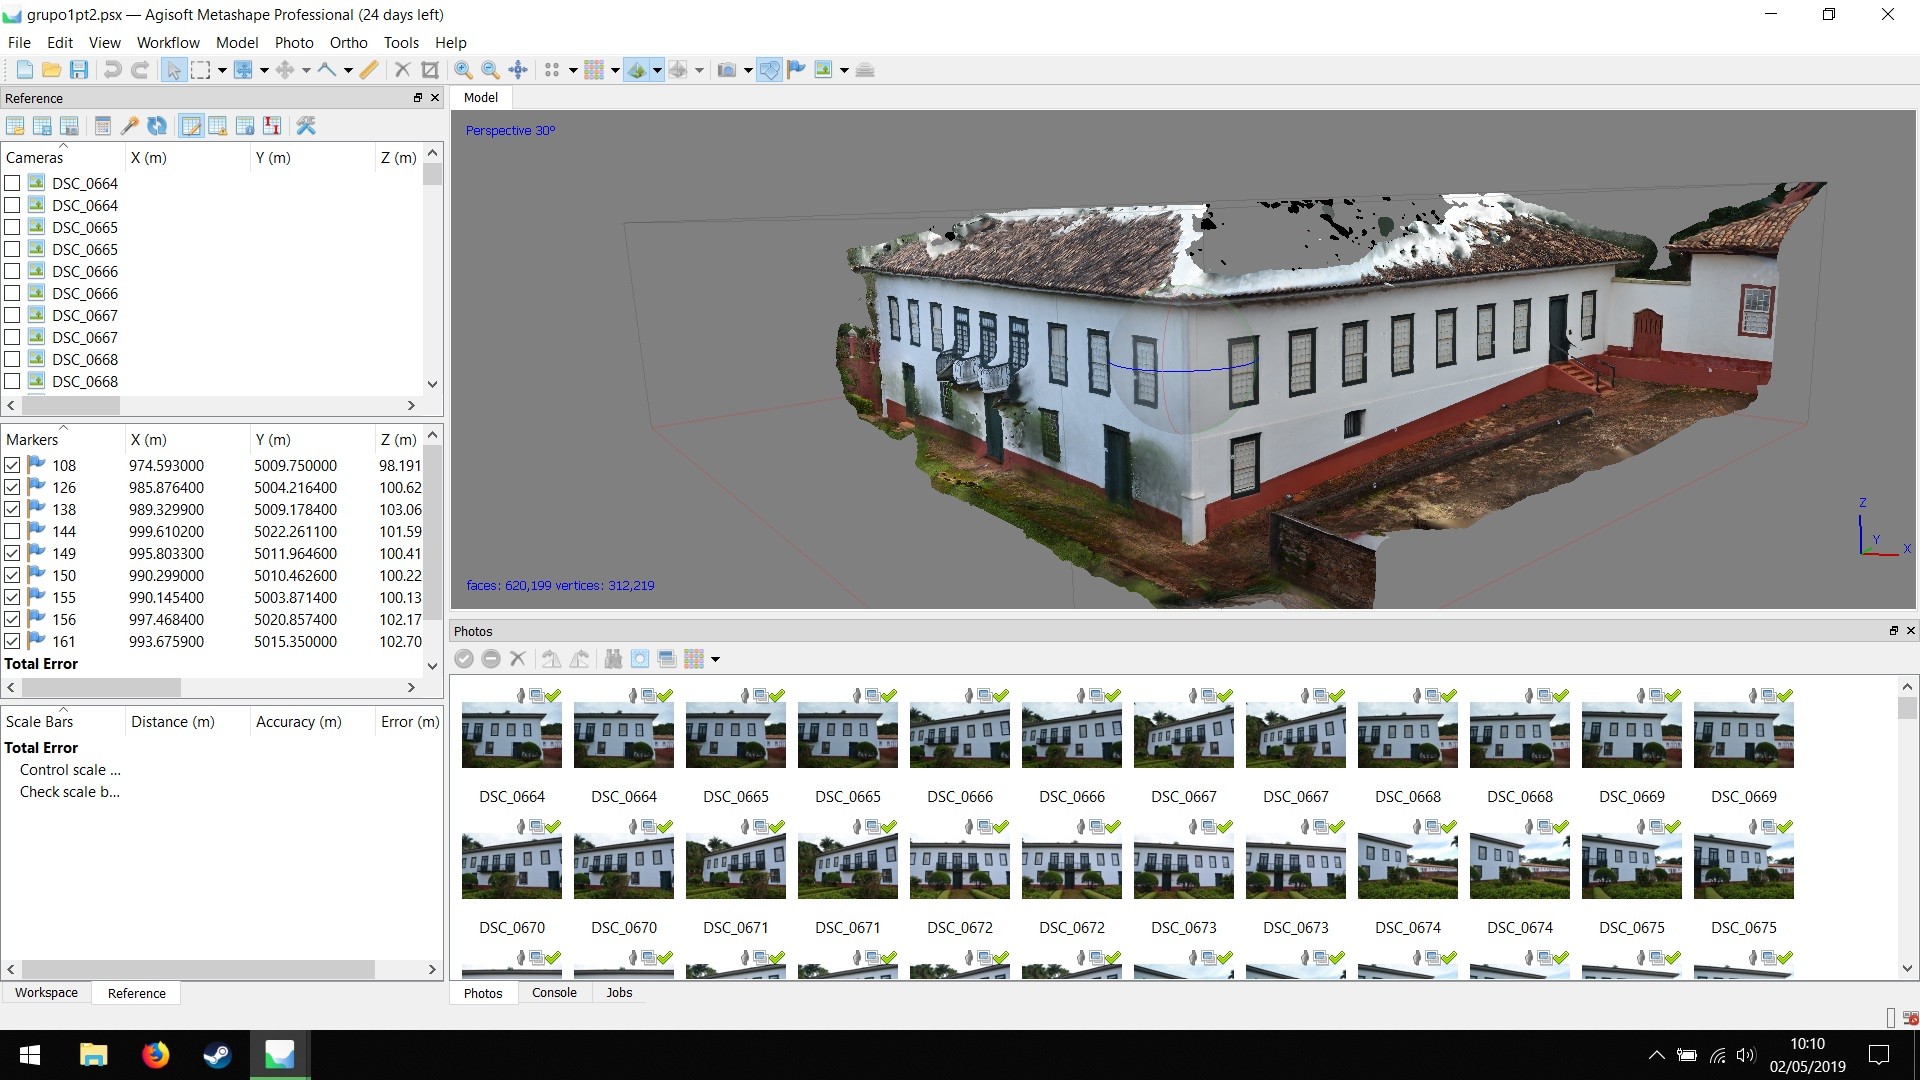
2. Laser Scanning or “Scan to BIM”
Laser scanning uses LIDAR to capture millions of data points and generate a highly accurate point cloud. This method is one of the fastest ways to capture complex existing architecture, particularly when detail and precision are essential.
Pros
Connected: The output is a point cloud or a set of digitized cartesian coordinates (x, y, z). Multiple scans can be aligned and cleaned in software like Autodesk Recap, then exported directly into Revit to begin modeling.
Efficient: Scanning is fast on site, often requiring less field time than other methods. However, processing and modeling the point cloud can be time-consuming depending on project size and complexity.
Accurate: When performed under the right conditions, scan-to-BIM can deliver highly accurate results. Reflective surfaces and strong ambient light can interfere with data capture, which may require scanning during low-light conditions or off-hours.
Cons
Disconnected building data: Notes, condition ratings, and photos remain separate from the point cloud. This makes it harder to access contextual data later unless a separate process is used to link it back to the model.
High equipment cost: Laser scanners are expensive, often large and difficult to transport. The cost of equipment and services makes this option less viable for smaller projects.
Site access limitations: Scans may need to be performed when lighting can be controlled. While this is manageable in commercial settings, it can be challenging in facilities that operate continuously, like hotels or industrial sites.
Too much detail: In some cases, laser scans capture an overwhelming amount of data, including uneven walls and minor surface irregularities. For small or straightforward projects, this level of detail can be excessive.
When to Use This Method
Laser scanning is best suited for large buildings, historic structures, irregular geometries, and projects where precision and clash detection are critical. It is also valuable when as-built documentation is limited or unavailable.
3. Photogrammetry
Similar to laser scanning, photogrammetry tools like Matterport generate a 3D model of a space by capturing and stitching together a series of high-resolution images. Instead of using laser light to measure surfaces, photogrammetry relies on visual data to reconstruct geometry. The equipment is significantly more affordable, often one-tenth the cost of a typical laser scanner. In many cases, photogrammetry can even be done with a phone.
Pros
Connected: Like laser scanning, photogrammetry can generate a point cloud that can be imported directly into Revit.
Accurate (with limitations): Photogrammetry can be highly accurate in the right conditions. Textured surfaces produce better results, while smooth, flat surfaces often lack the visual data needed for an accurate scan.
Cons
Time-consuming and disconnected from BIM: While photogrammetry captures surface finishes and materials well, the data still needs to be manually translated into the Revit model. The initial capture and processing can also be slow.
Hidden costs: Although scanning hardware is inexpensive, the software required to process and export point clouds typically involves monthly fees. Multiple scans may be needed to connect adjacent rooms, which increases time and cost.
When to Use This Method
Photogrammetry is a good option when documenting small to medium-sized spaces with visible texture, such as older buildings or environments with varied materials. It is less effective in spaces with smooth, flat, or reflective surfaces.
4. Mobile Capture Tools

Mobile tools like allow teams to document existing conditions with structured forms, location-based tagging, and photos. Unlike general-purpose field apps, Layer is designed for design professionals and connects that captured data directly to Revit or floor plans at any point in the project on or offline.
Layer supports a range of data types, including notes, photos, measurements, condition ratings, and photos, all of which can be linked to rooms or elements in your Model. Drawing View makes it easy to organize field data on top of uploaded floor plans. Layer’s Revit Add-in also allows teams to connect that information to Revit models, whether or not a model exists during the site visit.
Pros
Data is captured once and organized in a central interface
Photos and notes can be linked to specific locations or elements
Works with or without a Revit model
Efficient for multi-building sites or campuses
Flat-rate pricing and mobile-friendly design make it easy to adopt
Offline mode supports surveys in areas without connectivity
When to Use This Method
Mobile apps like Layer are well suited for existing conditions documentation across any project scale. They are especially useful for design teams working on renovations, occupied buildings, or distributed portfolios that require structured, repeatable data collection.
How to Choose the Right Method
Documentation Needed | Recommended Method |
|---|---|
Complex geometries or large buildings | Laser scanning |
Small to mid-sized interiors | Photogrammetry or Mobile App |
Budget-constrained projects | Pen and Paper or Mobile App |
BIM-linked notes and reports required | Mobile App (Layer) |
Historical or irregular structures | Laser scanning or a hybrid workflow |
Many teams combine methods. For example, laser scanning for geometry and Layer for notes, photos, and FF&E quantities.
How Architects Document Existing Conditions
Before visiting the site, teams define the scope of documentation. This may include information such as:
dimensions
door and window counts
structural conditions
finishes and material types
equipment and utilities
deficiencies or hazards
code or accessibility issues
Organizing this list in advance ensures that documentation is consistent across surveyors and buildings. Tools like Layer’s Building Survey Template offer a structured starting point for teams to capture and organize this data.
An architect documenting field data on a tablet. Mobile capture keeps photos, notes, and measurements tied to their location.
2. Document the Space
Once on site, architects capture the information outlined in the checklist. This typically includes measurements, field notes, condition ratings, marked-up drawings, and photographs.
Using a mobile app allows teams to record this data on a shared platform and tag it by room or system. For firms working on complex sites or large portfolios, mobile tools reduce duplicate entry and improve data accuracy.
Architects capture:
photos
measurements
material conditions
deficiencies
marked floor plans
field notes
Using a mobile tool helps align this information with spaces in BIM.
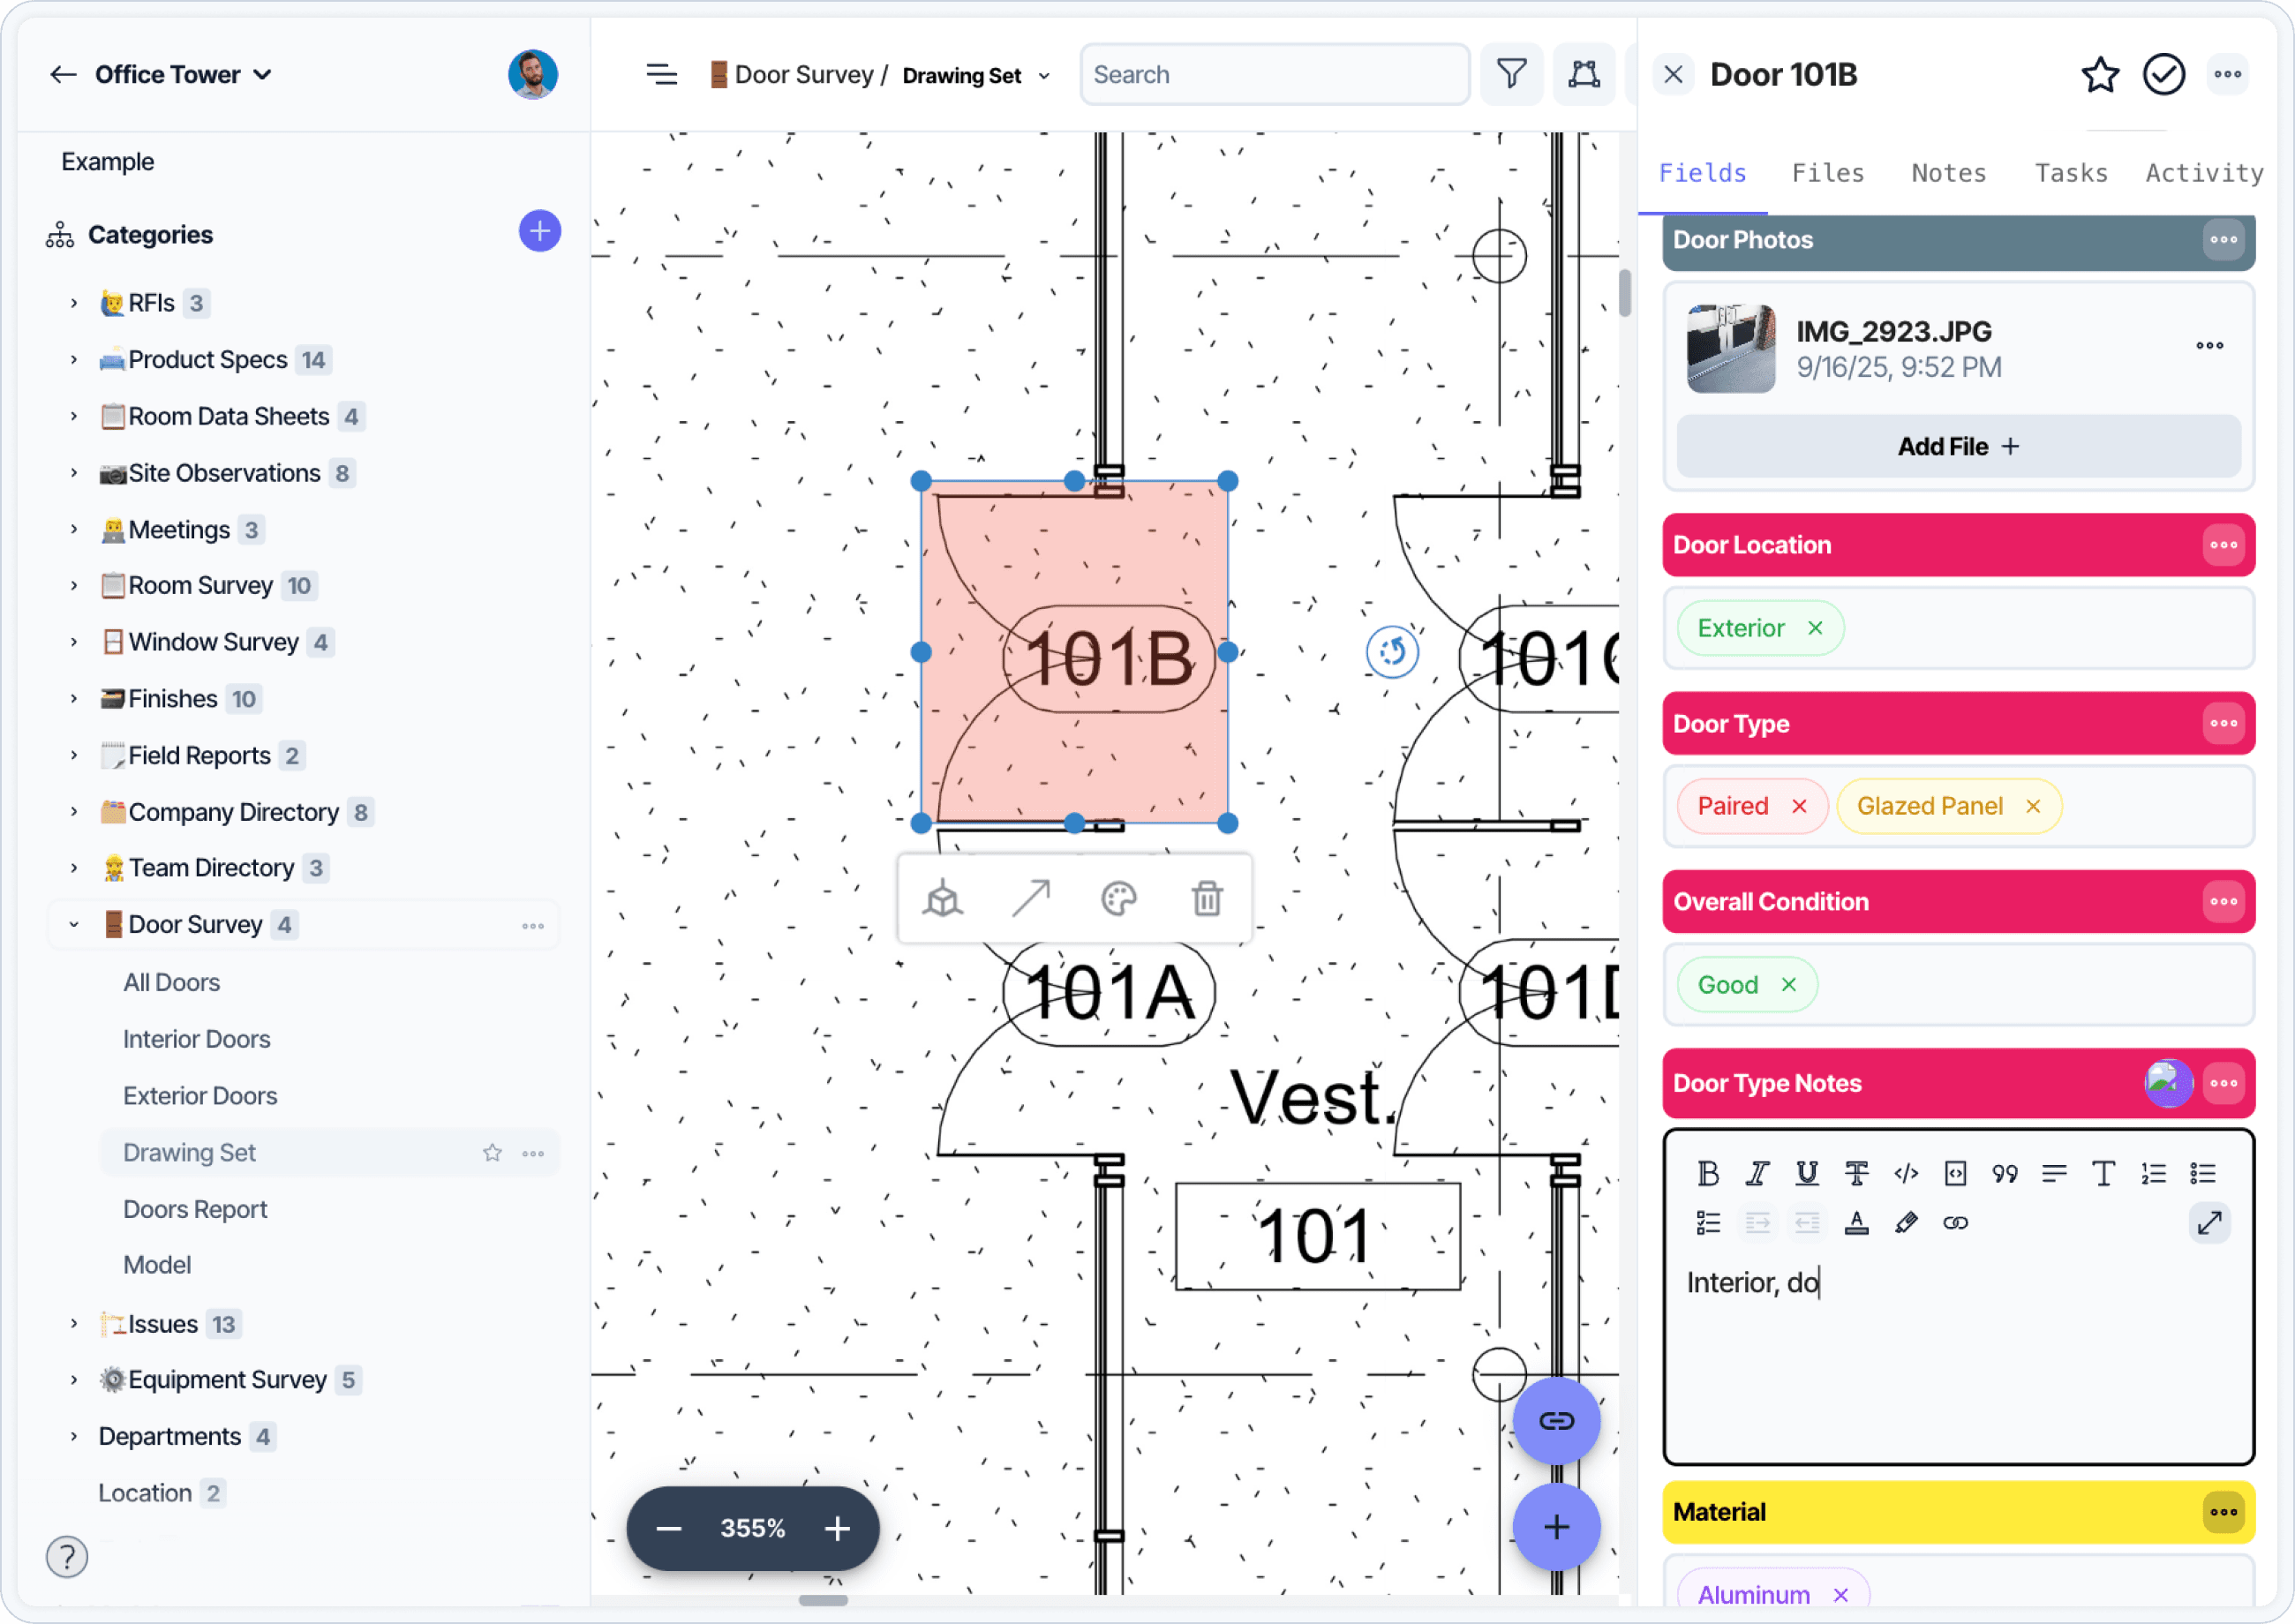
A door survey laid out on a floor plan view. Linking data to a plan accelerates downstream modeling and reporting.
3. Organize the Data
Depending on how you capture your data, there will be different steps to the cleanup and organization process. With laser scanning and photogrammetry, this typically involves stitching or “meshing” the data into a usable point cloud for modeling. A team working on site will often upload their scans at the end of the day so a remote team can assist with processing to save time.
If you used pen and paper, survey notes must be transcribed and images renamed or moved into folders. This slows down the modeling process and introduces errors. A mobile tool like Layer removes these extra steps. Data is instantly organized by floor plan, category, or building system, and can be reviewed before it is added to the model.
In addition to supporting modeling, survey data is often used to generate reports that inform the client’s next decisions. These deliverables may include photo-based documentation, annotated drawings, condition assessments, or code summaries.
The client may use this information to decide whether to renovate or demolish, identify safety concerns, or prioritize scope based on existing deficiencies. Structuring the data at the point of capture ensures that reporting is faster, more consistent, and tailored to project goals.
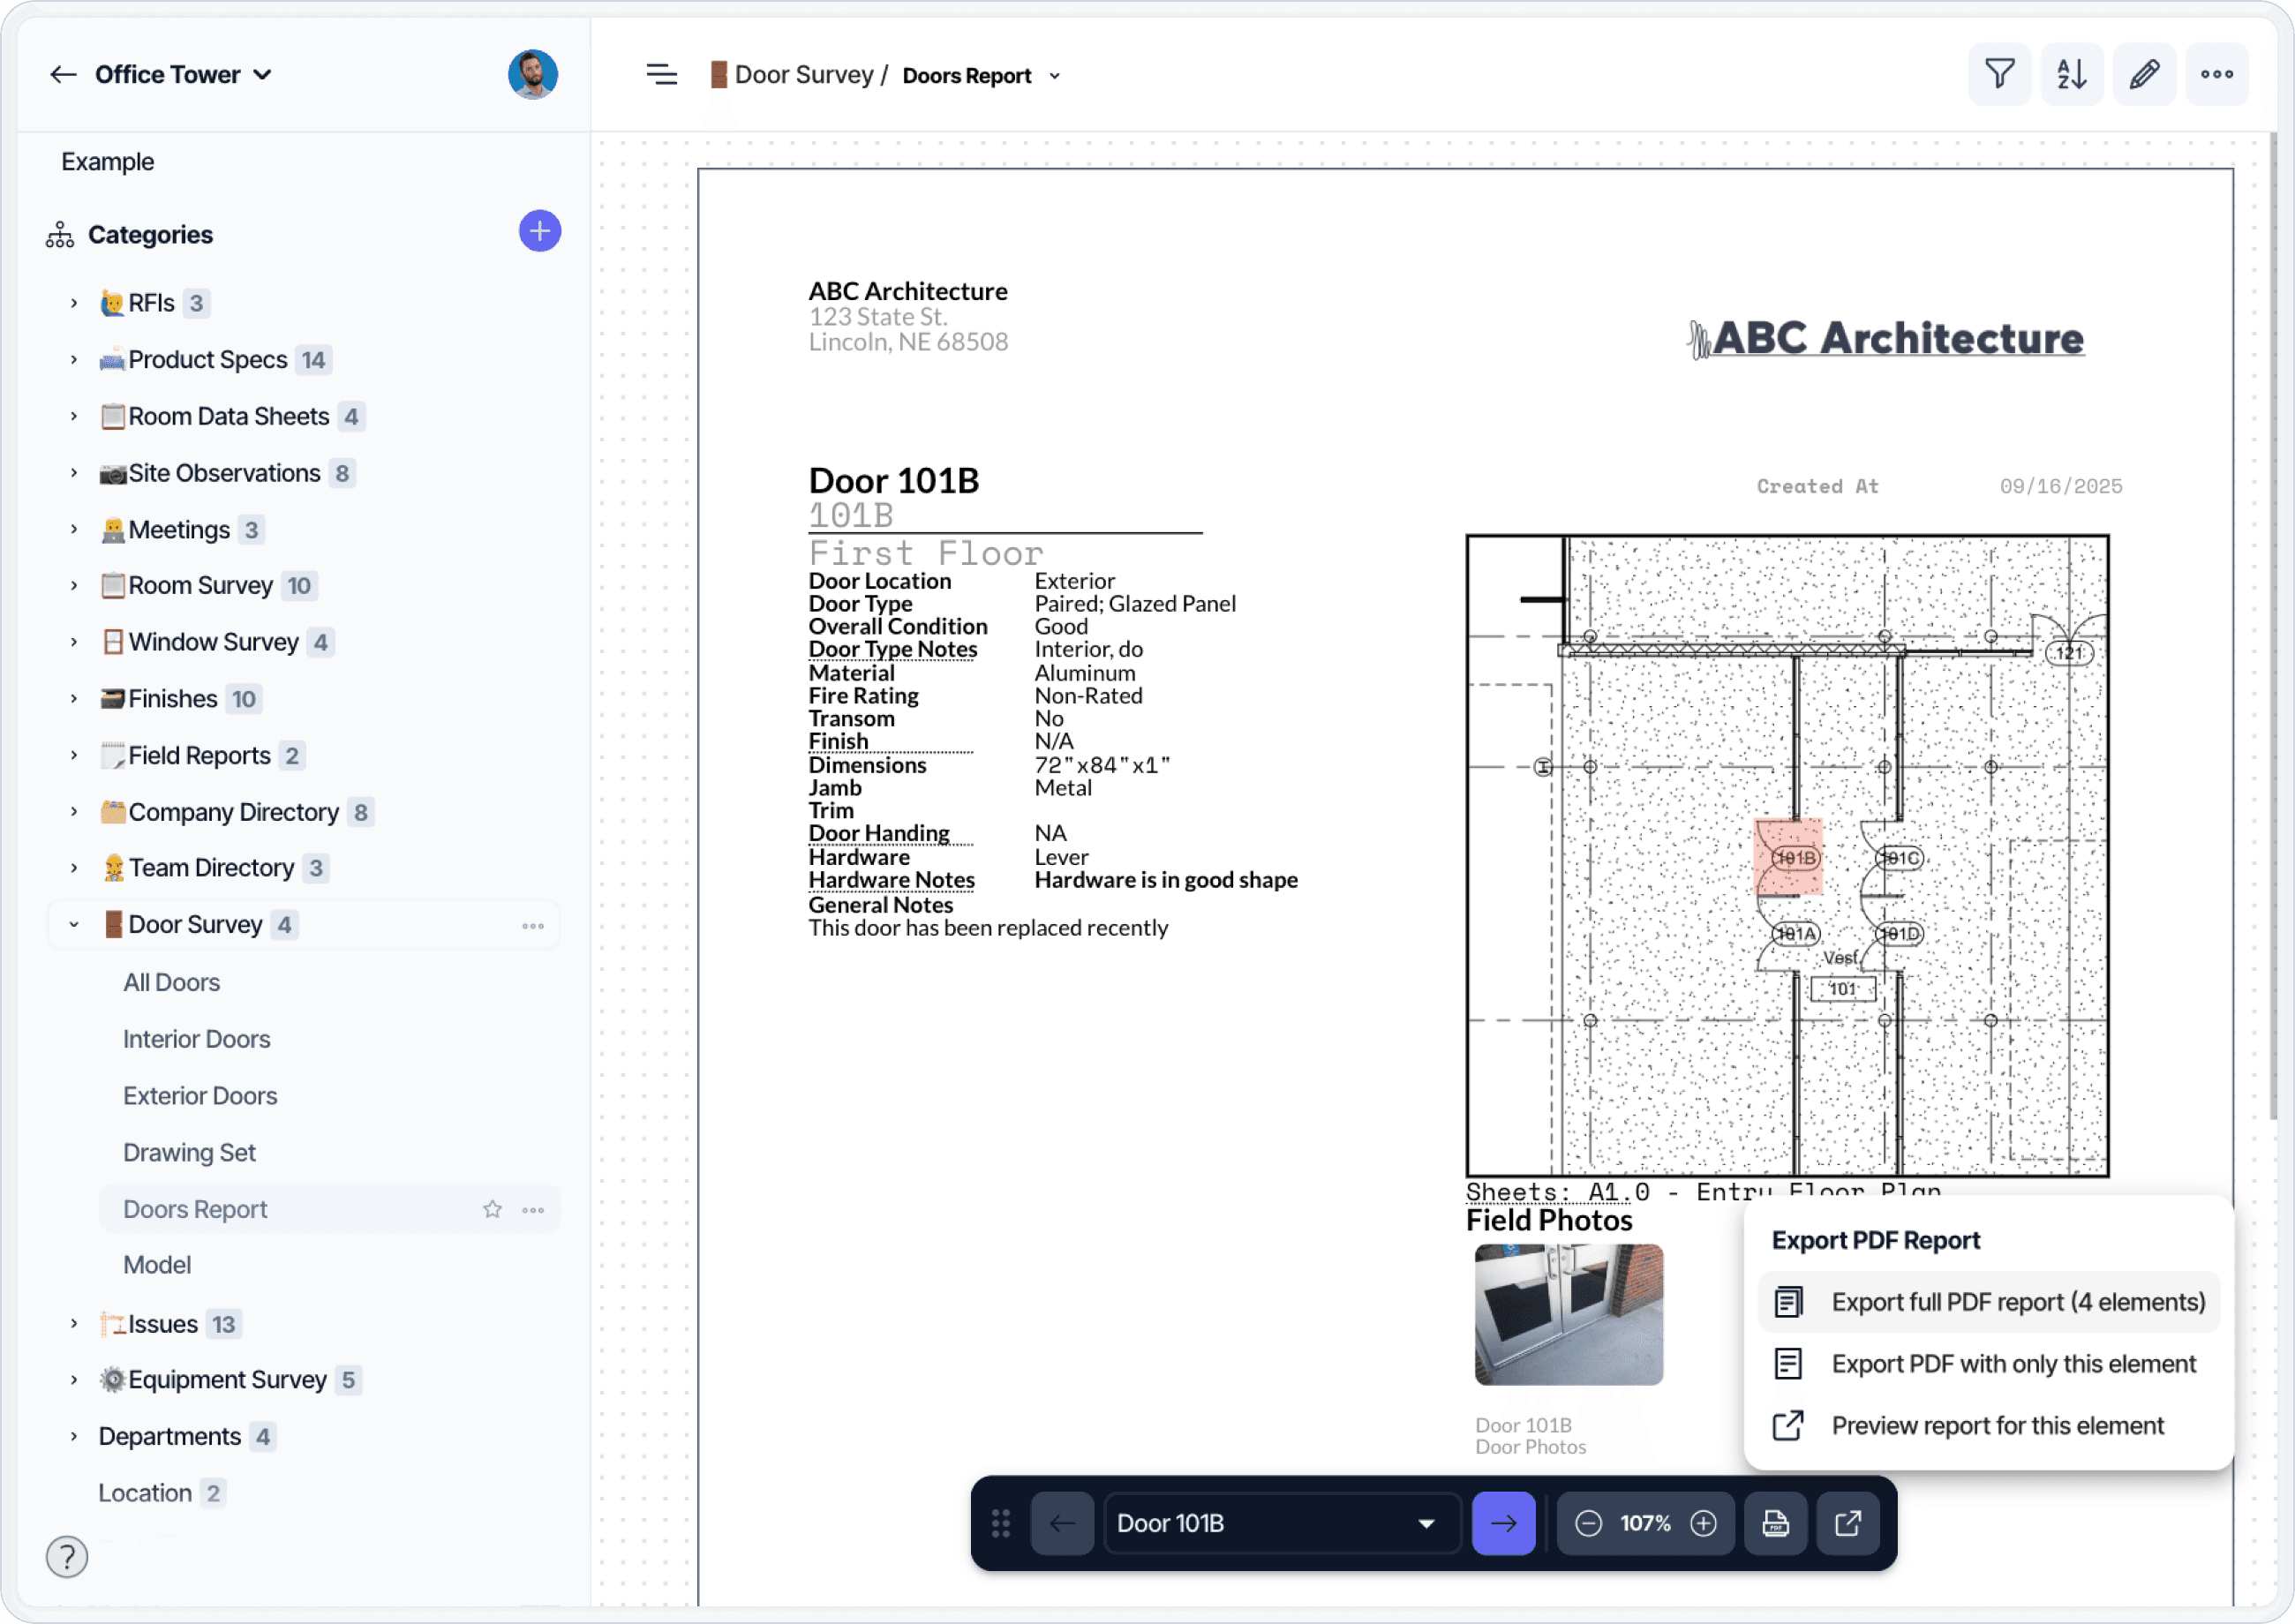
A pre-formatted door survey report generated from field data. Pre-built reports replace the manual export-and-format cycle.
4. Produce Existing Conditions Drawings
After the field survey, documentation is converted into baseline drawings. These may include:
existing floor plans
reflected ceiling plans
interior elevations
structural diagrams
MEP system locations
exterior site conditions
These drawings and models serve as the baseline for all design work. If the team is modeling in Revit, survey data can be used to place views, annotate elements, or populate room data sheets. These drawings will then serve as a reference point for future design, coordination, and cost estimation.
Common Challenges in Existing Conditions Documentation
Teams often face:
incomplete historical drawings
inaccessible areas
inconsistent measurement methods
lighting or visibility issues
data scattered across devices and platforms
A structured workflow supports accuracy and reduces coordination issues later in the project.
Why a Consistent Workflow Matters
Existing site conditions impact every phase of design and construction. The accuracy of your documentation directly affects the quality of design decisions and the volume of RFIs that surface during construction. A consistent workflow improves precision, reduces rework, and strengthens coordination with contractors.
Frequently Asked Questions
What are existing site conditions?
Existing site conditions include all physical characteristics of a building or site at the start of a project: structure, walls, systems, circulation, exterior context, and the condition of materials, finishes, and equipment. Many surveys also document existing furnishings, fixtures, and equipment.
Why is documenting existing conditions important?
Accurate documentation supports programming, design development, code analysis, cost estimating, existing conditions modeling, and the production of as-built drawings. It reduces rework by limiting field discrepancies that later become RFIs during construction.
What are the most common methods for documenting existing conditions?
Four common approaches: static site surveys (tape measure, notes, photos), laser scanning or scan-to-BIM (LIDAR point clouds), photogrammetry (3D models from photos), and mobile capture tools that link structured data to floor plans or Revit. Many teams combine methods.
When should I use laser scanning vs. photogrammetry?
Laser scanning is best for large buildings, historic structures, irregular geometries, and projects where precision and clash detection are critical. Photogrammetry is better for small to medium-sized spaces with visible texture; it is less effective on smooth, flat, or reflective surfaces.
How does scan-to-BIM work?
Scan-to-BIM uses LIDAR or photogrammetry to generate a point cloud of existing conditions. The point cloud is processed and aligned in software like Autodesk Recap, then imported into Revit. The design team uses the point cloud as a reference to model the building geometry.
What is the difference between a building survey and an existing conditions survey?
The terms overlap. A building survey is the broader process of documenting a building’s physical condition, structure, and systems. An existing conditions survey focuses specifically on capturing the current state of a building or site to support design work that follows. In practice, the same field exercise often serves both purposes.
How do I avoid common challenges in existing conditions documentation?
Four common pitfalls: incomplete historical drawings (verify everything in the field), inaccessible areas (document and reschedule), inconsistent measurement methods (use standardized templates), and data scattered across devices and platforms (use a structured tool that captures notes, photos, and measurements in one place).
Further Resources
The Building Survey Process Explained. The broader survey process.
The Layer Guide to Property Inspections. The companion guide for property inspections.
Assessment, Inspection, or Survey: What's the Real Difference?. Clarifies related survey types.
What is ASTM E2018-15? A Guide for Building Assessments. The ASTM standard for property condition assessments.
The Architectural Design Process Explained. Where existing conditions feed into Pre-Design.
4 Strategies for Simplifying the Pre-Design Phase. Pre-Design strategies that include conditions documentation.
The Architectural Room Data Sheet Process. Existing conditions feed Room Data Sheets.
HBIM (Historic or Heritage BIM) Explained. HBIM workflows for documenting historic conditions.
An Introduction to Adaptive Reuse Architecture. Existing conditions documentation is critical for adaptive reuse.
Building Survey Workflow Template in Layer. For documenting existing conditions in the field.
Room Data Sheets Workflow Template in Layer. For room-by-room conditions documentation.


