Interior Design
The FF&E process spans six phases: schematic layout, specification, client approval, procurement, delivery and installation, and handover. Learn what happens in each phase and how to keep design intent, schedule, and budget on track.


The FF&E process moves a project from preliminary furniture and equipment planning through to client handover. It typically spans six phases: schematic layout, specification, client approval, procurement, delivery and installation, and handover. Each phase involves different stakeholders and a different type of documentation, which is why FF&E is one of the most coordination-heavy parts of an interior project.
If you need a primer on what counts as FF&E, start with the comprehensive FF&E guide. This article focuses on the process itself, including the methods designers, procurement teams, and owners use to keep hundreds or thousands of items aligned with the design intent.
Procurement and delivery method affect how each phase plays out. Some projects follow OFCI (Owner Furnished, Contractor Installed), where the owner supplies the product and the contractor installs it. Others follow CFCI (Contractor Furnished, Contractor Installed), where the contractor handles both. Either way, the underlying process is the same: hundreds or thousands of items must be specified, approved, ordered, and coordinated with drawings and schedules. Each step generates documentation that needs to stay synchronized across the design team, the contractor, the procurement agent, and the owner.

Specified workstations, lighting, and accent furniture in a finished open-plan office. FF&E coordination spans dozens of vendors and lead times even on a single floor.
Every building type has its own FF&E needs. Offices require desks, chairs, and lighting. Healthcare facilities rely on clinical equipment. Hospitality projects include casegoods, soft seating, and operational equipment. The volume of items grows quickly. Each piece must be coordinated with drawings, schedules, rough-ins, finishes, and accessibility.
Project team members often track hundreds to thousands of FF&E items through design past construction. Options need to be considered. Costs assigned. Final choices need to be approved. Procurement, delivery, and installation statuses need to be recorded. Documentation needs to be recorded, compiled, and handed over to the owner.
A 3D model viewer showing a proposed furniture layout. Designers and clients can review the arrangement before specifications are locked in.
Making matters more complicated, almost everyone on the job is involved in this process (even in a small project), and everyone needs to know different things at different times to do their jobs. Here are some examples:
Clients need to view the look and feel of the furniture options before approving the selections.
Manufacturers need detailed specifications of the objects selected.
Project Controls requires delivery schedule, product certifications, and logistics information.
Technicians must know what equipment needs to be installed where, and what should be included in the work installation package.
Owners are concerned with product documentation, warrantee information, and maintenance requirements.
And this isn't even an exhaustive list!
Traditionally, this information lives all over the place: spreadsheets, sketchbooks, and design files. But, there’s a more efficient way to stay organized. Whether you are an architect or an interior designer, this article will walk you through the typical FF&E process and give you tips and tricks to keep everyone on the same page.
At a Glance: The 6 Phases of FF&E
Phase | Primary Output | Lead Stakeholder | Typical Timing |
|---|---|---|---|
1. Schematic Layout | Test fits, generic furniture placement | Designer | Schematic Design |
2. Specification Data | Cut sheets, finishes, model numbers | Designer | Design Development |
3. Client Approval | Approved FF&E package | Designer and Owner | End of Design Development |
4. Procurement | POs, lead time tracking, alternates | Procurement Agent or Designer | During Construction |
5. Delivery and Installation | On-site verification, punch list | Procurement Agent and General Contractor | Final months of Construction |
6. Client Handover | Manuals, warranties, asset records | Designer or Procurement Agent | Substantial Completion |
Step 1: Design the Schematic Layout
The FF&E process often begins during schematic design or feasibility studies. At this point, the furniture and fixture details are still conceptual. Designers typically create test fits, which are schematic layouts using generic placeholders to represent potential furniture or equipment arrangements.
A test fit helps evaluate circulation, spacing, and functional requirements. It allows the design team to ask questions such as:
Does the layout provide the correct quantity of furnishings or equipment?
Is the space functional for its intended users?
Are adjustments required to meet accessibility or client needs?
Some teams share these early layouts in a 3D model viewer so clients can review the arrangement before specifications are locked in. Layer's model viewer lets non-Revit users review test fits without opening the underlying file.
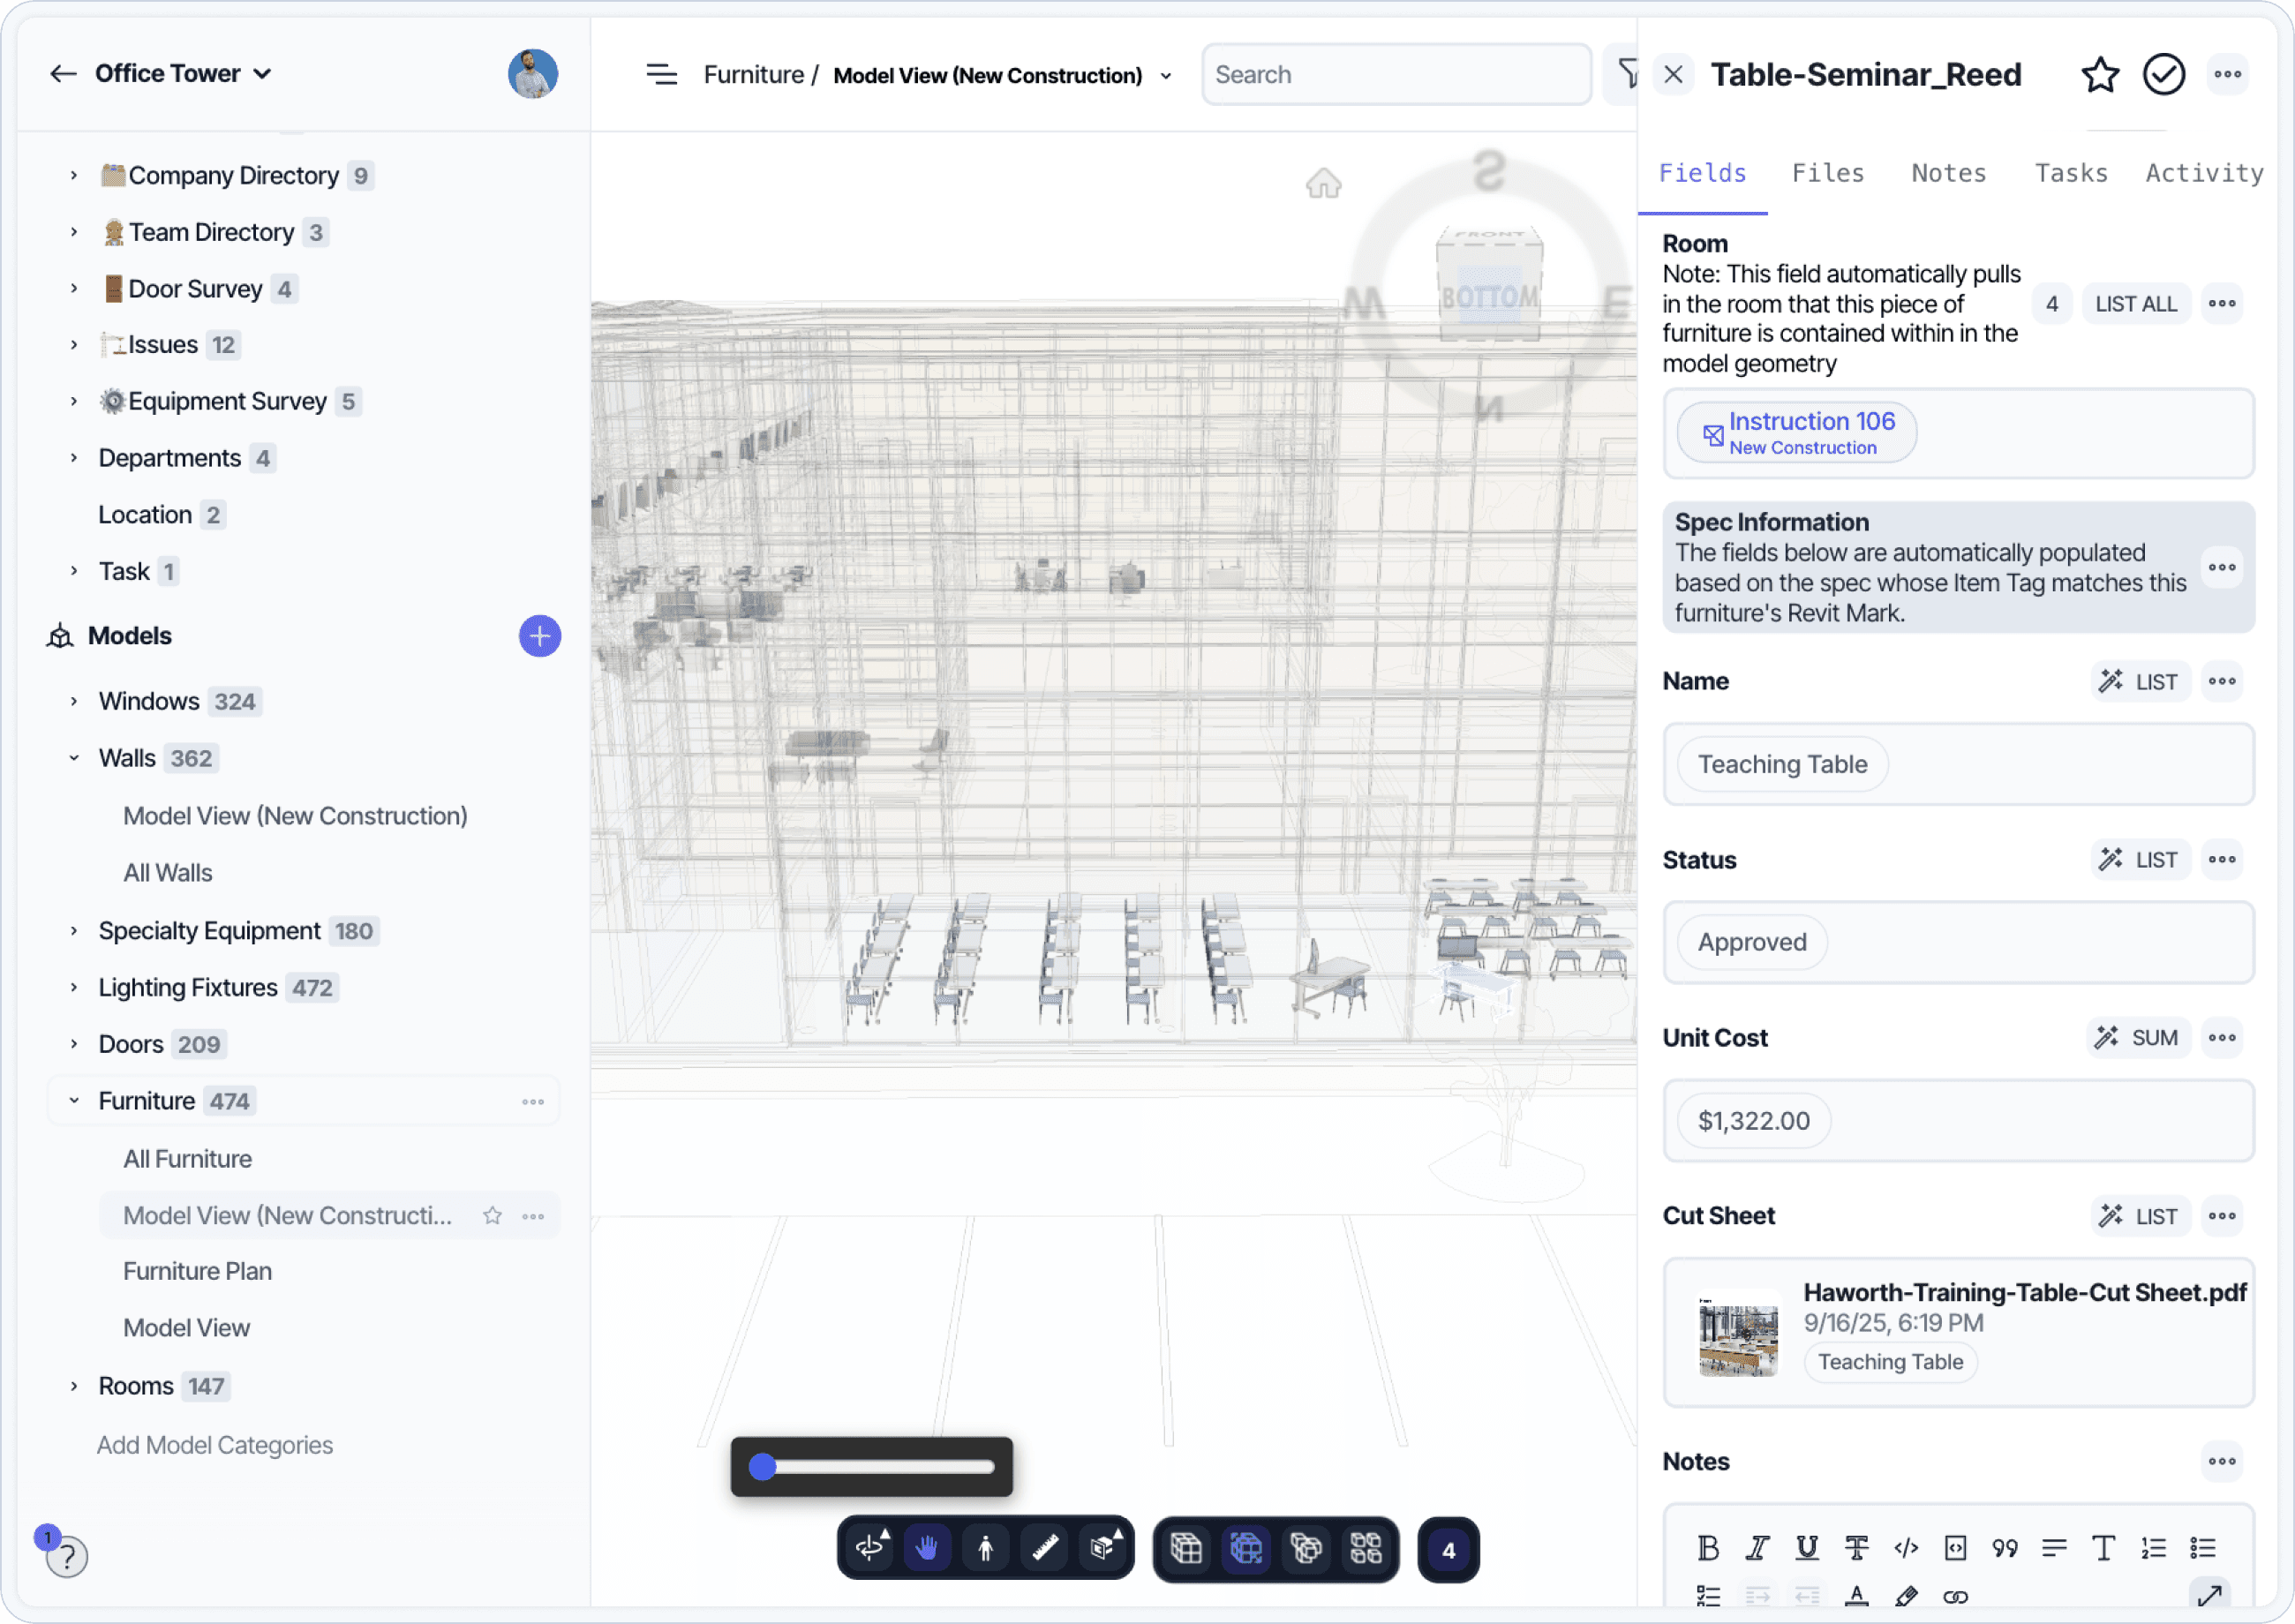
An interactive 3D model viewer with furniture in place. Clients can rotate, walk through, and approve test fits before formal specification.
Step 2: Gather Specification Data
Once layouts are confirmed, the next step is gathering FF&E specification data. Designers research vendors, attend trade shows, meet manufacturer representatives, and evaluate options for quality, pricing, and lead time. Specification data usually includes dimensions, finishes, model numbers, and warranty information.
Manual tracking across spreadsheets can lead to version errors and data loss, so many teams maintain this information in a specialized FF&E software. This ties data like specification info, cut sheets, and product images together and helps ensure that everyone on the project is referencing a single source of truth.
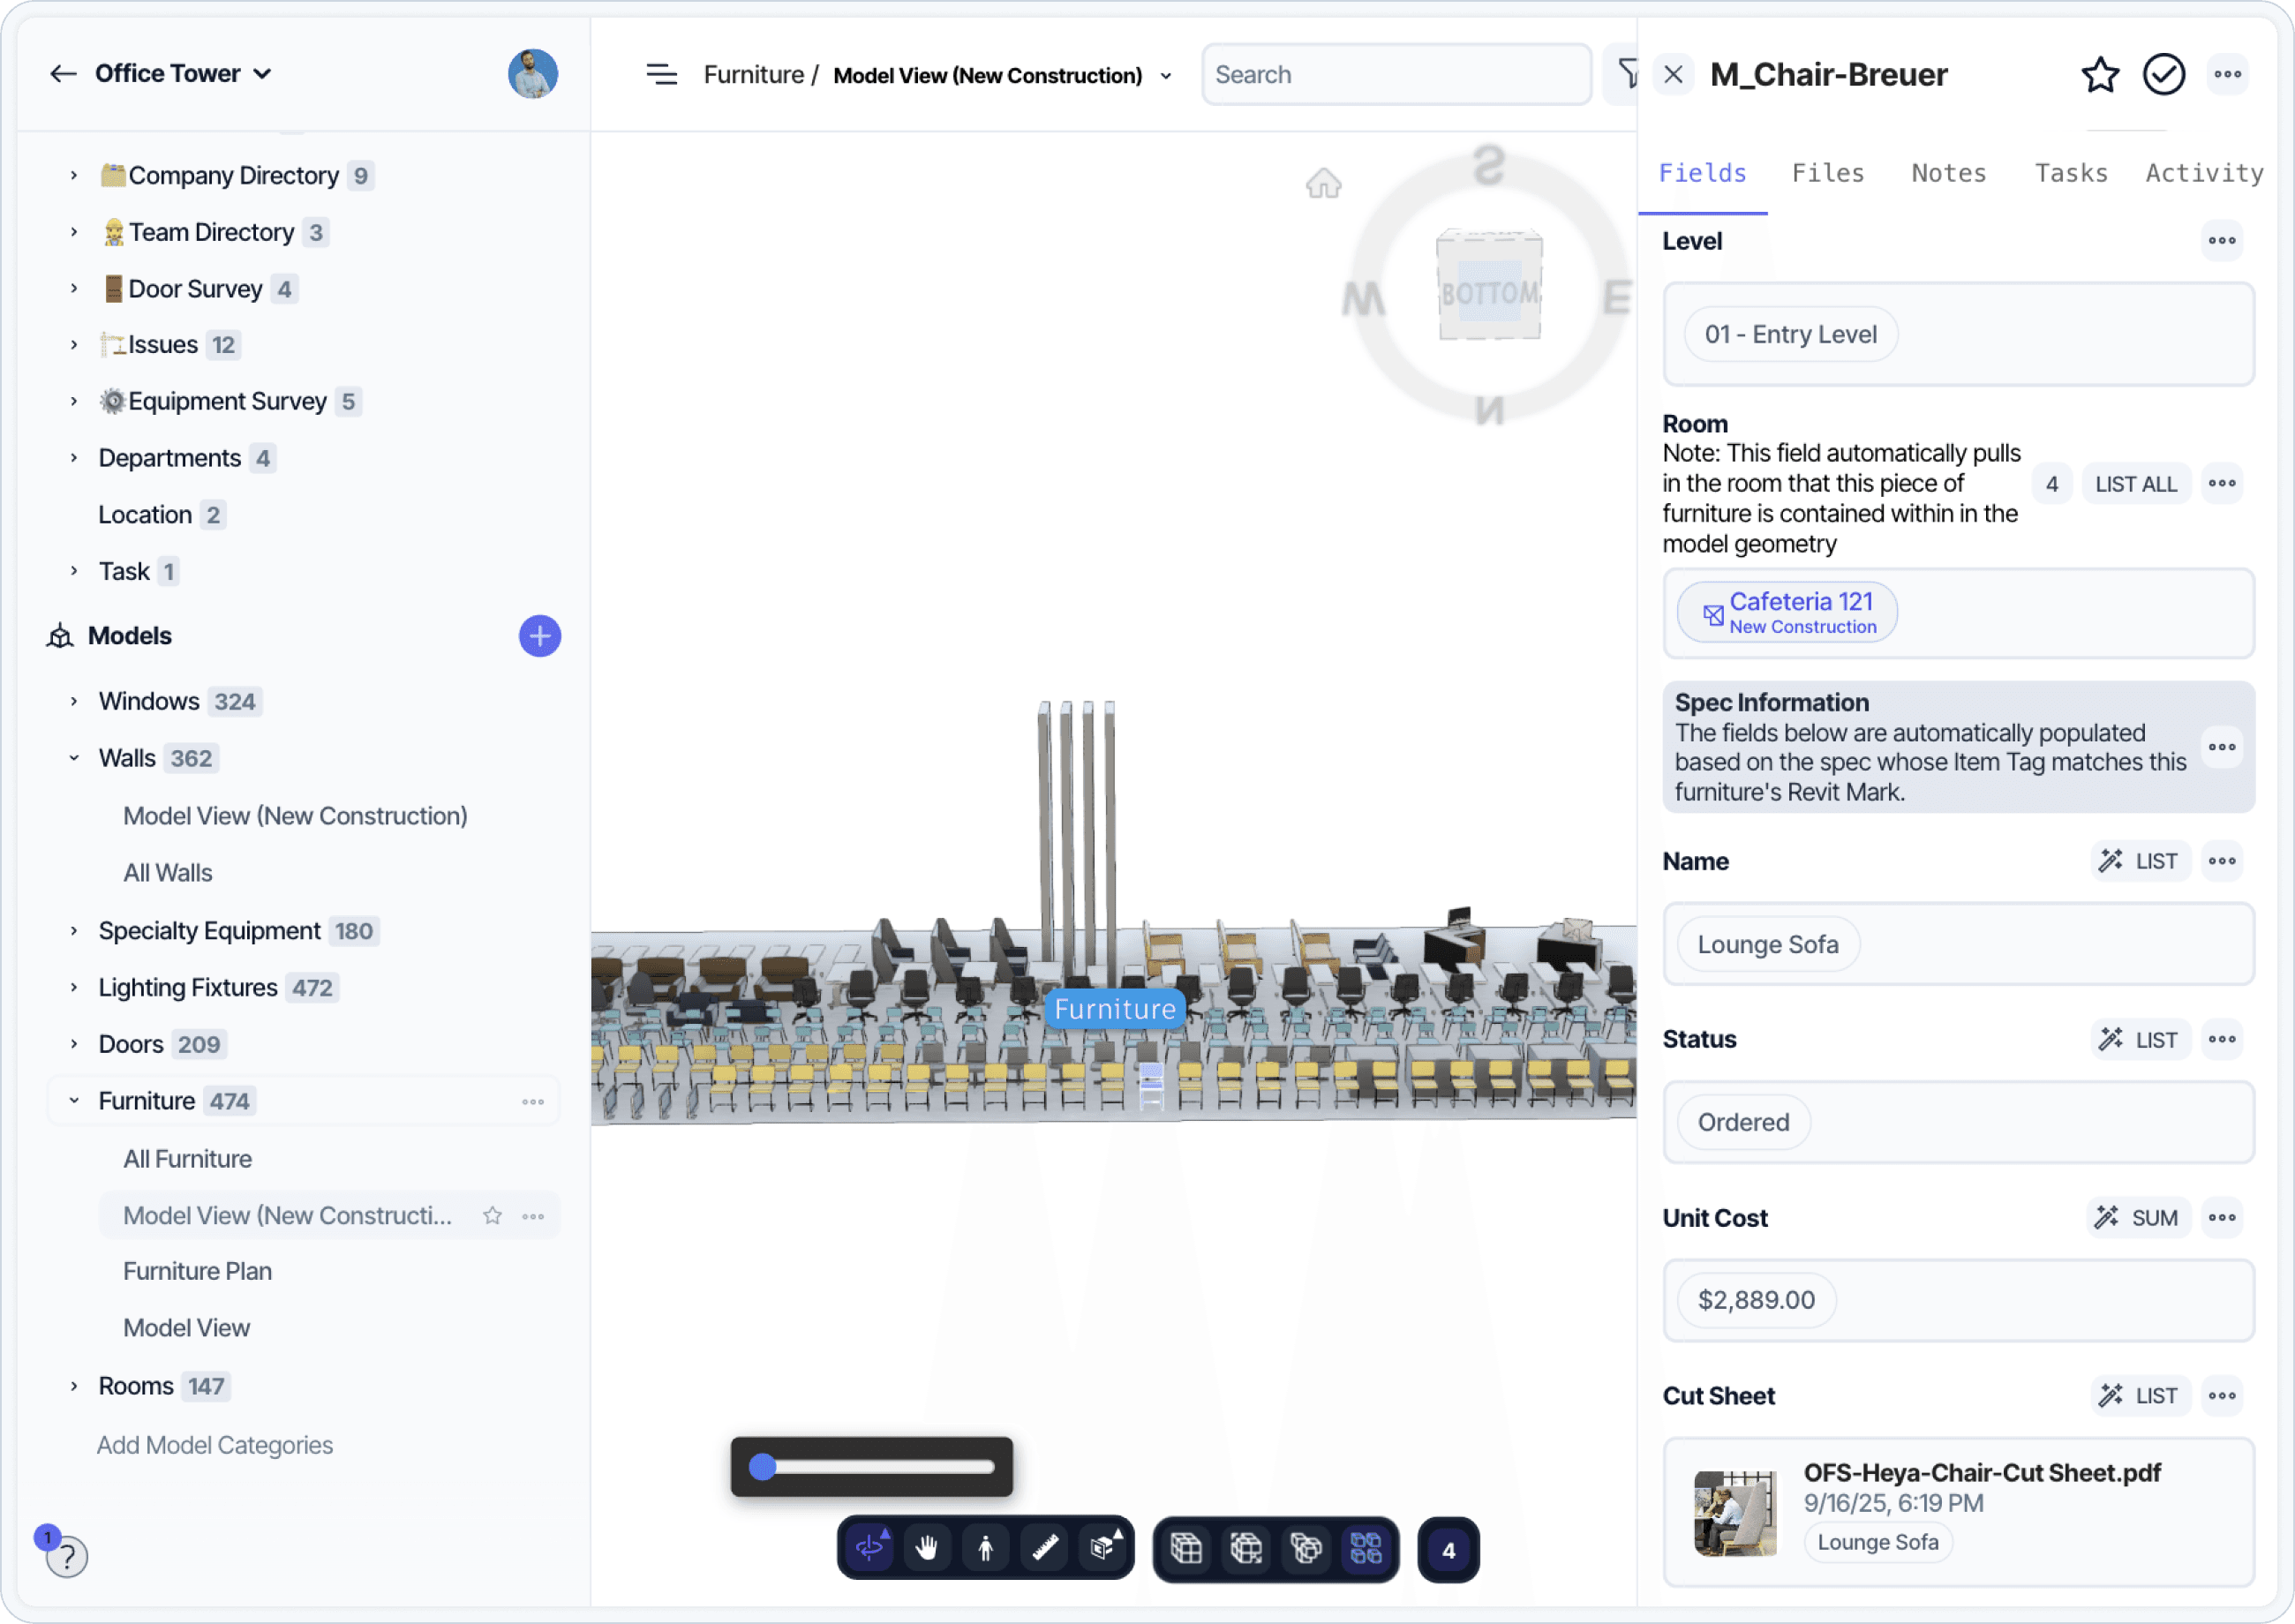
FF&E elements modeled in Revit with parameter data linked to a database. Linking the model to specification data keeps schedules, room data sheets, and specification sheets aligned.
When the library is linked to design tools such as Revit, any updates to FF&E elements remain synchronized with schedules, room data sheets, and specification sheets.
This approach keeps documentation consistent throughout design development. It also creates a single, searchable source of truth that supports collaboration between designers, vendors, and clients.
Step 3: Present the FF&E Selections to the Client
After collecting data, designers present FF&E selections for client review and approval. This step may require multiple meetings depending on the project scale. Clients need clear visuals, accurate pricing, and current lead times to make informed decisions.
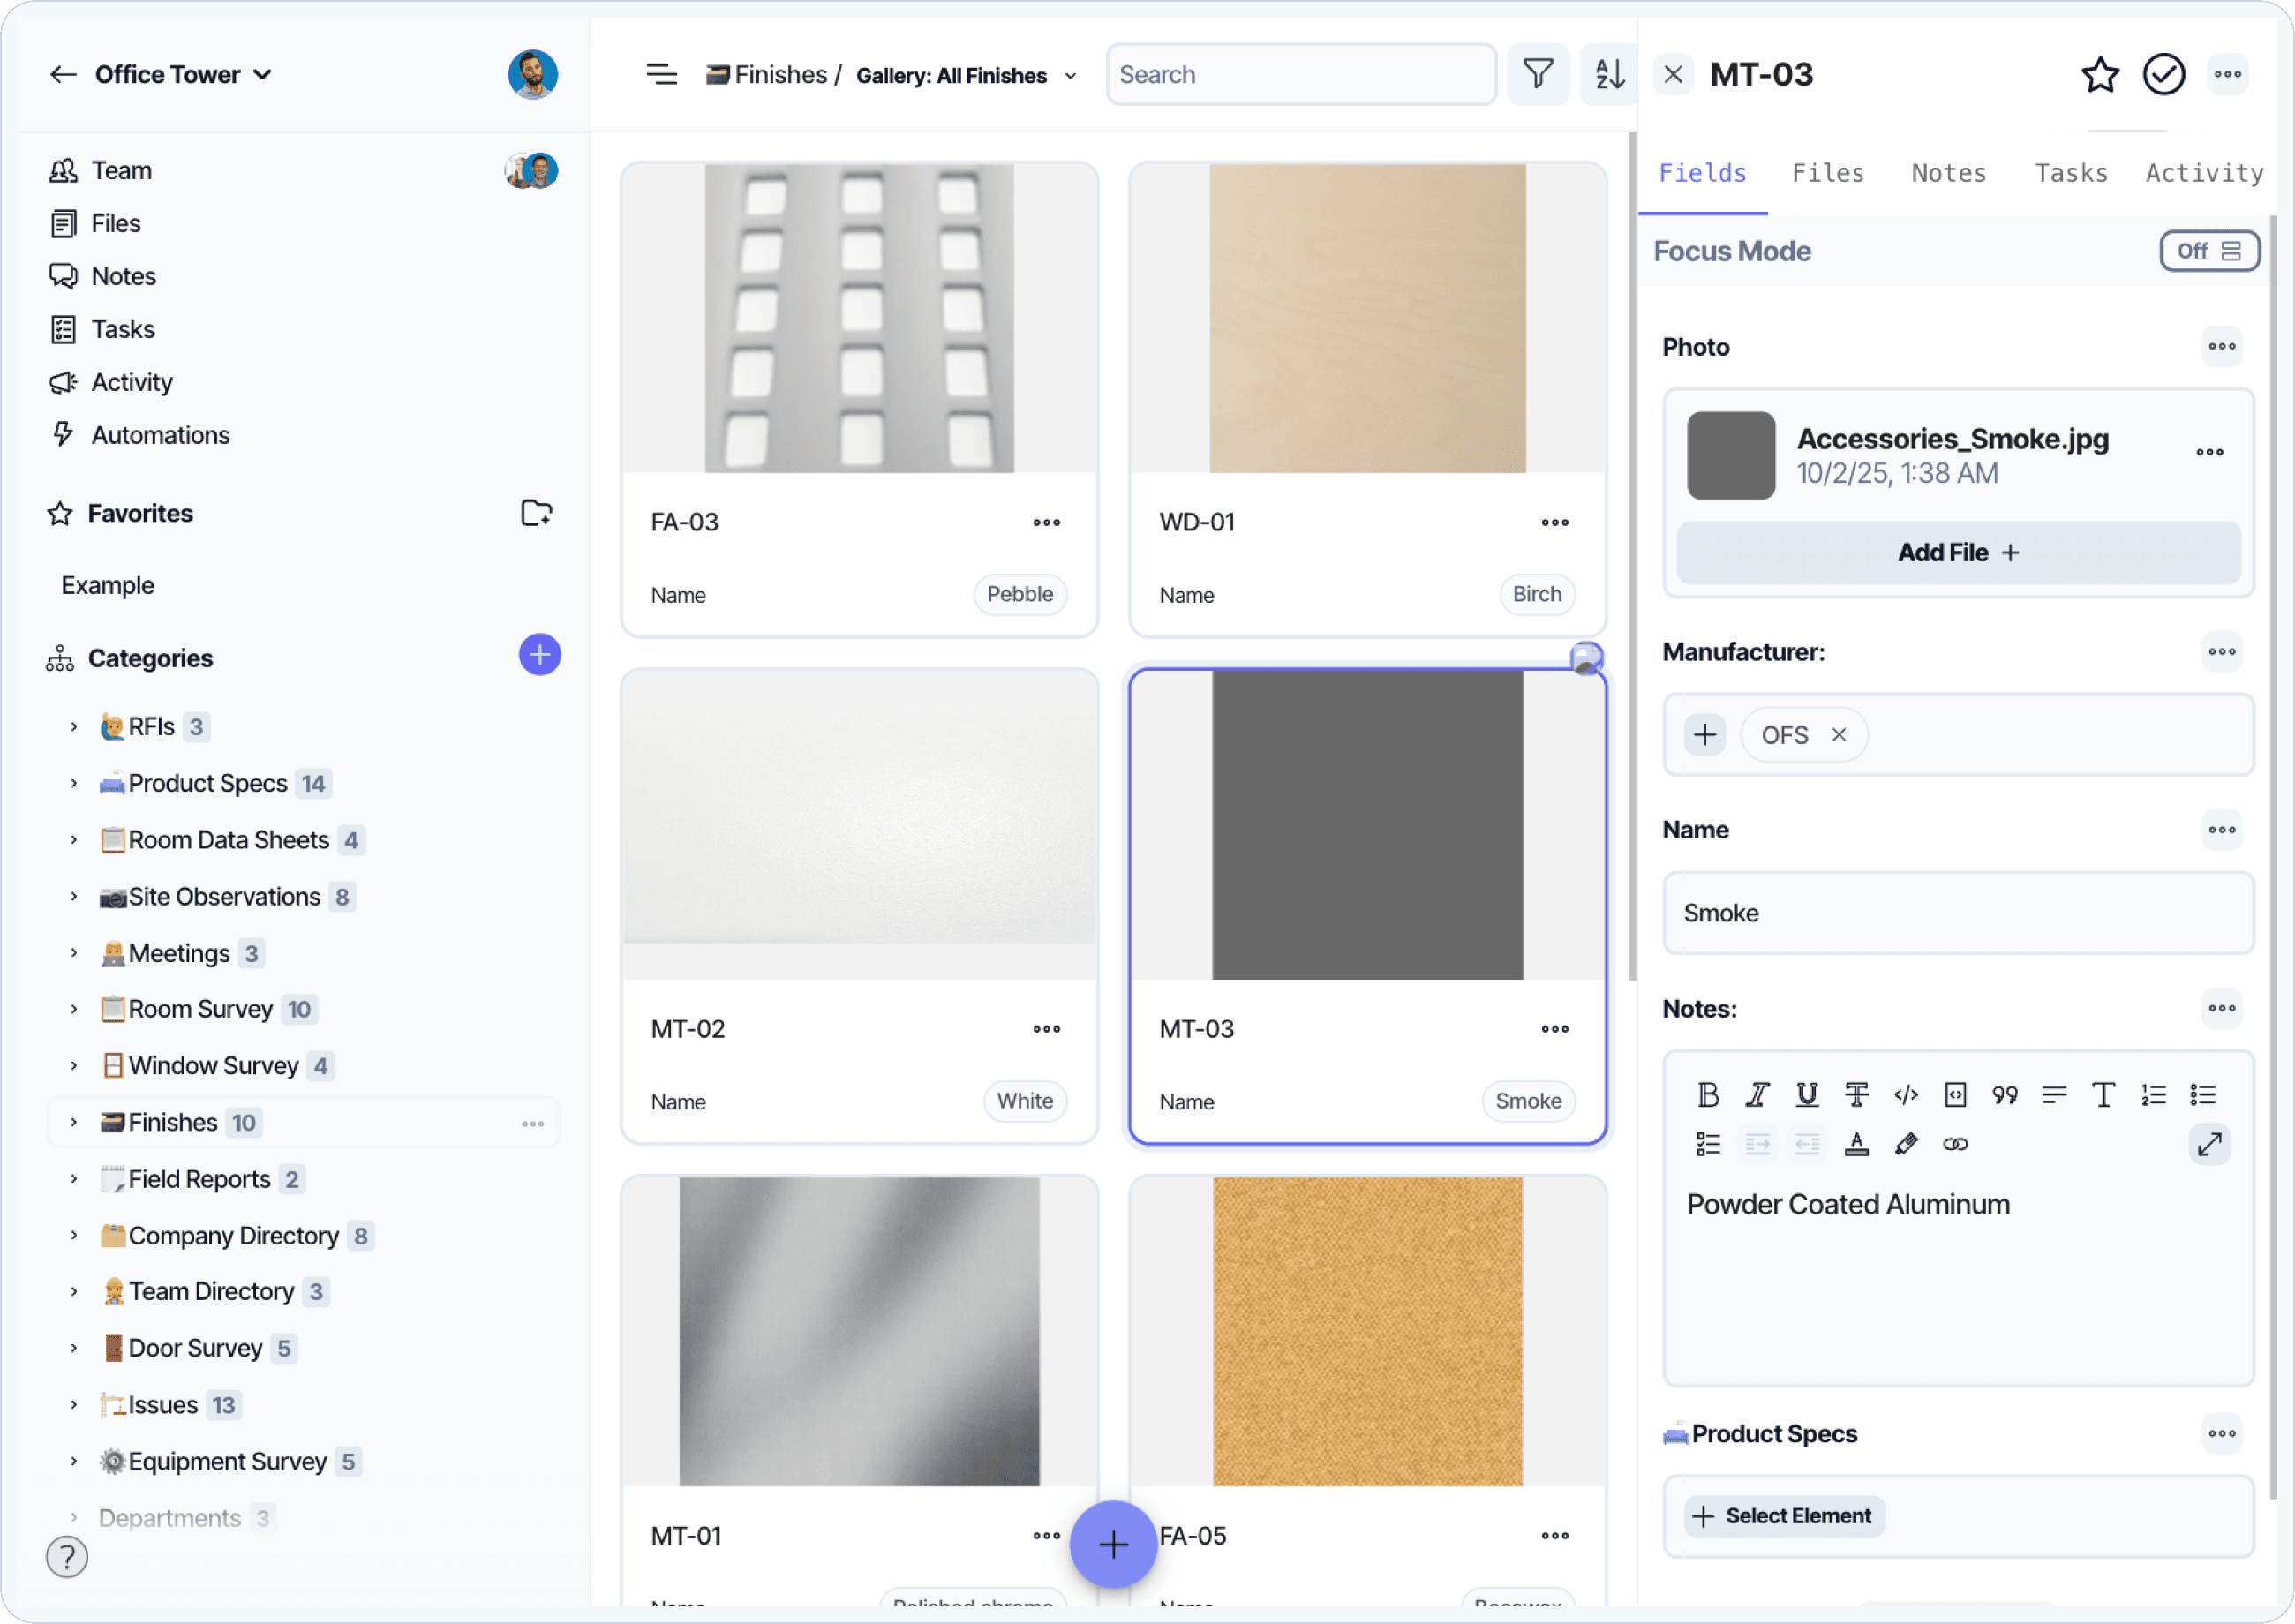
Finishes and cut sheets compiled for client presentation. Designers typically review FF&E packages with clients in multiple rounds before final approval.
Layer can help you create digital concept boards linked directly to the FF&E products, making it easy to reference them during meetings.
Step 4: Procurement
After the client approves the FF&E package, the project moves into procurement. Procurement involves ordering items, tracking delivery schedules, reviewing submittals, and coordinating communication between vendors, contractors, and designers.
Procurement requires managing a large amount of information. You may work with a procurement agent or manage ordering directly. If you manage it yourself, lead times are critical. For example, specifying a chair with an eight month lead time when occupancy is scheduled in six months will cause delays.
You will answer vendor questions, evaluate alternates, and track changes in availability. Items must arrive on site at the right time. Early arrivals may require storage. Late arrivals may delay construction.
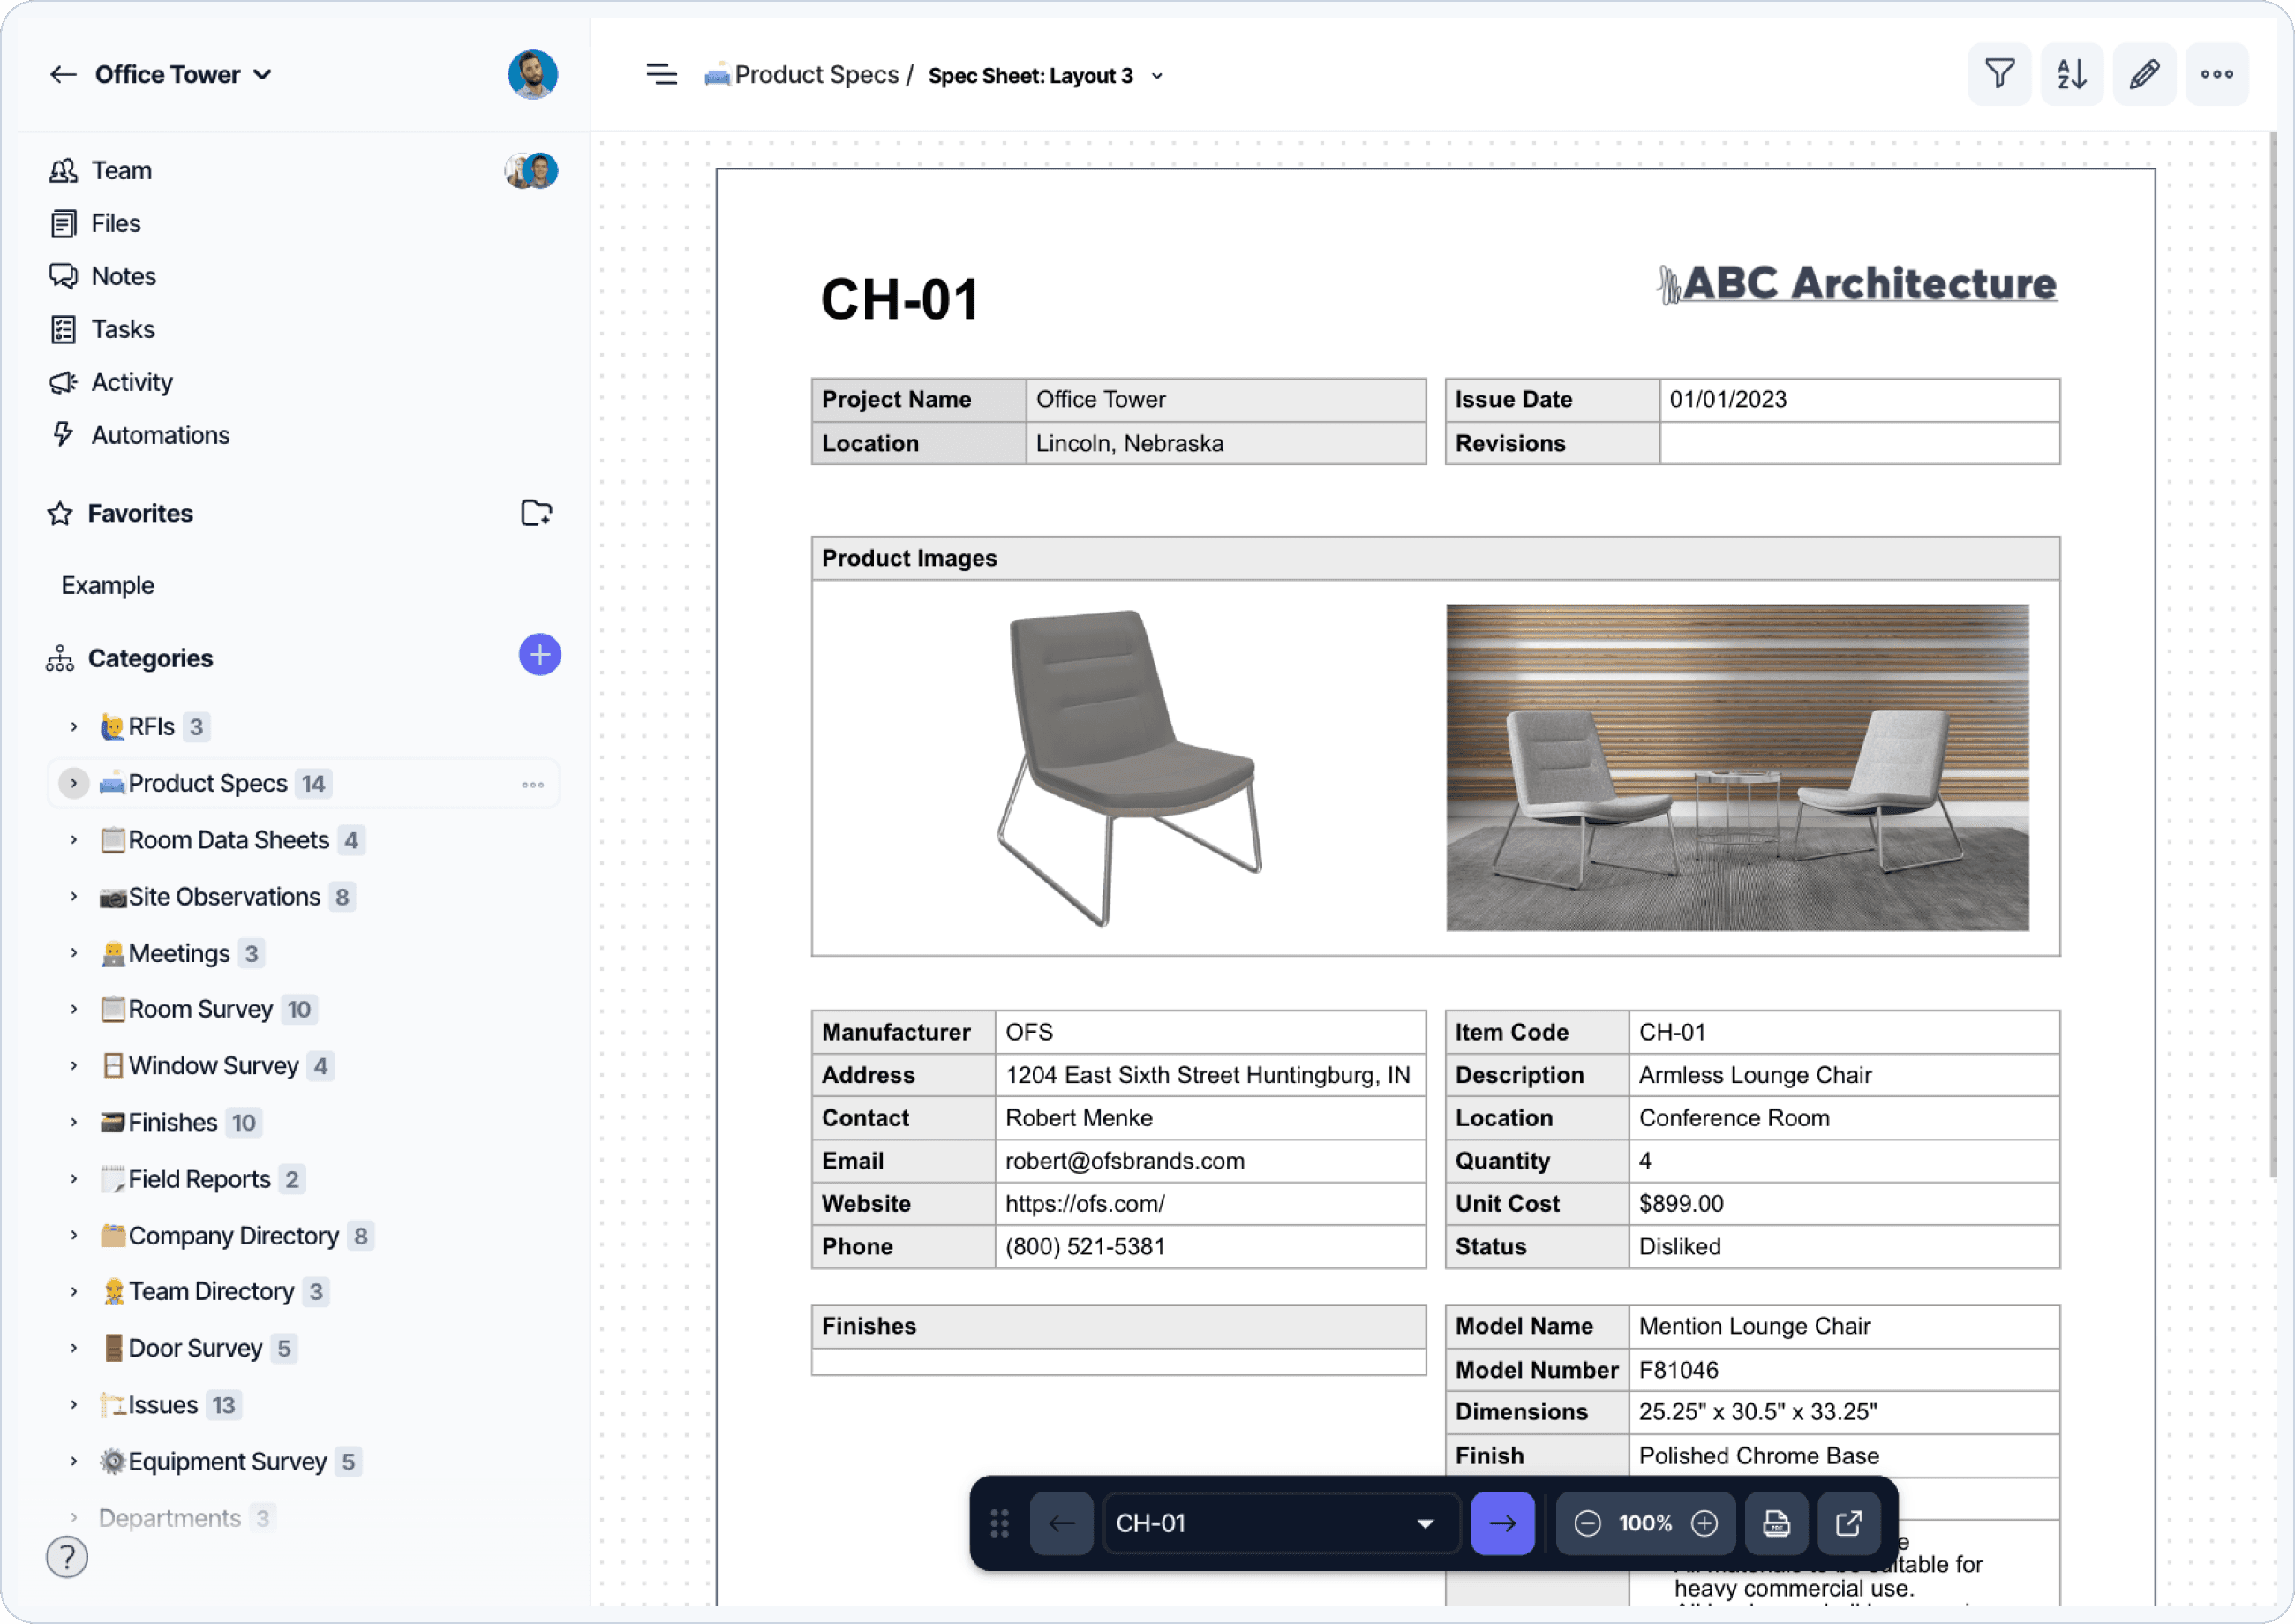
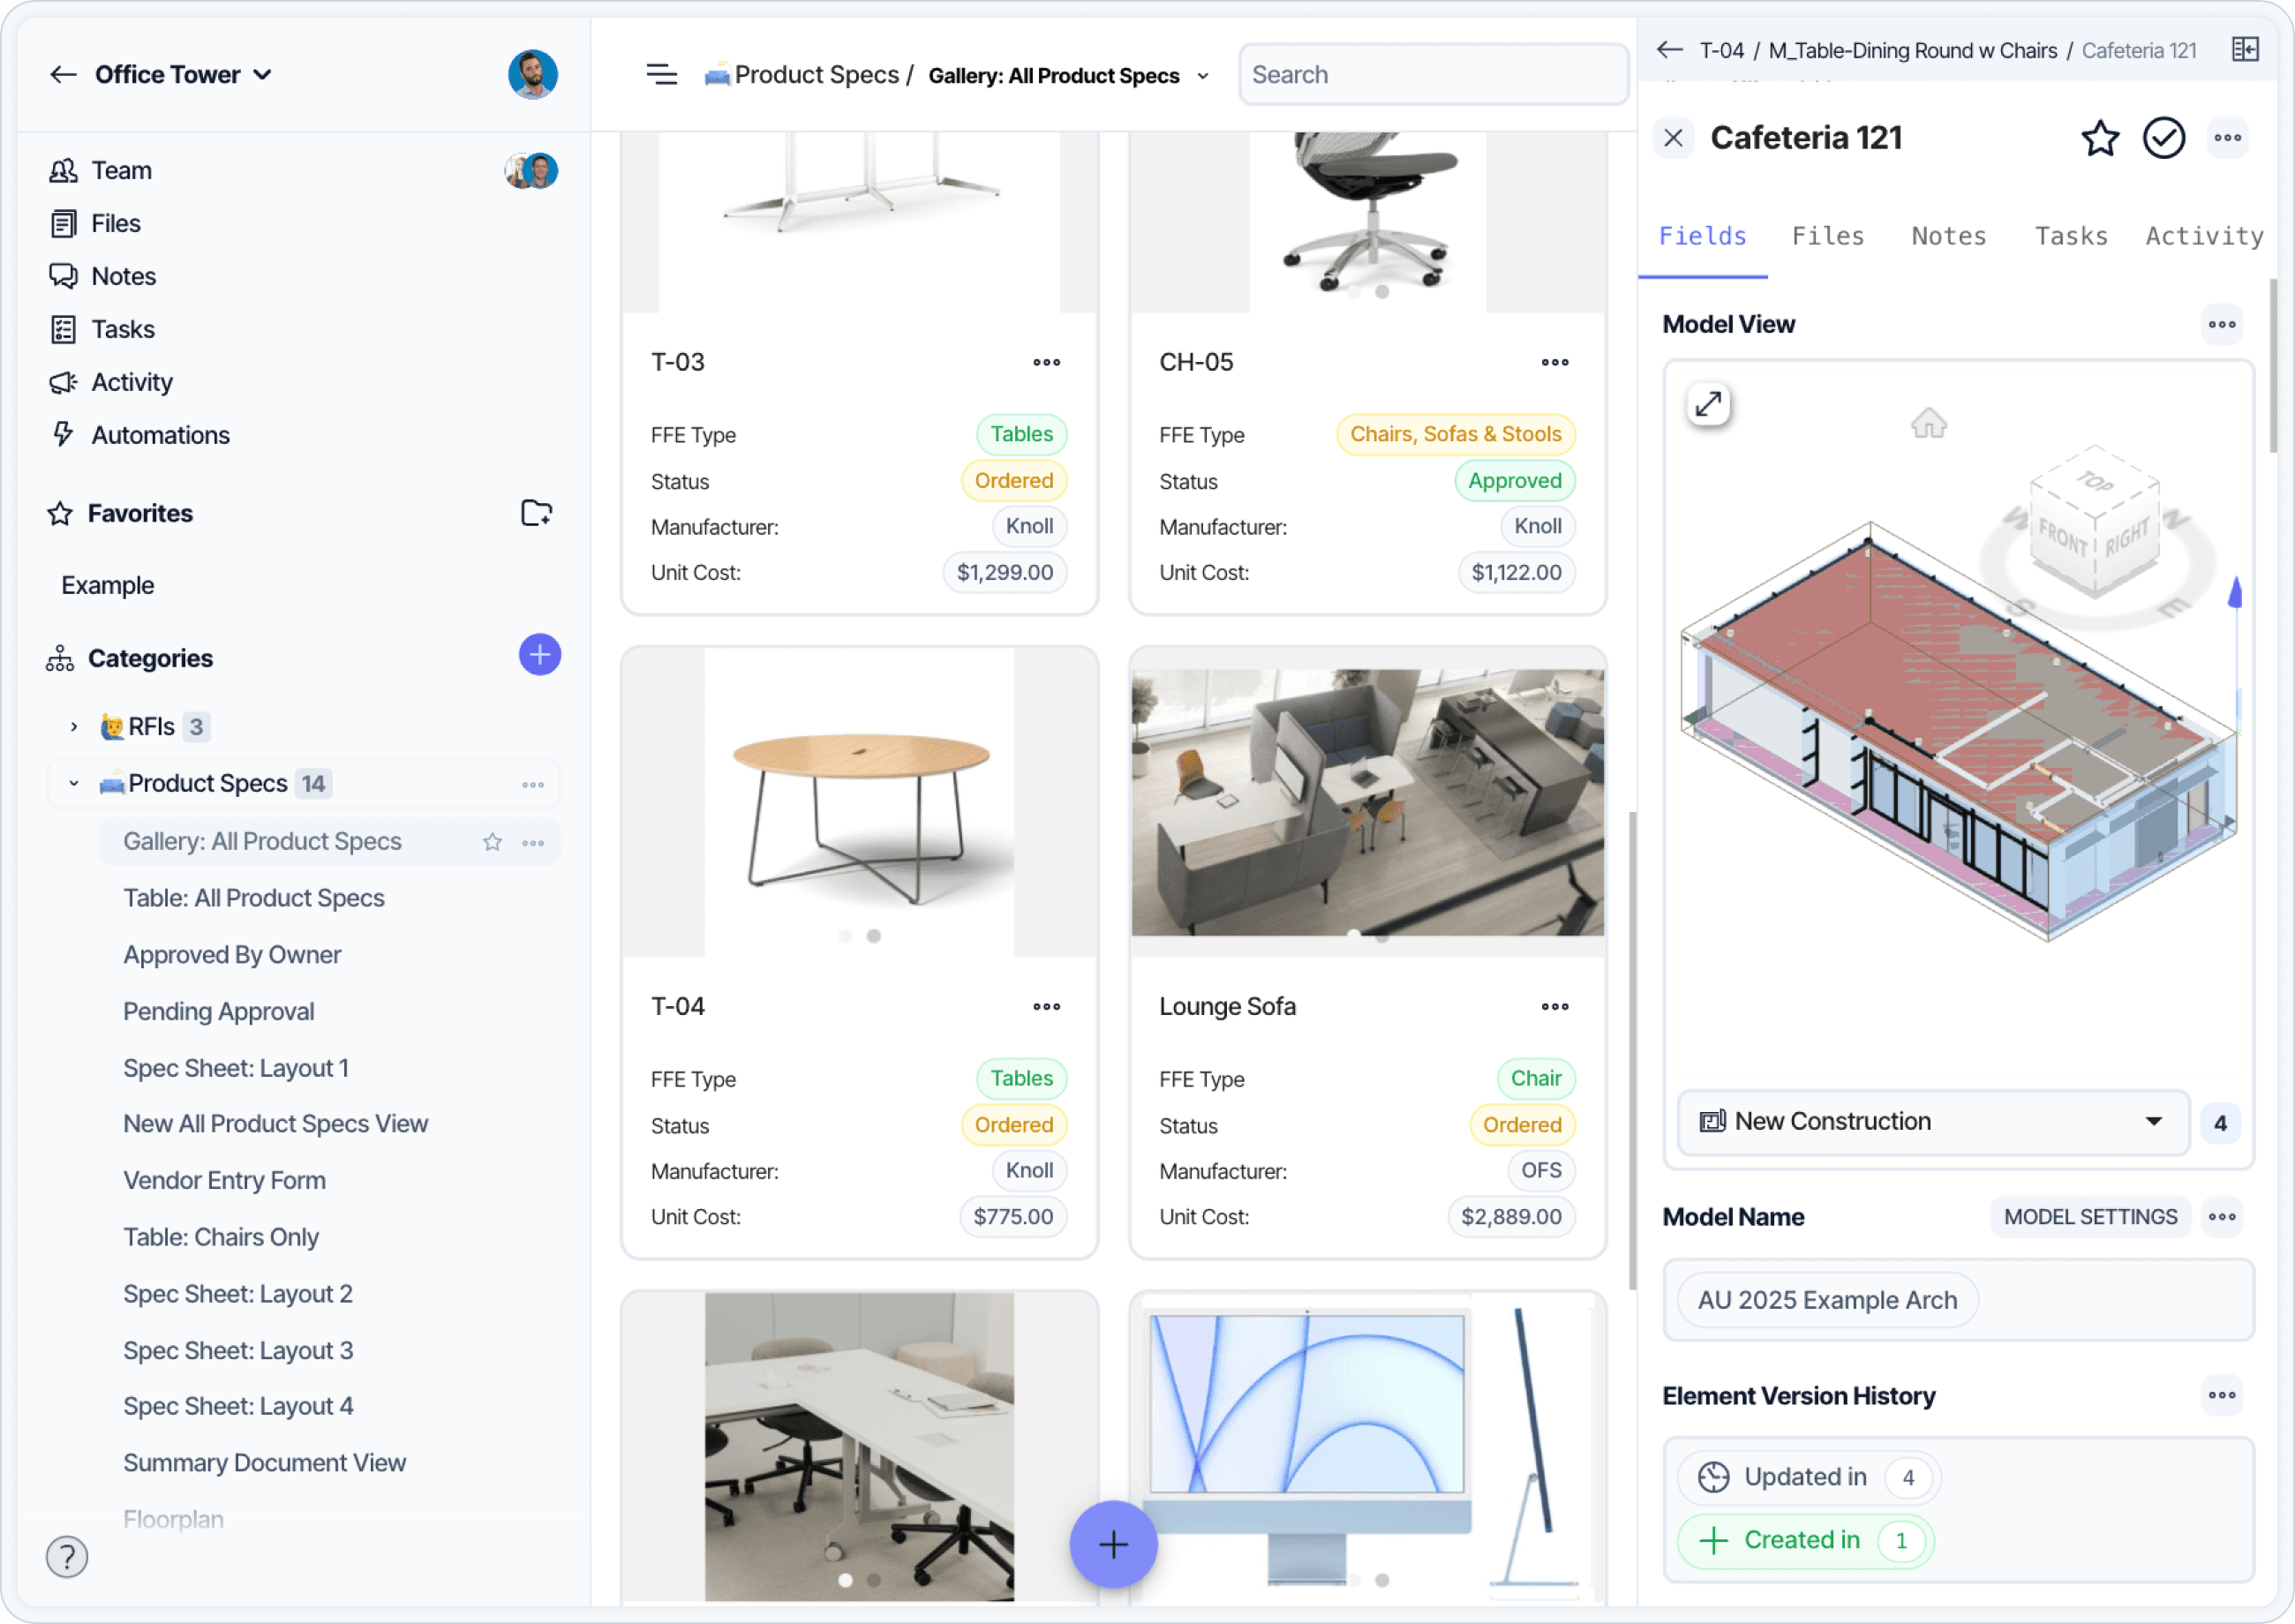
A specification sheet generated from project data. Spec sheets carry vendor information, finishes, dimensions, lead times, and budgets through procurement and into installation.
A shared procurement dashboard, with live status for each FF&E item, helps the GC, owner, designer, and procurement agent stay aligned without chasing email threads. Layer's Document View is one option for assembling and sharing spec sheets directly from the underlying project data.
Read FF&E Procurement Explained →
Step 5: Receive Delivery, Installation, and Punch List
FF&E has started to arrive on site, now what? Verification begins.
Each item must be inspected for damage or defects before installation. Larger projects often assign this task to procurement agents or contractors.
If there is damage, you’ll need to take photos and notate who is responsible for fixing or replacing the damaged item. If not, you or the contractor may be liable for damages down the road. You could also miss return windows to the vendor.
You likely are not responsible for the physical installation of FF&E, but you may be the primary point of contact to coordinate it. You can help the process run smoothly by providing easy-to-interpret furniture plans, lighting schedules, and installation information from the manufacturers.
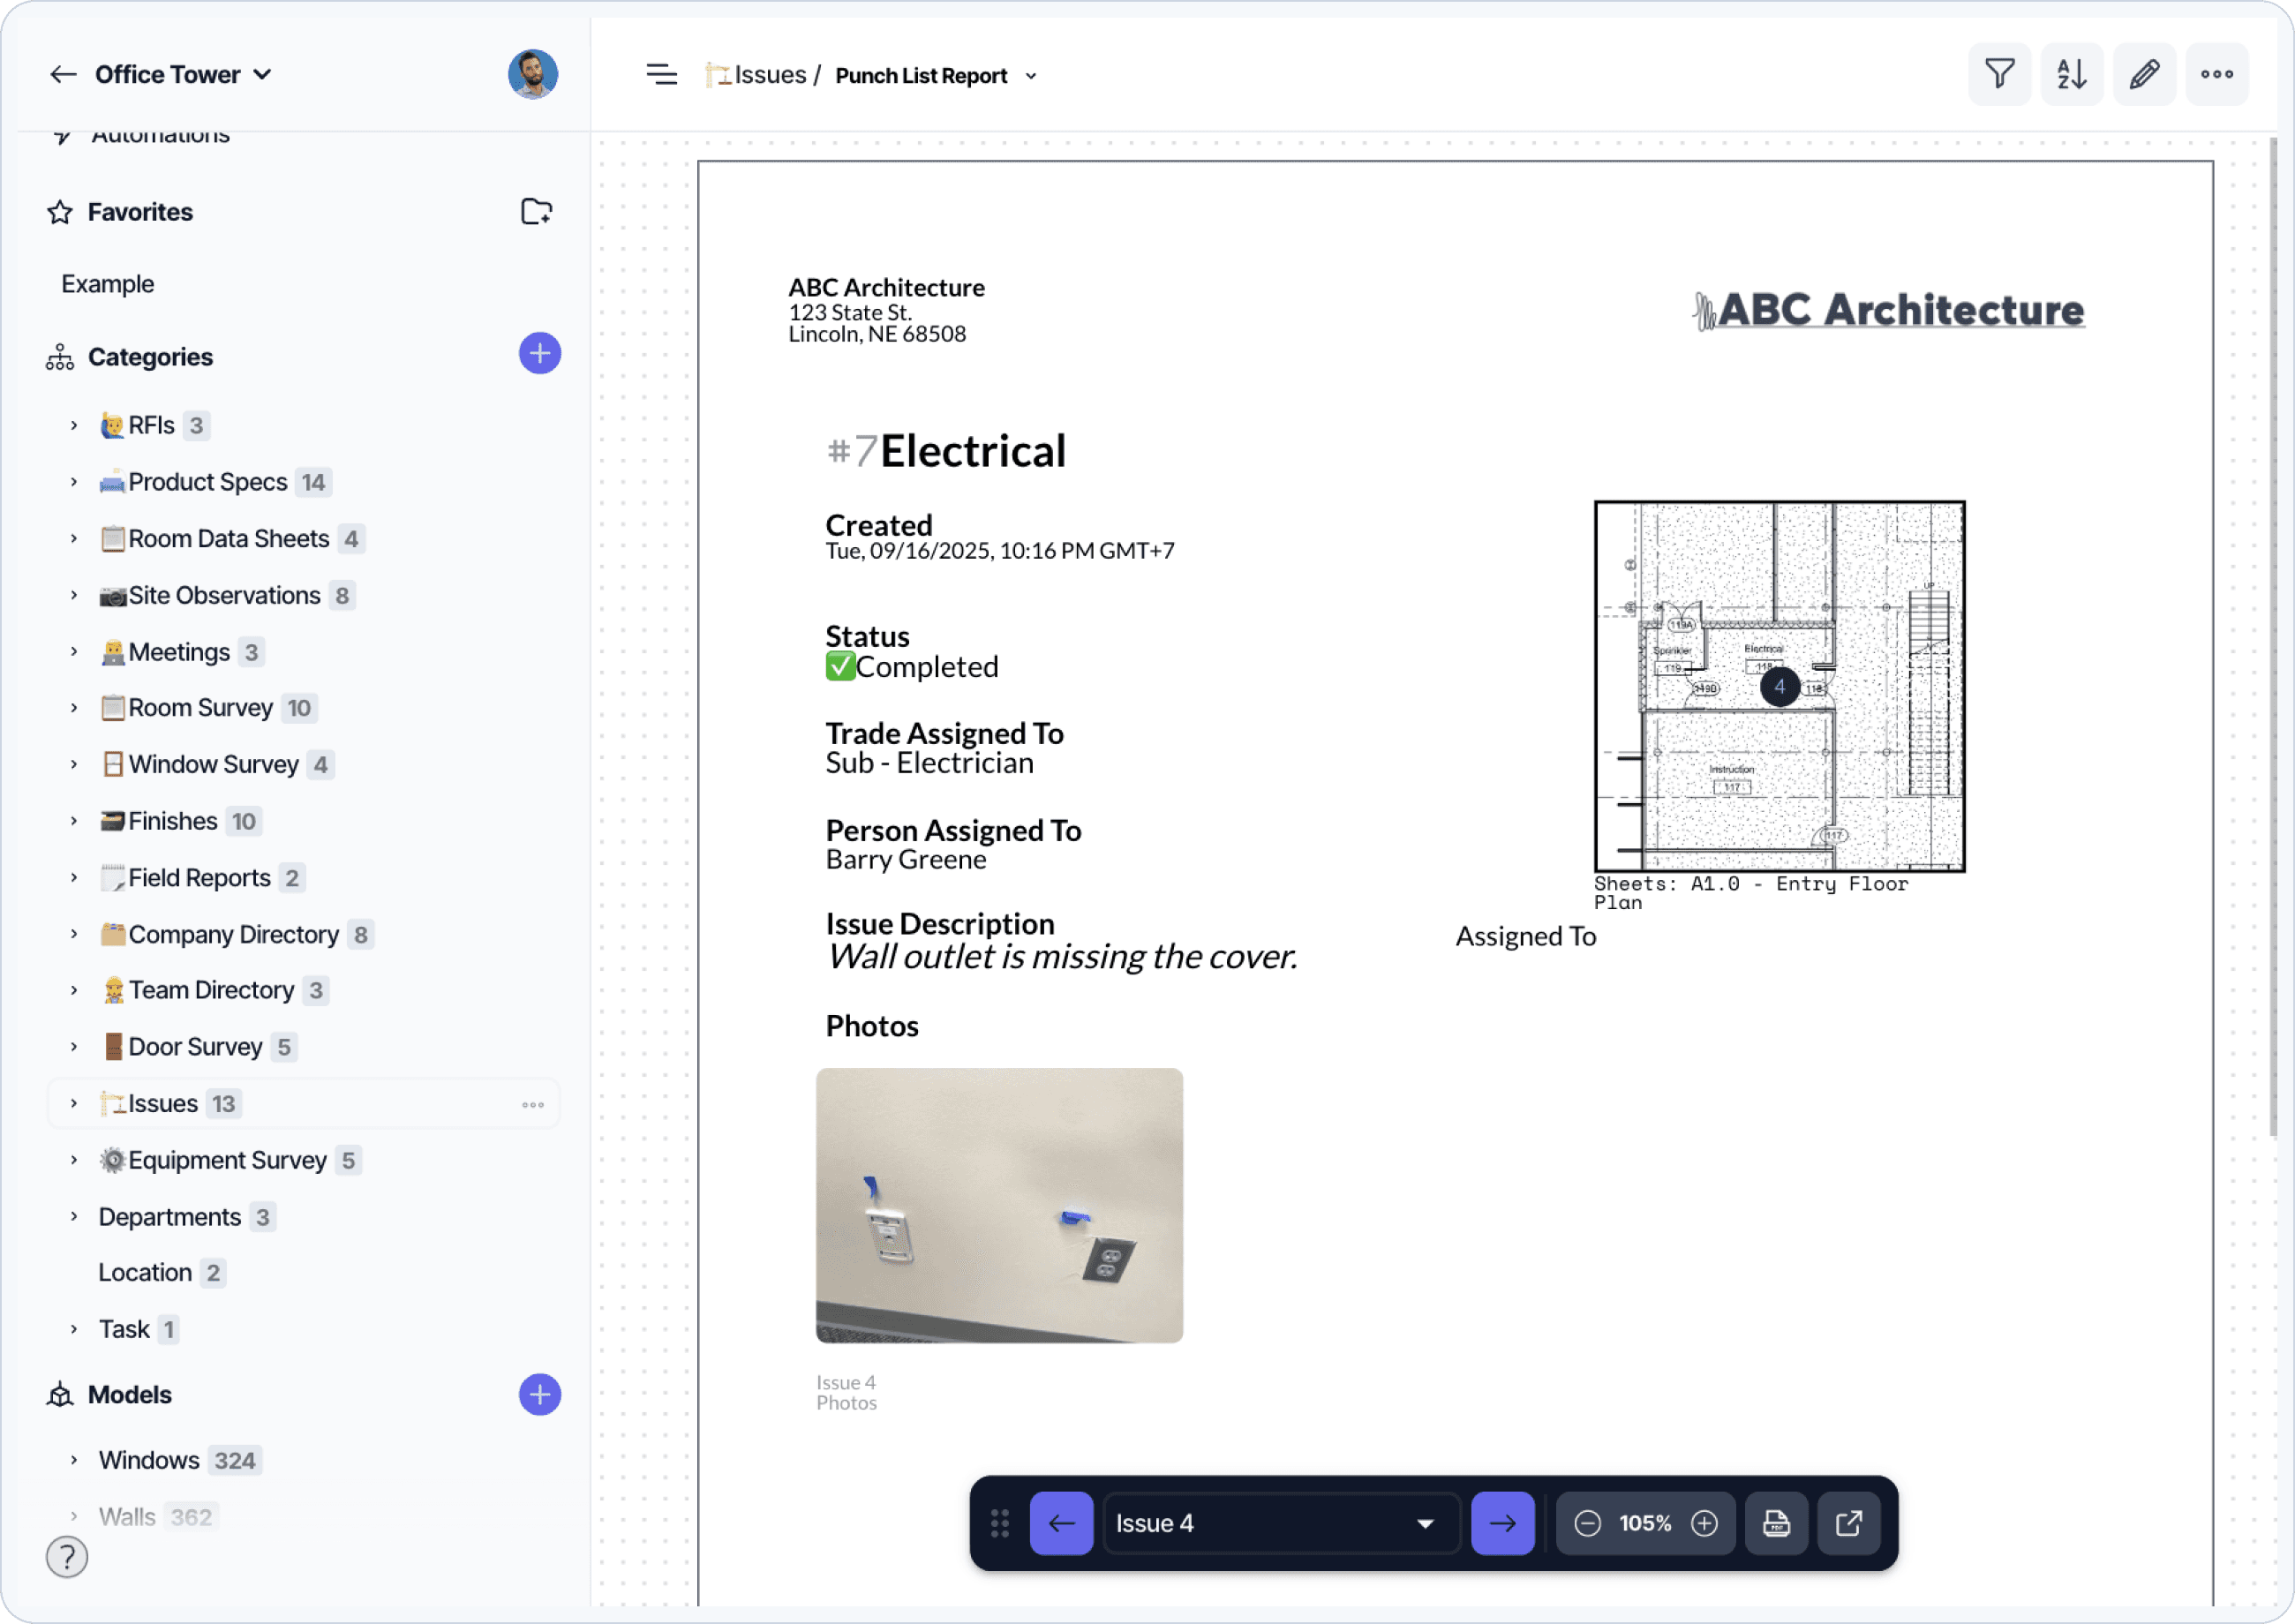
Tracking what has been delivered, what is approved for installation, and what still needs follow-up is easier when delivery status lives alongside the specification data. Pre-configured punch list templates such as Layer's punch list template help document that everything is installed correctly and without damage.
Read more about managing FF&E during CA →
Step 6: Client Handover
You’re almost there! Everything is installed and the client is happy. Now what?
Once installation is complete, you must prepare handover materials. These include manuals, warranties, and vendor information. If you provide an as built Revit model, you can link each FF&E item to its digital record.
This creates a comprehensive Owner’s Manual that supports long term building operation.
Frequently Asked Questions
How long does the FF&E process typically take?
The FF&E process spans the full project timeline, from schematic design through occupancy. Specification work usually begins during design development and continues into construction documents. Procurement runs in parallel with construction, often six to twelve months for large projects with custom items. Delivery and installation cluster in the final months of construction.
Who manages the FF&E process on a project?
On most projects, the interior designer leads specification and the procurement agent leads ordering and logistics. On smaller projects, the interior designer or owner may handle both roles. Hospitality and healthcare projects with high item volume typically use a dedicated FF&E procurement company.
When does FF&E procurement start?
Procurement starts after design intent is approved and the construction budget is set. Lead times for custom or imported items often run six months or longer, so procurement runs in parallel with construction rather than after it. See FF&E Procurement Explained for a deeper walkthrough.
What happens if a specified item is discontinued or unavailable?
The procurement agent or designer identifies an alternate. Alternates require side-by-side review of pricing, quality, lead time, and compatibility with adjacent materials, then formal owner approval before fabrication moves forward.
What documentation does the owner receive at handover?
Typical handover deliverables include purchase orders, inventory lists, warranty documentation, manufacturer manuals, installation manuals, maintenance instructions, punch list resolutions, and records of any items still in storage.
Is FF&E always specified by an interior designer?
No. On retail, hospitality, and education projects, brand standards or owner specifications may dictate FF&E directly. On smaller projects, owners may handle FF&E selection. The interior designer’s involvement scales with project complexity and the owner’s design preferences.
Further Resources
FF&E: A Comprehensive Guide to Furniture, Fixtures, and Equipment. The definitional reference covering categories, lifecycle, roles, and compliance.
FF&E Procurement Explained. A deeper look at the procurement phase, including vendor qualification, alternates, and follow-through.
FF&E in Construction Administration. Coordination, installation, and closeout responsibilities during CA.
How to Connect FF&E to Revit Workflows. Methods for keeping FF&E data and Revit elements in sync.
FF&E Specification Excel Template. A free Excel template for FF&E specification, cost tracking, and vendor data.
FF&E Workflow Template in Layer. A pre-configured Layer workflow that aligns FF&E data, procurement status, and Revit integration across project teams.


