Use JPEG or PNG photos for Layer uploads. iOS HEIC files upload successfully but cannot generate thumbnails. Learn how to change camera settings on iPhone.

Mike Lee
Layer accepts a wide range of image formats for File field uploads and photo attachments, but a few specific formats can cause silent thumbnail failures or red exclamation indicators in the file pane. The most common culprit is HEIC (also called HEIF), the default photo format on iPhones and iPads. This article covers which formats work well, which cause problems, and how to change your device's camera settings to avoid the issue.
Recommended formats
The formats below produce thumbnails reliably and display well in Drawing View, Document View, and the file preview window.
JPEG (.jpg, .jpeg)
PNG (.png)
WebP (.webp)
Uploads in these formats work consistently across Layer's mobile app, browser, and offline sync.
Formats that cause problems
These formats upload successfully but may not generate thumbnails or may display the red exclamation indicator in the file pane.
HEIC and HEIF (.heic, .heif): the default iOS camera format from iPhone 7 onward. The file uploads but Layer cannot produce a thumbnail. The full image is preserved on the file record, so you can download the original through the file menu, but the photo will not display in previews or in PDFs generated from Document View.
TIFF (.tif, .tiff): supported for upload but not all viewers render them. Convert to JPEG before uploading for the best result.
Camera raw formats (.raw, .cr2, .nef, .arw, .dng): not supported. Convert to JPEG before uploading.
If you see a red exclamation mark on a file in the file pane, the most likely cause is one of the unsupported formats above.
Recommended iOS settings
To change your iPhone or iPad camera to capture JPEG photos instead of HEIC:
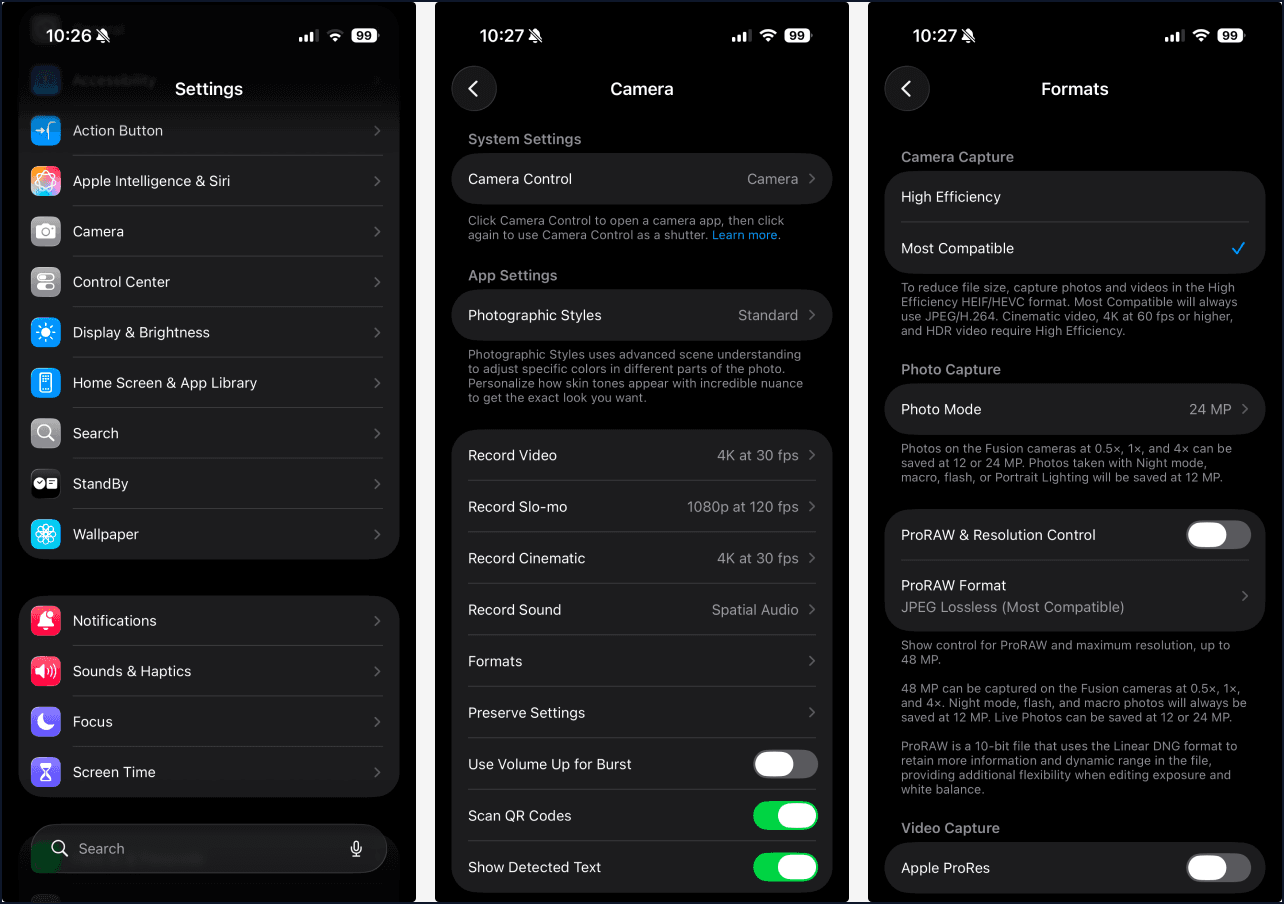
Open the Settings app.
Scroll to Camera and tap it.
Tap Formats.
Select Most Compatible.
From this point forward, the Camera app captures JPEG photos. Existing HEIC photos in your library remain as HEIC; the change applies only to new photos.
Users who frequently photograph job sites or surveys for Layer should make this change once on every device used in the field. The default iOS setting (High Efficiency / HEIC) is optimized for iCloud storage, not for compatibility with third-party tools.
Android cameras
Android devices typically default to JPEG output. The setting varies by manufacturer but is usually found under Camera app, Settings, Picture format. Verify the format is set to JPEG and not RAW or a proprietary High Efficiency format.
Fixing existing HEIC files
If you have already uploaded HEIC photos to a Layer project, the recommended workflow is:
Download the original HEIC files from Layer through the file menu, or locate them on your device.
Convert them to JPEG using a free converter such as the macOS Preview app (File, Export, JPEG), the iOS Files app (long-press the file, choose Convert Image, JPEG), or an online converter for batches.
Delete the HEIC versions in Layer and re-upload the JPEG versions.
For projects with many HEIC files, this is time consuming. A faster long-term fix is to change the camera setting first so new captures are JPEG, then clean up old HEIC files only on the elements that matter for printed reports or external sharing.
Other photo upload tips
File size: large originals (more than 10 MB per photo) upload but take longer, especially on slow networks. iOS Camera at the default resolution produces 2 to 5 MB JPEGs, which work well.
Orientation: most modern cameras embed orientation data, and Layer respects it. If a photo appears rotated incorrectly, the EXIF orientation may be missing or wrong. Re-export from a photo editor with the orientation baked in.
Geotagging: Layer does not extract GPS coordinates from photos. If you need geotagged photos linked to specific locations, use the Drawing View pin workflow or a Location field on the element.
When a thumbnail does not appear
If a photo uploaded successfully (no error) but shows no thumbnail and no preview:
Check the file format using the file menu's Copy File ID or the original filename on your device. If it ends in .heic or .heif, that is the cause.
If the format is supported, refresh the page or close and reopen the file pane.
If the thumbnail still does not appear, run the Reset Element Sync Engine step in Troubleshooting Layer.
If none of the above resolve it, contact support with the project name, the file name, and a screenshot of the file pane.

