Company Templates
Introduction to Project Templates
Get up and running with our new Project Templates feature.
Learn a fast and easy workflow for documenting existing building conditions.
Before we dive into the 4 easy steps, we want to first cover the basic organization of data in a Layer. You'll start by creating a Project, which is built from a hierarchy of Categories, Elements, and Fields. If you're familiar with using spreadsheets, just think of Categories as a sheet, Elements as the rows, and Fields as the columns.
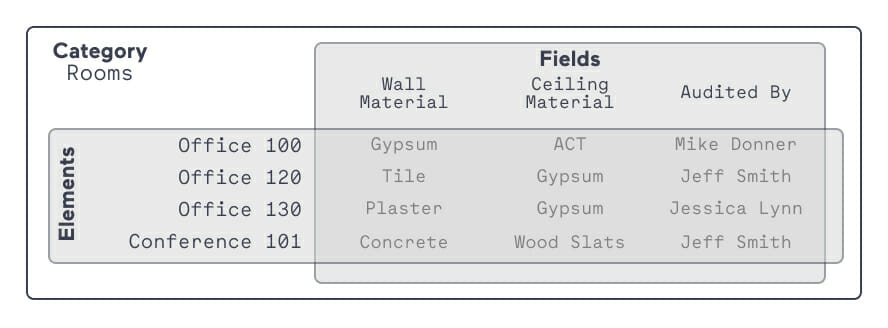
What are Categories?
Categories are the top of the organizational hierarchy. Categories are just that, categories or filters of information, aka your Elements with Fields. You can create Categories of things like rooms, drawings, or issues.
What are Saved Views?
Saved Views are like sub categories of information, where you can save specific search and filter configurations within a Category. For example, you have all of the rooms you're going to audit, but you want them separated by floor. You would created Saved Views for each floor.
What are Elements?
Elements are the single buckets of information that can be tangible things like Rooms, Windows, and Equipment— and intangible things like Deficiency Issues. Each Element stores its own customizable survey of Fields.
What are Fields?
Within each Element, you can create custom surveys. These surveys are built from a wide variety of customizable Form Fields. Use Related Fields to create relationships between Elements in different Categories.
Just a note that it's a lot easier to do Steps 1-4 before you go onsite. But it's not a problem if you need to add a room or a form field on the go. Layer is built for flexibility and our offline mode makes it possible to edit everything even without WiFi.
There are many types of site visits this process could work for. But for this exercise, we're going to document the existing conditions of a building.
You'll want to create a new Category called Existing Rooms and populate the Category with an Element for each room that will be inspected. Within these room Elements, you'll then create the form fields that will capture the different types of data you want to collect.
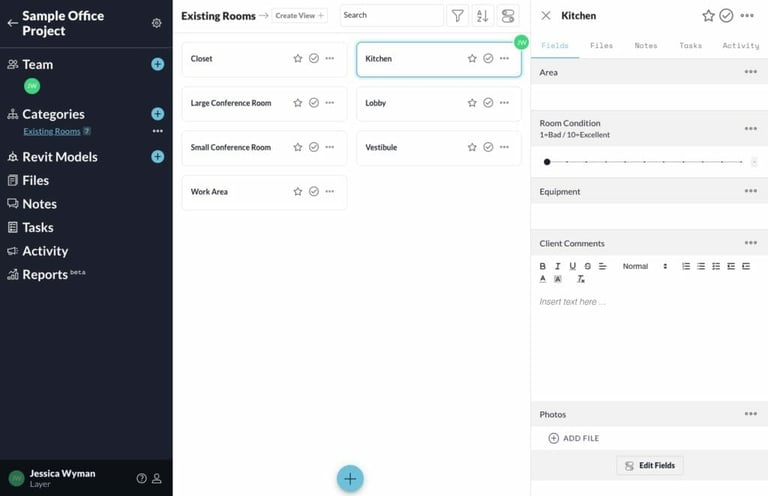
Need help creating your Categories, Elements, and Form Fields? Watch this quick tutorial:
Now you're ready to upload as-built drawings. Using Layer's Saved Views feature, you'll create a Saved Drawing View within the Existing Rooms Category. You'll then choose a default annotation marker, such as the polygon or rectangle tool.
Once you've uploaded your drawings, you'll click the Link to Existing button in the bottom right corner. You'll then outline the room and select the room name. You'll repeat this process for all of the rooms you're going to survey. After that's done, you're almost ready to go on site!
Last but not least, remember to download the Layer mobile app! Log in, take a quick peek around to get familiar with the mobile interface.
Once you're on site, you'll navigate to drawing view, click the room you're surveying, then take photos and input your data into the form fields. It's that easy!
Also know that if you forgot to set up anything in the office, it's super easy to add new annotations, Categories, Elements, and Form Fields on the fly!
Need more help? Email us at help@layer.team or schedule a demo of Layer
Get up and running with our new Project Templates feature.
Layer makes it easy to connect FF&E to Revit workflows. Designers and specifiers who don't know Revit can complete Revit schedules using Layer.