Jessica Wyman
Updated: Oct 15, 2024
The FF&E Process Explained
In this guide, we’ll explain the furniture, fixture, and equipment (FF&E) selection process and dive into the tools you need to implement and deliver a successful FF&E scope.

First off, what exactly is FF&E?
FF&E is an acronym that stands for Furniture, Fixtures, and Equipment. FF&E typically consists of all the moveable elements in a space. Chairs, appliances, shelving, and electronics are some examples. FF&E makes a building functional, without it, spaces would simply be empty.
Every project is different. The FF&E specified, when it's specified, and by who will depend on the client. For instance, offices will need desks, chairs, overhead lighting, kitchen appliances, and decor. An owner may often leave the specification to an interior designer or FF&E consultant.
For industrial spaces, infrastructure, or medical facilities, and owner may wish to have greater control. Often much of the equipment will be specified as OFCI (Owner Furnished, Contractor Installed). This may also be the case when you work on a project that has tight brand standards or franchise specified equipment vendors.
So how do Interior Designers keep track of all this complexity?

Designers often track hundreds to thousands of FF&E items during the design process. Options need to be considered. Costs assigned. Final choices need to be approved.
Procurement, delivery, and installation statuses need to be recorded. At the same time, this data is often required by multiple outside stakeholders:.
Manufacturers need the specification of the objects selected.
Electricians need to understand if any of the elements require electricity.
Clients need to view the look and feel of the furniture options before approving the selections.
And this isn't even an exhaustive list!
Usually, this information lives all over the place - spreadsheets, sketchbooks, and design files. Whether you are an architect or an interior designer, this article will provide you tips and tricks to stay organized using Layer.
Step 1: Design the Schematic Layout
Depending on the scale and type of project, the FF&E process may start as early as the feasibility stage. You have an architectural layout that may or may not be finalized, and now you need to populate it with furniture and fixtures. For the most part, FF&E is vague at this early stage. You aren't selecting specific pieces…. just yet!
Designers create test fits, which are schematic floor plan layouts, to understand potential FF&E arrangements.
| What do you mean, a test fit? A "Test Fit" is exactly what it sounds like!
Typically, during this process a designer puts generic placeholder furniture in the drawings. The placeholder furniture brings scale to the space and provides a rough quantity for each object type. This allows the design team to quickly determine if a particular set of furniture will work for the space. It helps answer questions such as:
Do I have the right amount of furniture for specified for the project?
Will the building's occupants be able to functionally use the space?
Do other changes to the design need to be made to meet the client's requirements?
Pro-tip: With Layer, designers can share potential furniture layouts with clients and collaborators via an interactive 3D model viewer tool.
Step 2: Gather Specification Data
Regardless of whether you’re an architect, interior designer, or even a medical equipment planner, you’ll be visiting numerous websites for FF&E options. You might also visit showrooms, attend vendor conferences, or meet with product representatives to get more in depth information.
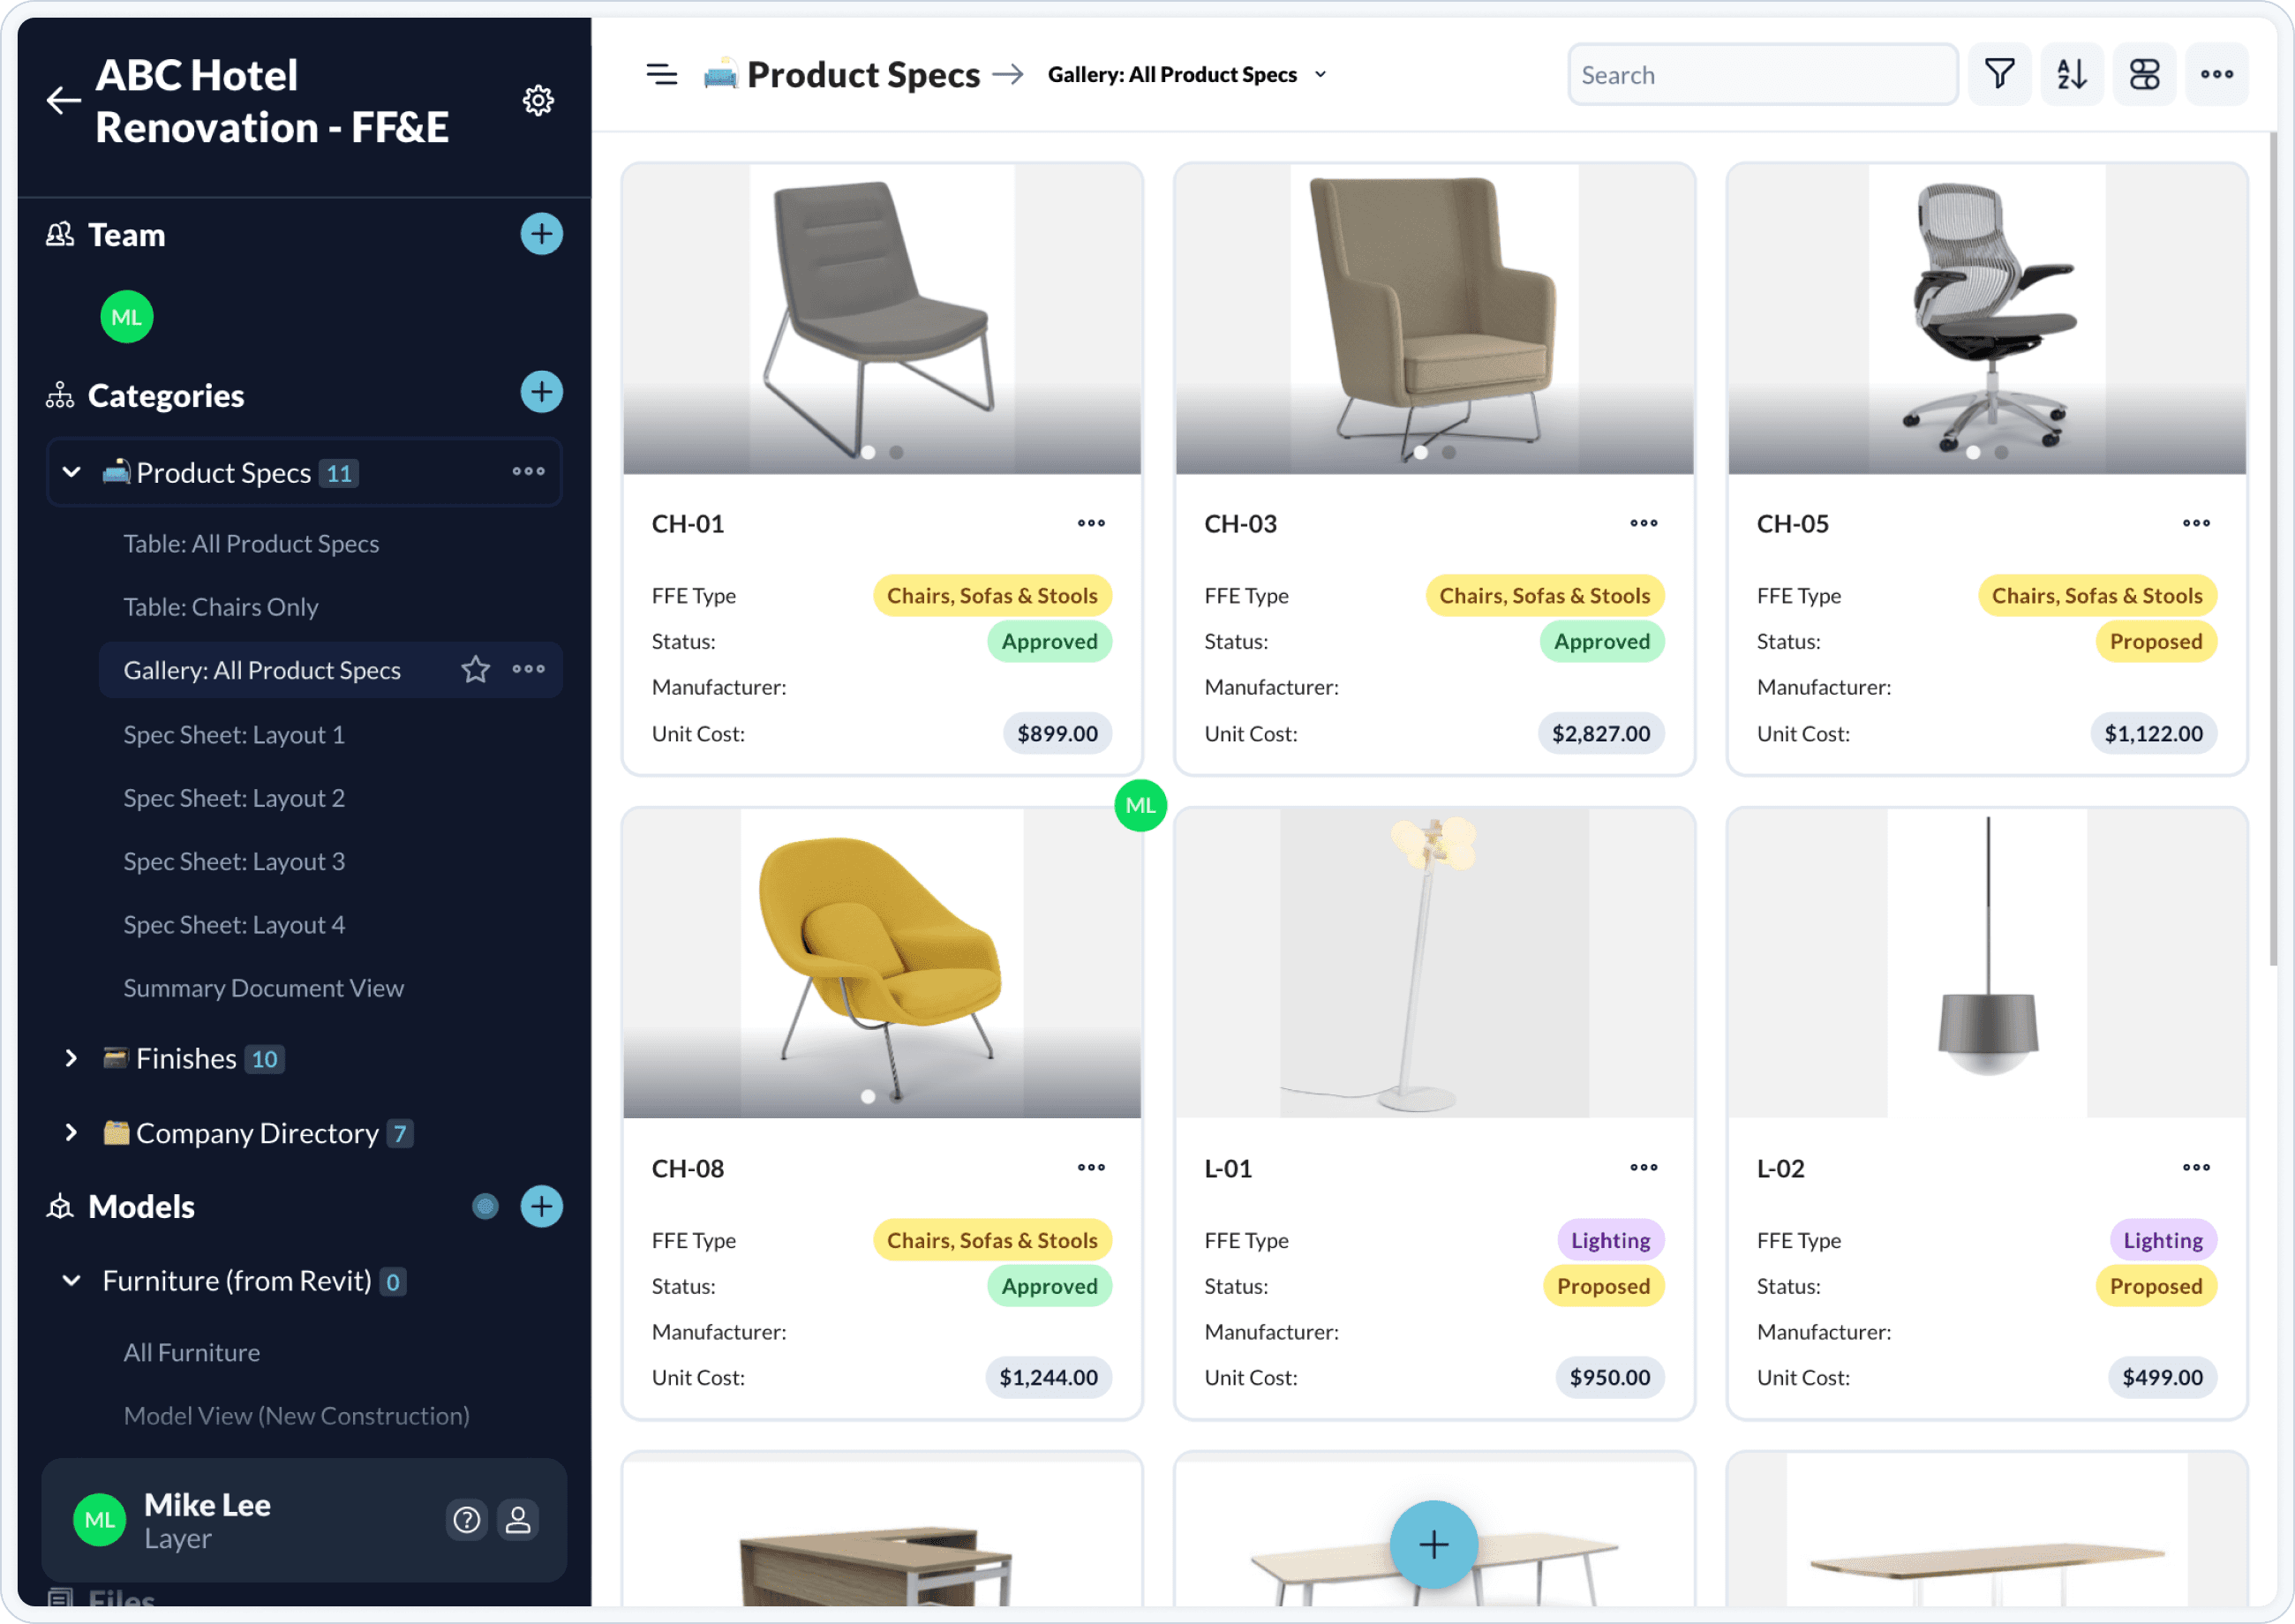
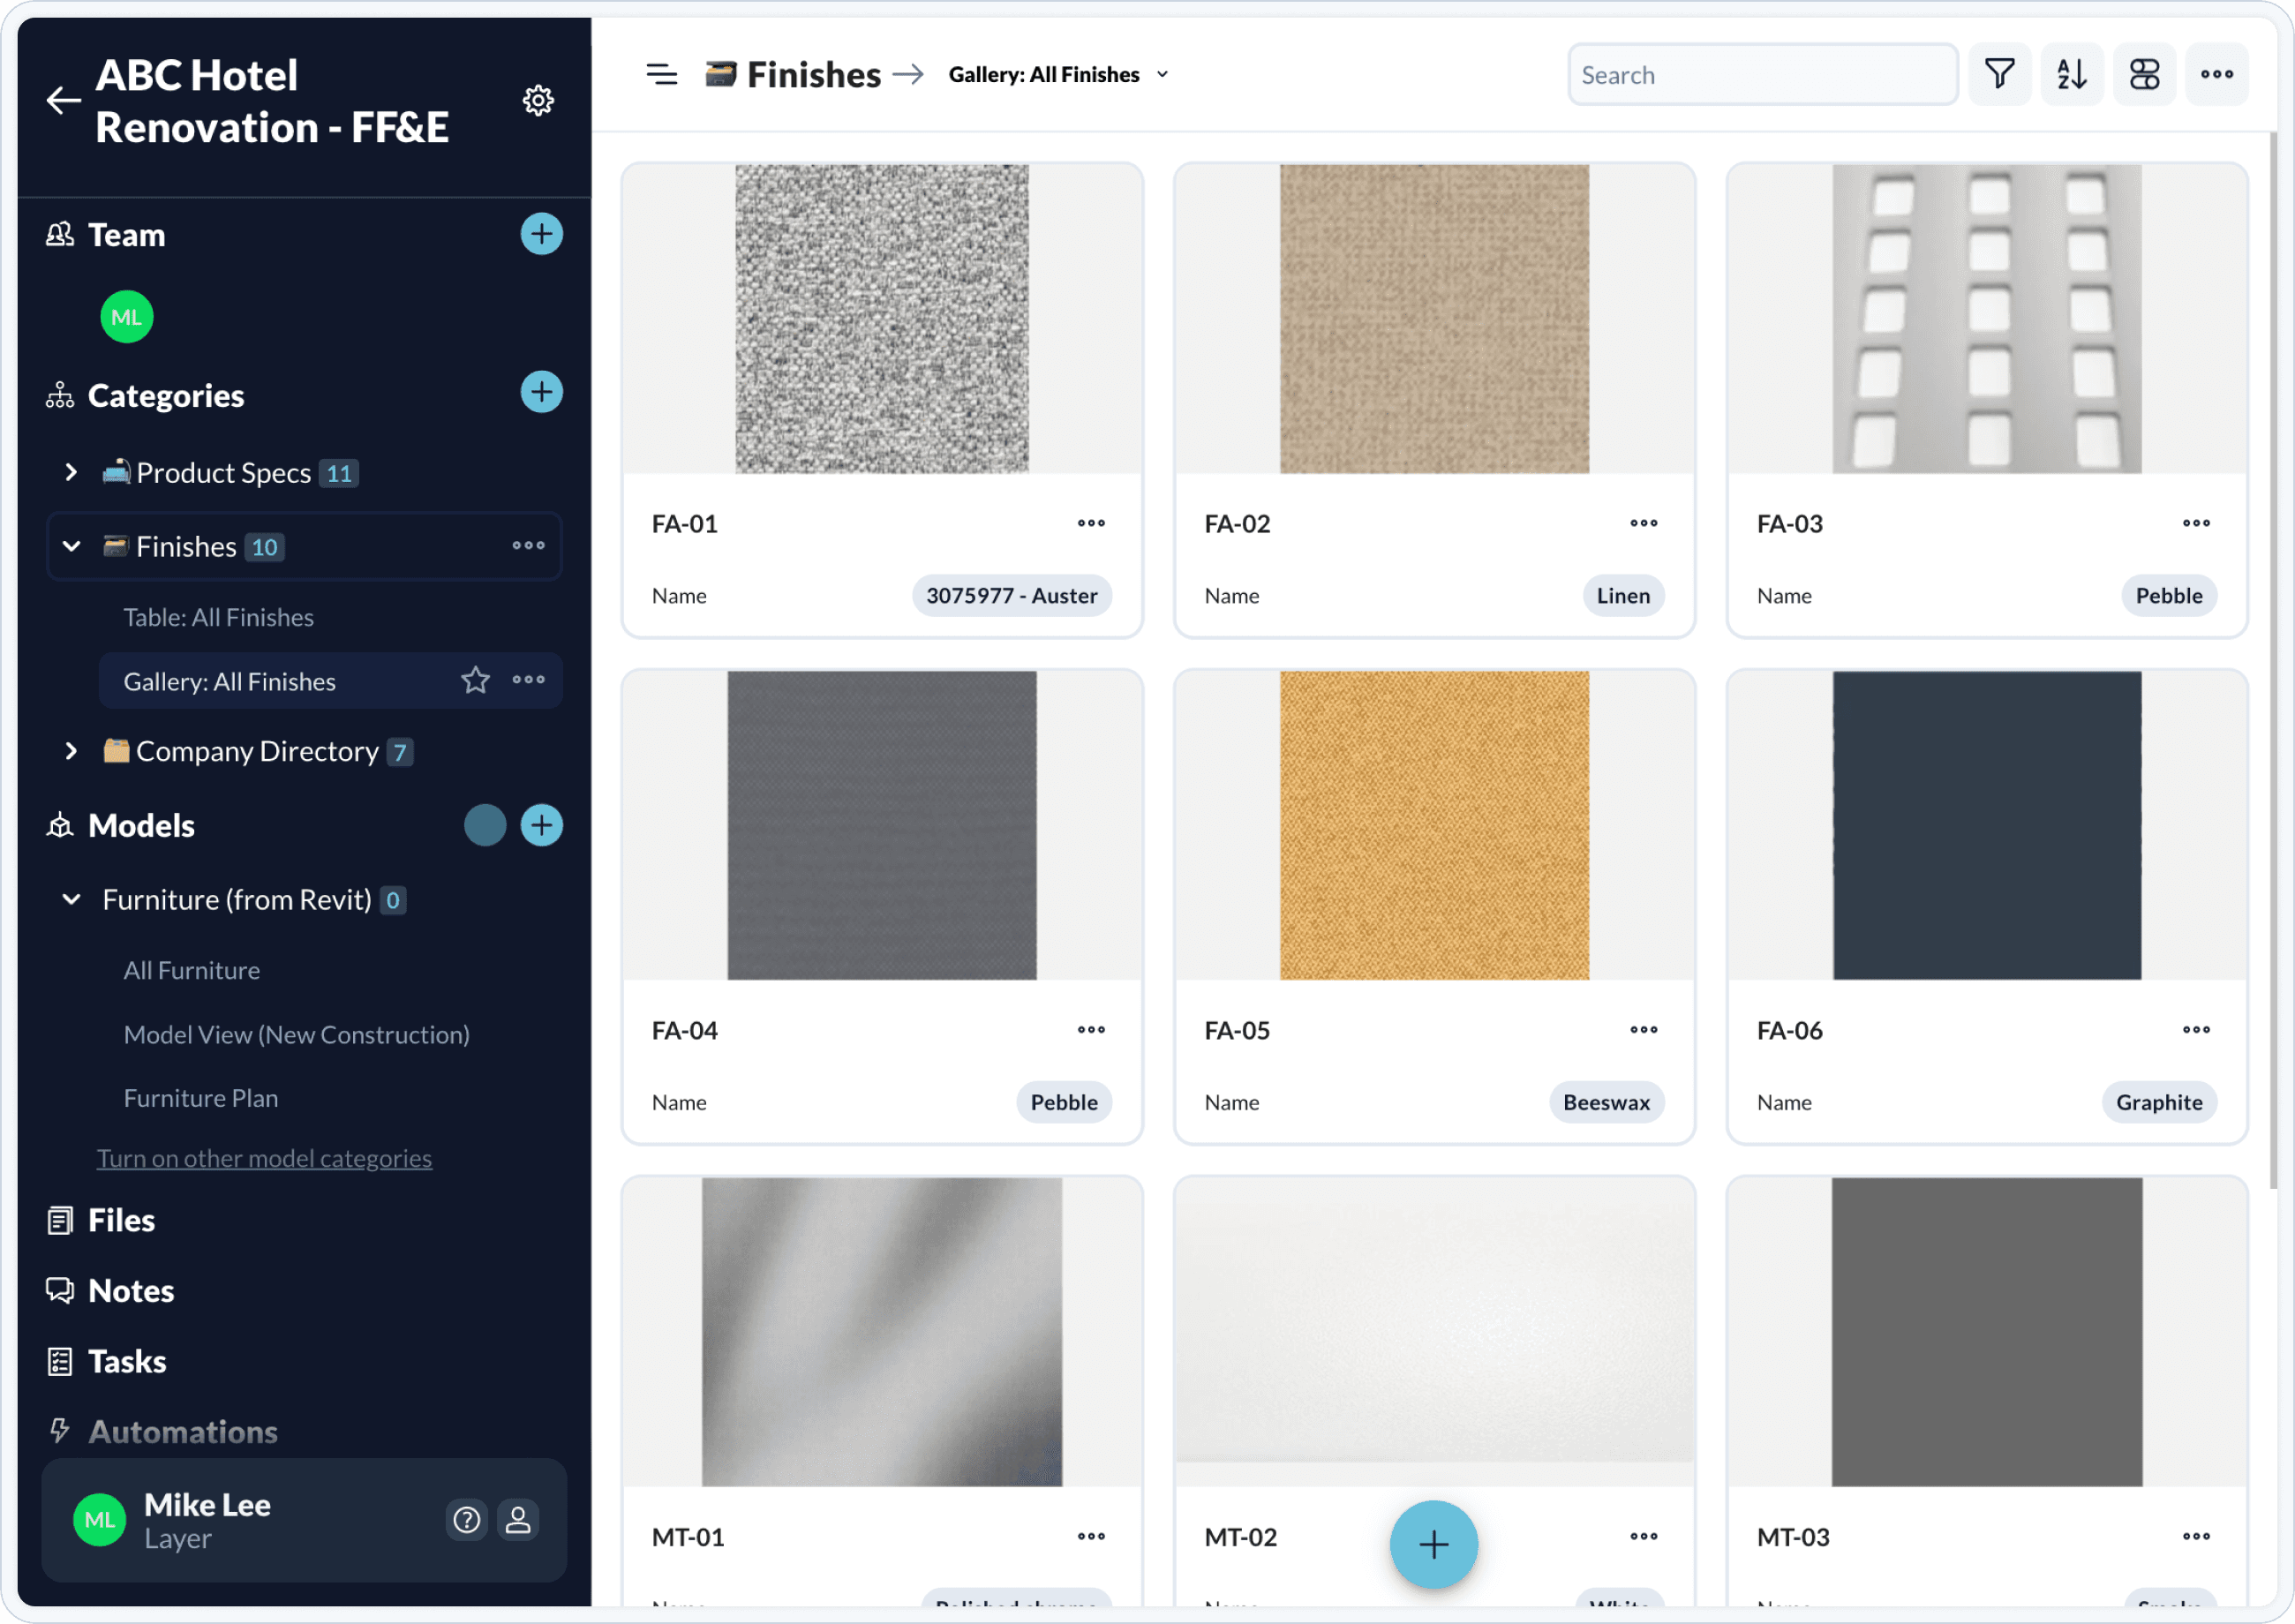
In short, you’re collecting a lot of FF&E specification data. Photos, cut sheets, pricing and model numbers are some of the data points required to put together complete specifications. In some cases, you may even need to document existing owner FF&E items already in the space.
With Layer, you can create a digital directory of FF&E products with cut sheets, photos, and more. These specs can be linked directly to the 3D object in Revit and you can share them directly with vendors. No more external and disconnected spreadsheets.
Step 3: Present the FF&E Selections to the Client
You’ve gathered several options for each piece of FF&E and created test-fit drawings for each option. Now it’s time to review all your design solutions with the client.
Achieving client approval may require several meetings, especially for large projects. Be prepared with up-to-date information on pricing and lead times so clients can make informed decisions promptly. Storing all information in Layer allows you to easily access this data in real-time during meetings.
Layer can help you create digital concept boards linked directly to the FF&E products, making it easy to reference them during meetings.
Step 4: Procurement
Great news—the client approved your FF&E package! Now, it's time to finalize drawings and proceed with procuring the pieces.
Procurement is a detailed process that requires the ability to manage a large amount of information. Depending on the project and scope of work, you may work with a procurement agent or handle the ordering yourself. If you are doing it yourself, tracking "lead time" is crucial. For instance, if you specify office chairs that have an 8 month lead time, but occupancy is scheduled to occur 6 months from now, you will end up with an unhappy client!
You will provide a list of specifications, answer vendor questions, and evaluate options. You will also propose alternatives in cases of product discontinuations, budget constraints, or changes in design intent.
Timing is critical. Items must arrive on site when needed: arriving late could cause delays. Ordering too early could imposed additional costs for storage or the risk of damage or loss.
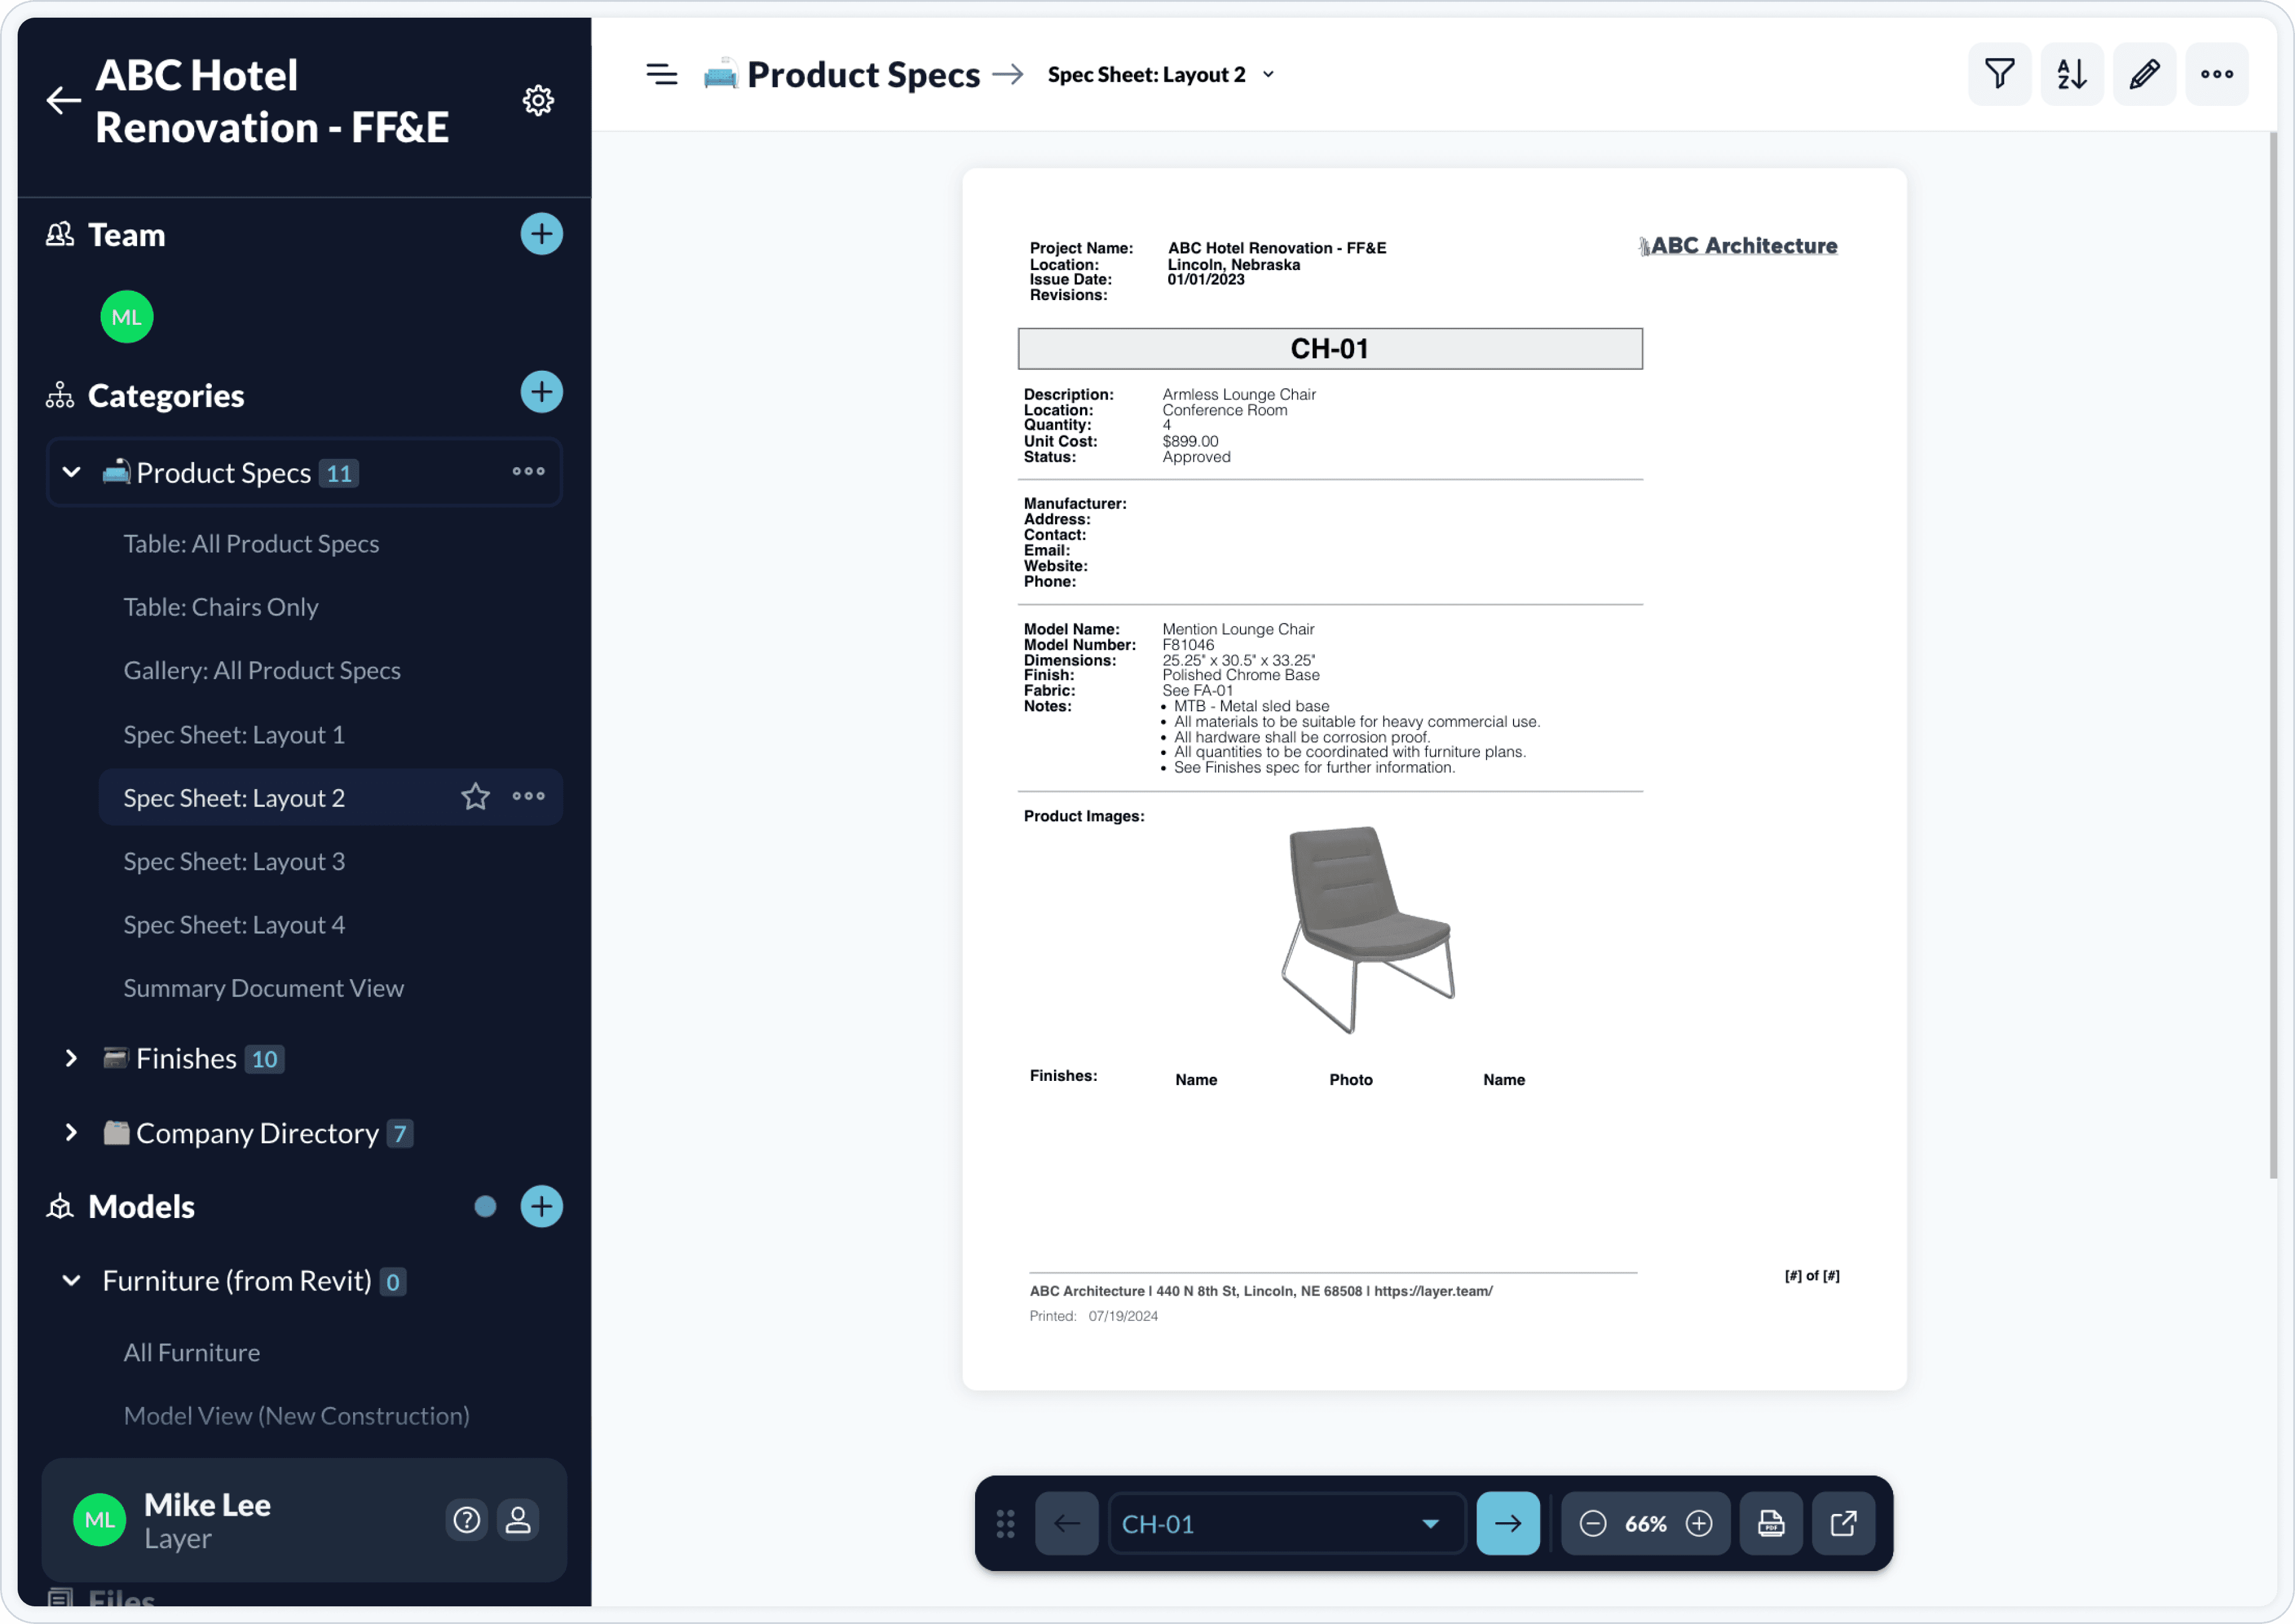
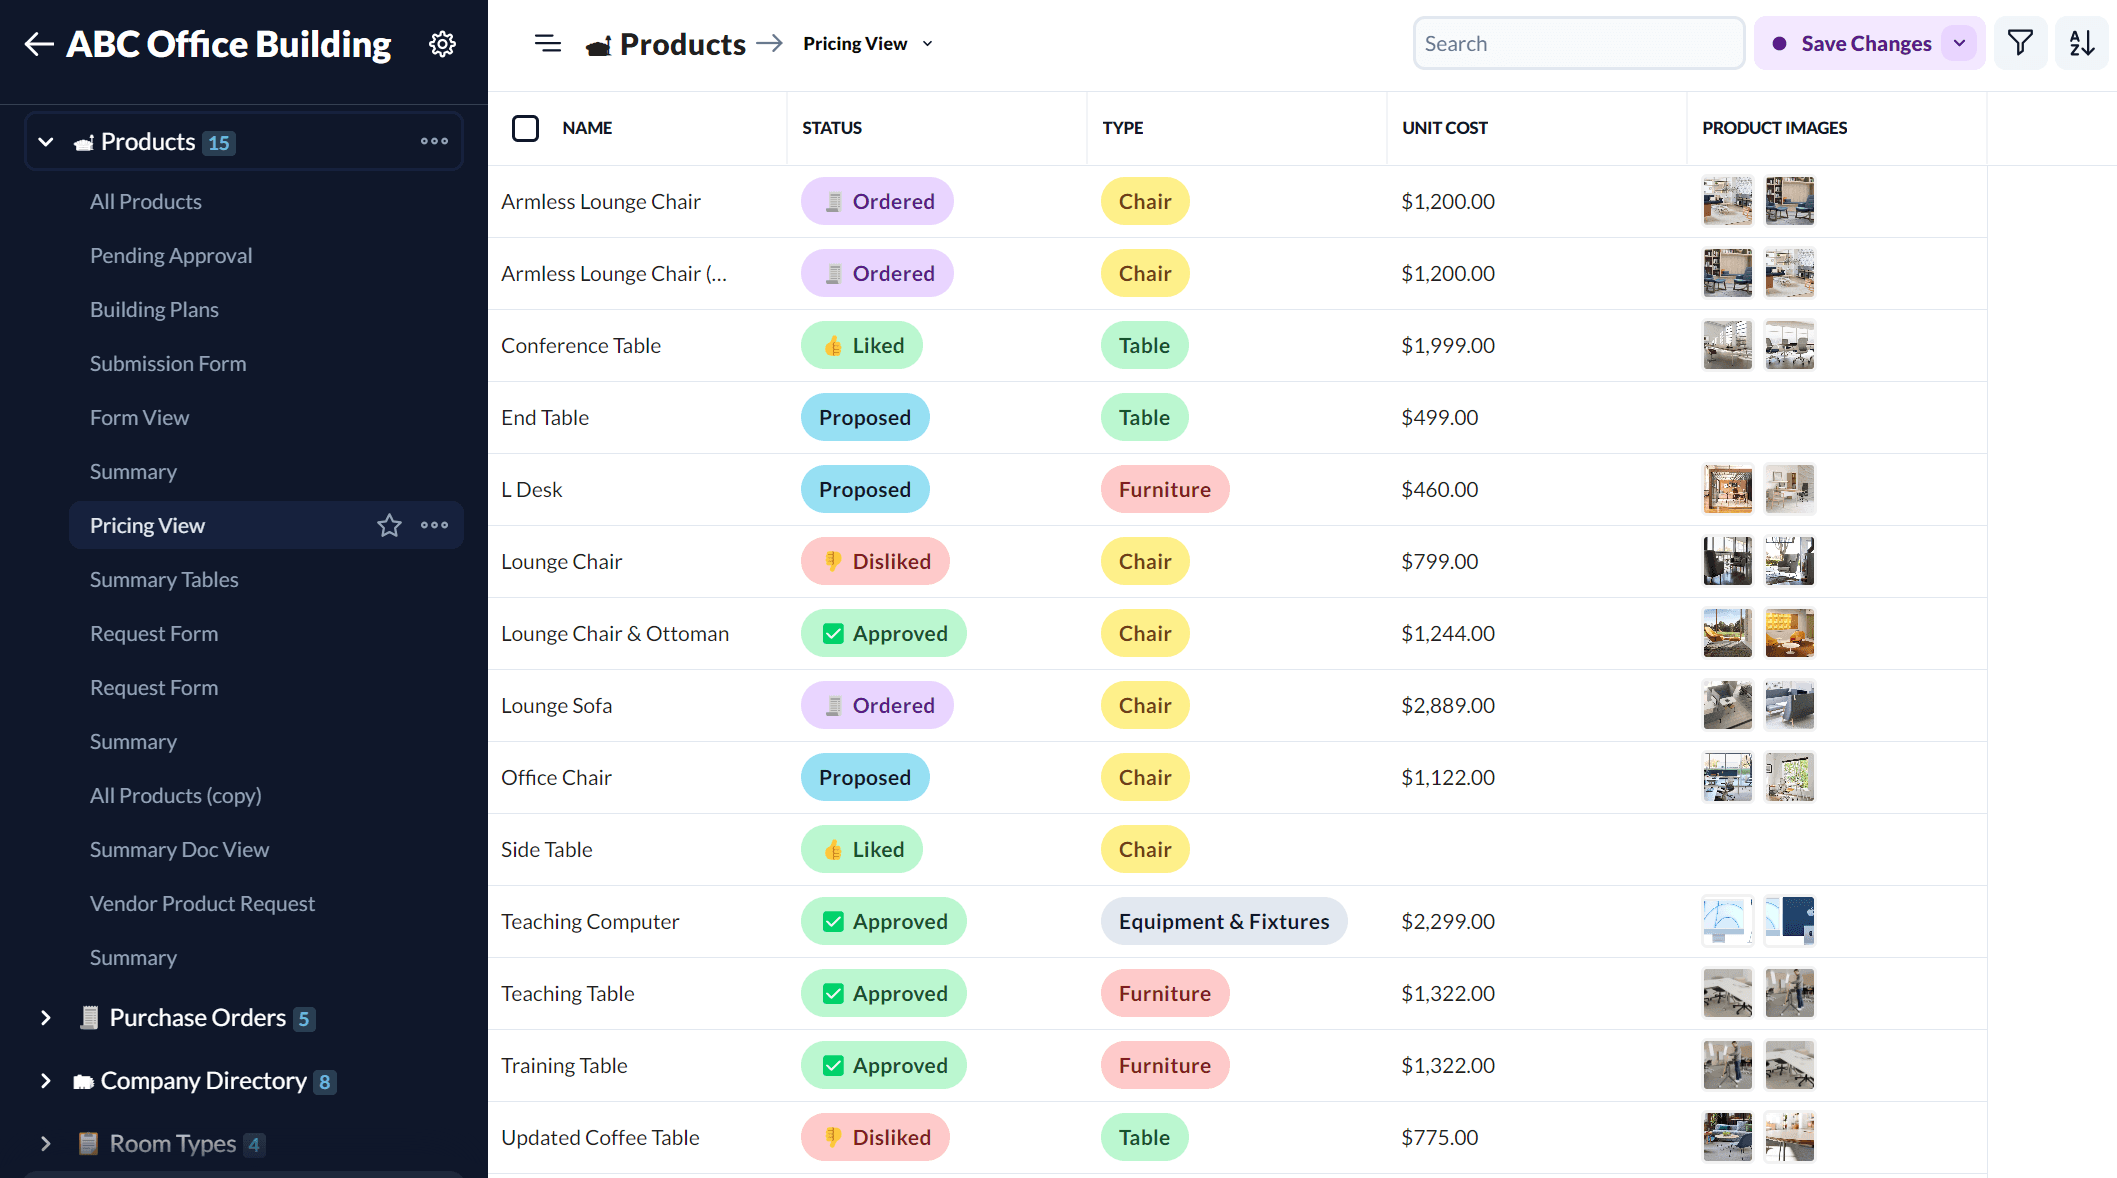
With Layer, you can make it easy for the GC, owner, designer, and procurement agent to view one shareable dashboard with up-to-date statuses for each piece of FF&E. You can even design spec sheets right in our platform.
Step 5: Receive Delivery, Installation, and Punch List
FF&E has started to arrive on site, now what?
First start by inspecting the condition of every piece of FF&E before installation. For larger projects, this task is usually the responsibility of the procurement agent or contractor.
If there is damage, take photos and notate who is responsible for fixing or replacing the damaged item. If not, you or the contractor may be liable for damages down the road. You could also miss return windows to the vendor.
You likely are not responsible for the physical installation of FF&E, but you may be the primary point of contact to coordinate it. You can help the process run smoothly by providing easy-to-interpret furniture plans, lighting schedules, and installation information from the manufacturers.
With Layer, you can track FF&E items that have been delivered and approved for installation. You can use our pre-configured template to create a punch list to document that everything is installed correctly and without damage.
Step 6: Client Handover
You’re almost there! Everything is installed and the client is happy. Now what?
Set your client up for success by providing them with a digital Owner’s Manual of maintenance instructions and vendor contact information for each piece of FF&E.
If you are delivering an as-built Revit model to the client, connect the Owner's Manual to the digital model via Layer. Doing this adds even more value to your services and helps your client effectively and easily operate their building.
Looking Beyond Spreadsheets
In our experience, a software tool linked to Revit is the best solution for capturing, organizing, and sharing FF&E project data. This makes it easy to streamline communication in one dashboard, not in separate documents and folders. Doing so will reduce, if not eliminate, the number of errors that arise from using disparate communication and documentation channels.